## Line Chart: Ablation study of buffer-manager -- Accuracy
### Overview
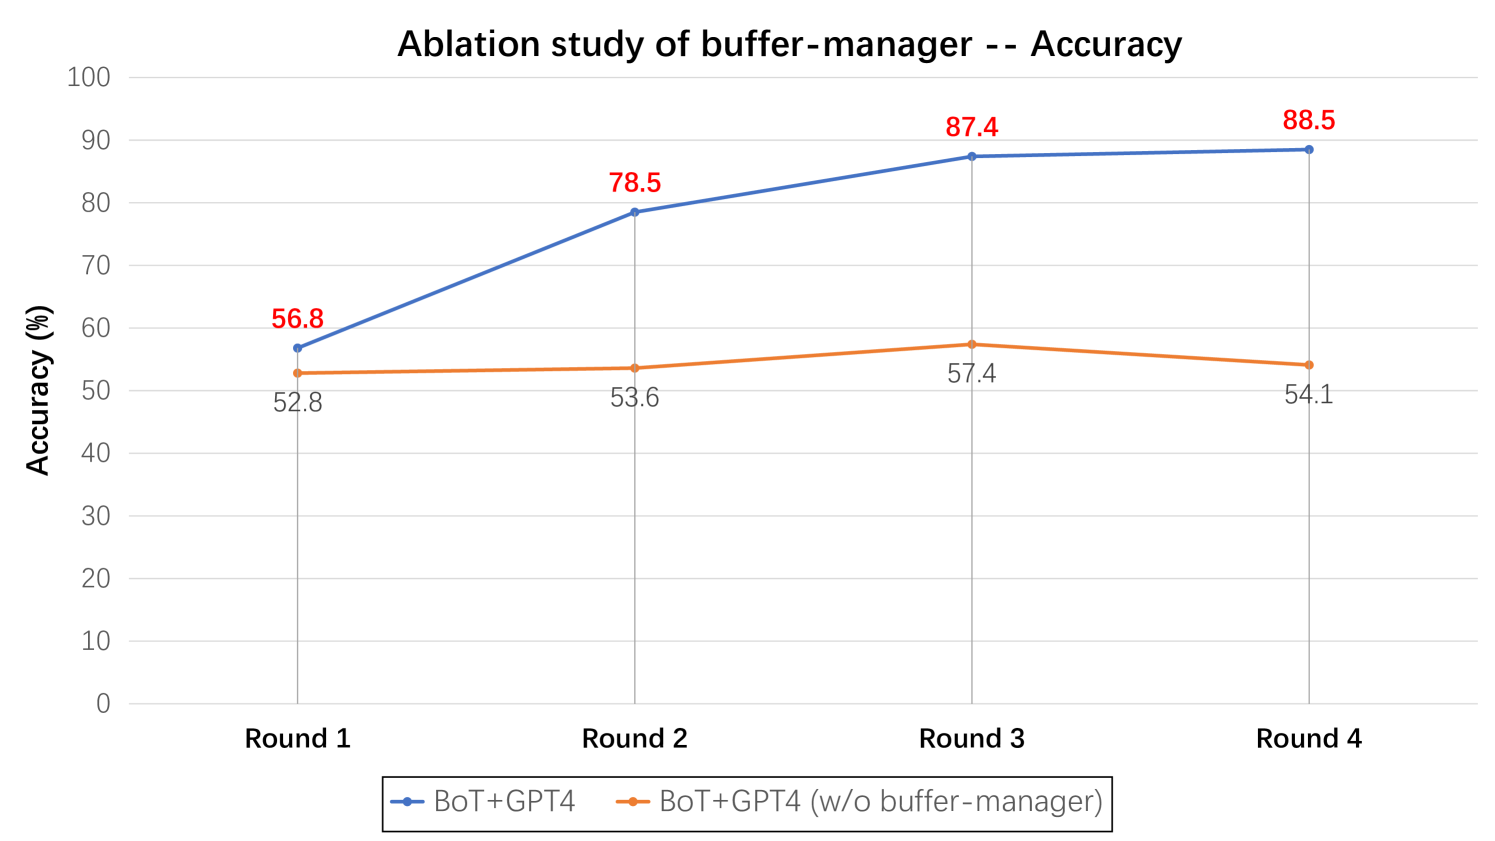
This image is a line chart comparing the accuracy performance of two system configurations over four sequential rounds. The chart is titled "Ablation study of buffer-manager -- Accuracy" and demonstrates the impact of including or excluding a "buffer-manager" component on the overall accuracy of a system referred to as "BoT+GPT4".
### Components/Axes
* **Chart Title:** "Ablation study of buffer-manager -- Accuracy" (Top Center)
* **Y-Axis:**
* **Label:** "Accuracy (%)" (Left side, vertical)
* **Scale:** Linear scale from 0 to 100, with major gridlines and labels at intervals of 10 (0, 10, 20, 30, 40, 50, 60, 70, 80, 90, 100).
* **X-Axis:**
* **Labels:** "Round 1", "Round 2", "Round 3", "Round 4" (Bottom, horizontal). These represent discrete, sequential evaluation points.
* **Legend:** Located at the bottom center of the chart.
* **Blue line with circular markers:** "BoT+GPT4"
* **Orange line with circular markers:** "BoT+GPT4 (w/o buffer-manager)"
### Detailed Analysis
The chart plots two data series, each with four data points corresponding to the four rounds.
**Data Series 1: BoT+GPT4 (Blue Line)**
* **Trend:** Shows a strong, positive, upward trend. The accuracy increases sharply from Round 1 to Round 2, continues to increase at a slower rate to Round 3, and then plateaus with a very slight increase to Round 4.
* **Data Points (Values are labeled in red above each marker):**
* Round 1: 56.8%
* Round 2: 78.5%
* Round 3: 87.4%
* Round 4: 88.5%
**Data Series 2: BoT+GPT4 (w/o buffer-manager) (Orange Line)**
* **Trend:** Shows a relatively flat, stagnant trend with minor fluctuations. Accuracy increases slightly from Round 1 to Round 3, then decreases at Round 4.
* **Data Points (Values are labeled in gray below each marker):**
* Round 1: 52.8%
* Round 2: 53.6%
* Round 3: 57.4%
* Round 4: 54.1%
### Key Observations
1. **Significant Performance Gap:** There is a large and growing accuracy gap between the two configurations. The system with the buffer-manager (blue) consistently outperforms the system without it (orange).
2. **Diverging Trajectories:** The two lines diverge significantly after Round 1. The blue line ascends rapidly, while the orange line remains nearly horizontal.
3. **Peak Performance:** The highest accuracy achieved is 88.5% by the "BoT+GPT4" configuration at Round 4.
4. **Performance Drop:** The configuration without the buffer-manager experiences a performance drop of 3.3 percentage points between Round 3 (57.4%) and Round 4 (54.1%), while the other configuration continues to improve.
### Interpretation
This ablation study provides strong evidence for the critical role of the "buffer-manager" component in the BoT+GPT4 system. The data suggests that the buffer-manager is not merely an incremental improvement but a fundamental component for achieving high accuracy and, crucially, for enabling **continuous learning or improvement over successive rounds**.
* **Without the buffer-manager (orange line):** The system's performance is capped at a low-to-mid 50% range and shows no capacity for meaningful improvement across rounds. The dip in Round 4 may indicate instability or an inability to leverage subsequent data effectively.
* **With the buffer-manager (blue line):** The system demonstrates a clear capacity for learning, with accuracy improving by over 30 percentage points from Round 1 to Round 4. The most substantial gain occurs between the first two rounds, suggesting the buffer-manager is essential for initial knowledge integration or context management.
In essence, the chart illustrates that the buffer-manager is the key differentiator that transforms the system from one with static, mediocre performance into one capable of progressive and significant accuracy gains. The "ablation" (removal) of this component severely cripples the system's functionality.