## Line Chart: Ablation study of buffer-manager -- Accuracy
### Overview
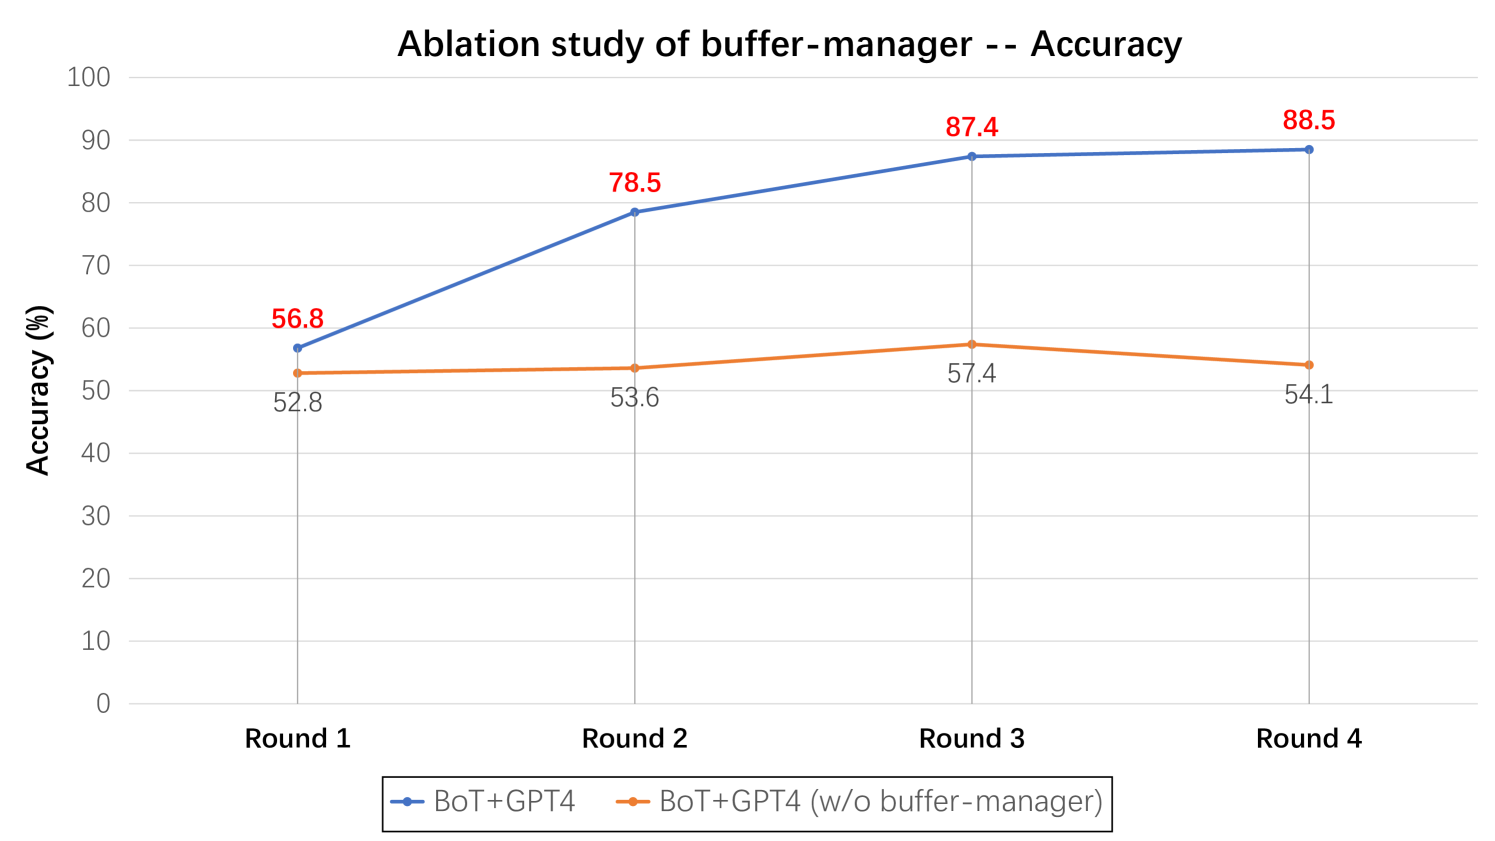
The chart compares the accuracy of two configurations ("BoT+GPT4" and "BoT+GPT4 (w/o buffer-manager)") across four ablation rounds. The blue line represents the full system with a buffer-manager, while the orange line represents the system without it. Accuracy is measured on a percentage scale from 0 to 100.
### Components/Axes
- **X-axis (Rounds)**: Labeled "Round 1" to "Round 4" at equal intervals.
- **Y-axis (Accuracy %)**: Scaled from 0 to 100 in increments of 10.
- **Legend**: Positioned at the bottom center, with:
- Blue line: "BoT+GPT4"
- Orange line: "BoT+GPT4 (w/o buffer-manager)"
- **Data Points**: Red numerical labels above each line's markers (e.g., "56.8" for Round 1, blue line).
### Detailed Analysis
1. **Round 1**:
- BoT+GPT4 (blue): 56.8%
- BoT+GPT4 (w/o buffer-manager, orange): 52.8%
2. **Round 2**:
- BoT+GPT4: 78.5%
- BoT+GPT4 (w/o buffer-manager): 53.6%
3. **Round 3**:
- BoT+GPT4: 87.4%
- BoT+GPT4 (w/o buffer-manager): 57.4%
4. **Round 4**:
- BoT+GPT4: 88.5%
- BoT+GPT4 (w/o buffer-manager): 54.1%
### Key Observations
- The blue line ("BoT+GPT4") shows a **steady upward trend**, increasing from 56.8% to 88.5% across all rounds.
- The orange line ("BoT+GPT4 w/o buffer-manager") exhibits **minimal improvement**, peaking at 57.4% in Round 3 before declining to 54.1% in Round 4.
- The gap between the two lines widens significantly in later rounds (e.g., 31.1% difference in Round 4).
### Interpretation
The data demonstrates that the **buffer-manager component is critical for improving accuracy**, particularly in later ablation rounds. The full system ("BoT+GPT4") achieves near-doubled accuracy compared to the system without the buffer-manager. The orange line's slight decline in Round 4 suggests potential instability or overfitting when the buffer-manager is omitted. This ablation study highlights the buffer-manager's role in stabilizing and enhancing performance over iterative rounds.