## Diagram: Reasoning Process Comparison (ORM, PRM, HRM)
### Overview
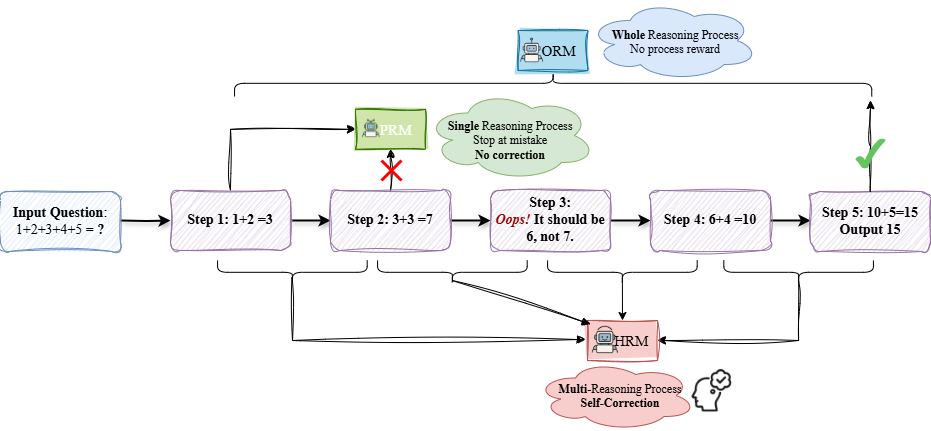
The image is a flowchart diagram illustrating and comparing three different reasoning process models: ORM (Whole Reasoning Process), PRM (Single Reasoning Process), and HRM (Multi-Reasoning Process with Self-Correction). It uses a specific arithmetic problem ("1+2+3+4+5 = ?") as an example to demonstrate how each model handles a step-by-step calculation, including an error and its correction.
### Components/Axes
The diagram is structured as a process flow from left to right, with additional components placed above and below the main flow.
**Main Flow (Center, Left to Right):**
1. **Input Question Box (Leftmost):** A blue-bordered rectangle containing the text: `Input Question: 1+2+3+4+5 = ?`
2. **Step Boxes (Purple, Sequential):** Five purple-bordered rectangles connected by arrows, representing calculation steps.
* `Step 1: 1+2 = 3`
* `Step 2: 3+3 = 7` (This step contains an error.)
* `Step 3: Oops! It should be 6, not 7.` (This step contains a correction annotation in red text "Oops!" and the correct calculation.)
* `Step 4: 6+4 = 10`
* `Step 5: 10+5=15 Output 15` (Final output box.)
**Upper Components:**
1. **ORM (Top Center):** A blue box labeled `ORM` with a small robot icon. A cloud-shaped callout connected to it states: `Whole Reasoning Process No process reward`. An arrow from this cloud points to the final output (Step 5), marked with a green checkmark.
2. **PRM (Above Step 2):** A green box labeled `PRM` with a small robot icon. A cloud-shaped callout connected to it states: `Single Reasoning Process Stop at mistake No correction`. An arrow from this cloud points to Step 2, which is marked with a large red "X".
**Lower Component:**
1. **HRM (Below Steps 2-5):** A red box labeled `HRM` with a small robot icon. A cloud-shaped callout connected to it states: `Multi-Reasoning Process Self-Correction` with a small icon of a head with a checkmark. Arrows from the HRM box connect to Steps 2, 3, 4, and 5, indicating its involvement in monitoring and correcting the process.
**Flow Arrows:**
* Solid black arrows connect the main step boxes sequentially.
* A curved arrow from the ORM cloud points to the final Step 5.
* An arrow from the PRM cloud points to the erroneous Step 2.
* Multiple arrows connect the HRM box to the step boxes where it intervenes.
### Detailed Analysis
The diagram uses the arithmetic sequence `1+2+3+4+5` to model a reasoning chain.
* **The Error:** The error is introduced in `Step 2: 3+3 = 7`. The correct sum is 6.
* **PRM Behavior:** The PRM (Single Reasoning Process) model is shown to "Stop at mistake" with "No correction." This is visually represented by the arrow from the PRM cloud terminating at the erroneous Step 2, which is crossed out with a red X. The process halts here under this model.
* **HRM Behavior:** The HRM (Multi-Reasoning Process) model is shown to enable "Self-Correction." It is connected to the erroneous Step 2 and the subsequent correction in `Step 3: Oops! It should be 6, not 7.` This indicates the HRM model identifies the error and generates a corrective step, allowing the process to continue to the correct final answer.
* **ORM Behavior:** The ORM (Whole Reasoning Process) model is associated with the final, correct output (`Step 5: Output 15`). The label "No process reward" suggests it evaluates the end result without assigning credit or blame to intermediate steps. The green checkmark confirms the final answer is correct under this model.
### Key Observations
1. **Error Handling is Central:** The core of the diagram is the contrast between how the three models handle an intermediate computational error.
2. **Visual Coding:** Colors and symbols are used consistently: Blue for ORM (whole process), Green for PRM (single process, stops), Red for HRM (multi-process, corrects). The red "X" and "Oops!" highlight the error and correction.
3. **Process Flow vs. Oversight:** The main purple boxes show the linear calculation flow. The ORM, PRM, and HRM components represent different oversight or evaluation frameworks applied to that flow.
4. **Outcome:** Only the processes involving self-correction (HRM) or whole-process evaluation (ORM) reach the correct final answer (15). The PRM process fails at the point of error.
### Interpretation
This diagram is a conceptual model comparing AI or cognitive reasoning architectures. It argues that:
* **Single-step evaluation (PRM)** is brittle; it detects errors but cannot recover, leading to process failure.
* **Multi-step, self-correcting evaluation (HRM)** is more robust. It can identify errors mid-process, generate corrective sub-steps, and steer the reasoning back on track, leading to a correct outcome.
* **Whole-process evaluation (ORM)** judges the final output without concerning itself with the path taken. It accepts the result if correct, regardless of intermediate mistakes (which may have been corrected by another mechanism like HRM).
The underlying message is that for complex, multi-step reasoning tasks, architectures capable of **self-correction (HRM)** are essential for reliability. The ORM model represents a final answer checker, while PRM represents a fragile step-by-step validator. The diagram suggests that a combination (perhaps HRM feeding into an ORM-like final judge) might be an effective design pattern for building robust reasoning systems. The arithmetic example is a simple metaphor for any sequential problem-solving task where early errors can propagate and invalidate results.