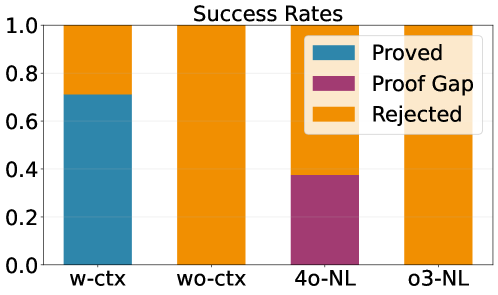
## Stacked Bar Chart: Success Rates
### Overview
The image displays a stacked bar chart titled "Success Rates." It compares the proportional outcomes of four different methods or conditions, categorized into three possible results: "Proved," "Proof Gap," and "Rejected." The chart uses a normalized scale from 0.0 to 1.0 on the y-axis, indicating that the data represents proportions or percentages of a whole for each category on the x-axis.
### Components/Axes
* **Chart Title:** "Success Rates" (centered at the top).
* **Y-Axis:** Vertical axis labeled with numerical markers: `0.0`, `0.2`, `0.4`, `0.6`, `0.8`, `1.0`. This represents the proportion of total outcomes.
* **X-Axis:** Horizontal axis with four categorical labels: `w-ctx`, `wo-ctx`, `4o-NL`, `o3-NL`.
* **Legend:** Positioned in the top-right corner of the chart area, overlapping the bars slightly. It defines three color-coded categories:
* **Blue (Teal):** `Proved`
* **Purple (Magenta):** `Proof Gap`
* **Orange:** `Rejected`
### Detailed Analysis
The chart consists of four vertical bars, each summing to a total height of 1.0 (100%). The composition of each bar is as follows:
1. **Bar: `w-ctx` (Leftmost)**
* **Bottom Segment (Blue - Proved):** Extends from 0.0 to approximately **0.7** on the y-axis.
* **Top Segment (Orange - Rejected):** Extends from ~0.7 to 1.0.
* **Trend/Composition:** This is the only bar containing the "Proved" outcome. The majority (~70%) of results are "Proved," with the remainder (~30%) "Rejected."
2. **Bar: `wo-ctx` (Second from left)**
* **Entire Bar (Orange - Rejected):** Fills the entire bar from 0.0 to 1.0.
* **Trend/Composition:** 100% of outcomes are "Rejected." No "Proved" or "Proof Gap" results are present.
3. **Bar: `4o-NL` (Third from left)**
* **Bottom Segment (Purple - Proof Gap):** Extends from 0.0 to approximately **0.35** on the y-axis.
* **Top Segment (Orange - Rejected):** Extends from ~0.35 to 1.0.
* **Trend/Composition:** This is the only bar containing the "Proof Gap" outcome. Approximately 35% of results are a "Proof Gap," with the remaining ~65% "Rejected."
4. **Bar: `o3-NL` (Rightmost)**
* **Entire Bar (Orange - Rejected):** Fills the entire bar from 0.0 to 1.0.
* **Trend/Composition:** Identical to `wo-ctx`; 100% of outcomes are "Rejected."
### Key Observations
* **Exclusive Outcomes:** The "Proved" outcome appears **only** in the `w-ctx` condition. The "Proof Gap" outcome appears **only** in the `4o-NL` condition.
* **Dominance of Rejection:** The "Rejected" outcome is present in all four categories and is the sole outcome for `wo-ctx` and `o3-NL`.
* **Binary vs. Ternary Results:** The `w-ctx` and `4o-NL` bars show a split between two outcomes, while `wo-ctx` and `o3-NL` show a single, uniform outcome.
* **Visual Uncertainty:** Exact numerical values are not labeled on the bars. The values for the "Proved" segment in `w-ctx` (~0.7) and the "Proof Gap" segment in `4o-NL` (~0.35) are approximate visual estimates.
### Interpretation
This chart likely presents results from a comparative study or experiment evaluating different systems, models, or configurations (denoted by `w-ctx`, `wo-ctx`, `4o-NL`, `o3-NL`) on a task involving formal verification or proof generation.
* **What the data suggests:** The presence of context (`ctx`) appears critical for achieving a "Proved" outcome, as seen in `w-ctx`. The absence of context (`wo-ctx`) leads to complete failure ("Rejected"). The `NL` (likely "Natural Language") variants show different failure modes: `4o-NL` frequently results in an incomplete "Proof Gap," while `o3-NL` fails entirely ("Rejected").
* **Relationship between elements:** The chart directly contrasts the performance of these four conditions. The stark difference between `w-ctx` and `wo-ctx` highlights the importance of the contextual component. The difference between the two `NL` models suggests varying capabilities or approaches in handling the task, with one (`4o-NL`) making partial progress and the other (`o3-NL`) not at all.
* **Notable anomalies/trends:** The complete absence of any "Proved" or "Proof Gap" results in the two rightmost bars (`wo-ctx`, `o3-NL`) is a significant finding, indicating these conditions are wholly ineffective for the measured task. The chart effectively communicates that success is not just binary (pass/fail) but includes an intermediate state ("Proof Gap"), which is only observed in one specific configuration.