## Line Charts: Training Performance Comparison
### Overview
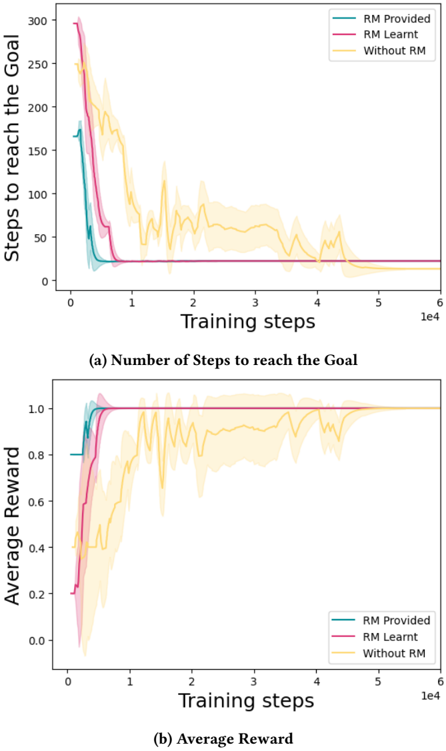
The image displays two vertically stacked line charts comparing the training performance of three different reinforcement learning approaches over 60,000 training steps. The charts analyze efficiency (steps to goal) and effectiveness (average reward). The three conditions are: "RM Provided" (teal line), "RM Learnt" (magenta line), and "Without RM" (yellow line). Shaded regions around each line indicate variance or confidence intervals.
### Components/Axes
* **Chart (a) - Top:**
* **Title:** (a) Number of Steps to reach the Goal
* **Y-axis:** Label: "Steps to reach the Goal". Scale: 0 to 300, with major ticks at 0, 50, 100, 150, 200, 250, 300.
* **X-axis:** Label: "Training steps". Scale: 0 to 6 (x10^4), with major ticks at 0, 1, 2, 3, 4, 5, 6.
* **Legend:** Located in the top-right corner. Contains three entries:
* "RM Provided" (teal line)
* "RM Learnt" (magenta line)
* "Without RM" (yellow line)
* **Chart (b) - Bottom:**
* **Title:** (b) Average Reward
* **Y-axis:** Label: "Average Reward". Scale: 0.0 to 1.0, with major ticks at 0.0, 0.2, 0.4, 0.6, 0.8, 1.0.
* **X-axis:** Label: "Training steps". Scale: 0 to 6 (x10^4), with major ticks at 0, 1, 2, 3, 4, 5, 6.
* **Legend:** Located in the bottom-right corner. Contains the same three entries as chart (a).
### Detailed Analysis
**Chart (a) - Steps to Goal:**
* **RM Provided (Teal):** Shows the fastest convergence. Starts at approximately 175 steps. Drops sharply to a baseline of ~25 steps by 0.5e4 (5,000) training steps and remains stable with very low variance (narrow shaded area) for the remainder of training.
* **RM Learnt (Magenta):** Starts at the highest point, ~300 steps. Converges rapidly, reaching the same ~25-step baseline as "RM Provided" by approximately 1e4 (10,000) steps. Variance is initially high but diminishes quickly after convergence.
* **Without RM (Yellow):** Starts around 250 steps. Exhibits high variance and slow, noisy convergence. It takes significantly longer to reduce the step count, only approaching the ~25-step baseline after 4e4 (40,000) steps. The shaded variance region remains wide throughout most of the training period.
**Chart (b) - Average Reward:**
* **RM Provided (Teal):** Reaches near-optimal performance (average reward ~1.0) extremely quickly, within the first 0.5e4 (5,000) steps. Maintains this high reward with minimal variance.
* **RM Learnt (Magenta):** Starts at a low reward (~0.2). Learns quickly, matching the "RM Provided" performance of ~1.0 reward by 1e4 (10,000) steps and remains stable.
* **Without RM (Yellow):** Shows highly unstable learning. The reward fluctuates dramatically between ~0.4 and ~1.0 for the first 4e4 (40,000) steps. It only stabilizes near the optimal reward of ~1.0 after this point, with persistent higher variance than the other two methods.
### Key Observations
1. **Clear Performance Hierarchy:** Both methods using a Reward Model (RM) significantly outperform the "Without RM" baseline in both learning speed and stability.
2. **Convergence Points:** "RM Provided" converges fastest (~5k steps). "RM Learnt" converges slightly later (~10k steps) but reaches the same final performance. "Without RM" is the slowest, converging only after ~40k steps.
3. **Variance Reduction:** The use of an RM (provided or learnt) dramatically reduces the variance (shaded area) in both metrics compared to the baseline, indicating more reliable and consistent learning.
4. **Inverse Relationship:** There is a clear inverse correlation between the two charts. As the average reward increases and stabilizes (Chart b), the number of steps required to reach the goal decreases and stabilizes (Chart a).
### Interpretation
The data strongly suggests that incorporating a Reward Model (RM), whether pre-provided or learned during training, is crucial for efficient and stable reinforcement learning in this task context.
* **The "RM Provided" condition** acts as an upper-bound benchmark, showing the ideal performance when perfect reward signal is available from the start.
* **The "RM Learnt" condition** demonstrates that an agent can successfully learn its own effective reward model, achieving comparable final performance to the provided model, albeit with a short initial learning overhead (~5k additional steps).
* **The "Without RM" condition** highlights the difficulty of learning with a sparse or poorly shaped reward signal. The high variance and slow convergence indicate inefficient exploration and unstable policy updates. The agent eventually stumbles upon a successful policy, but the process is unreliable and resource-intensive.
**Underlying Message:** The charts make a compelling case for reward modeling as a method to shape the learning landscape. It provides a denser, more informative feedback signal that guides the agent toward the goal more directly, reducing wasted exploration (fewer steps) and preventing performance collapses (lower variance). The fact that a *learnt* RM performs nearly as well as a *provided* one is particularly significant, as it suggests the system can autonomously develop this critical learning scaffold.