TECHNICAL ASSET FINGERPRINT
d3328711b64d48b1cc1cd7cb
Click to view fullscreen
Press ESC or click to close
FOUND IN PAPERS
EXPERT: gemini-2.0-flash VERSION 1
RUNTIME: nugit/gemini/gemini-2.0-flash
INTEL_VERIFIED
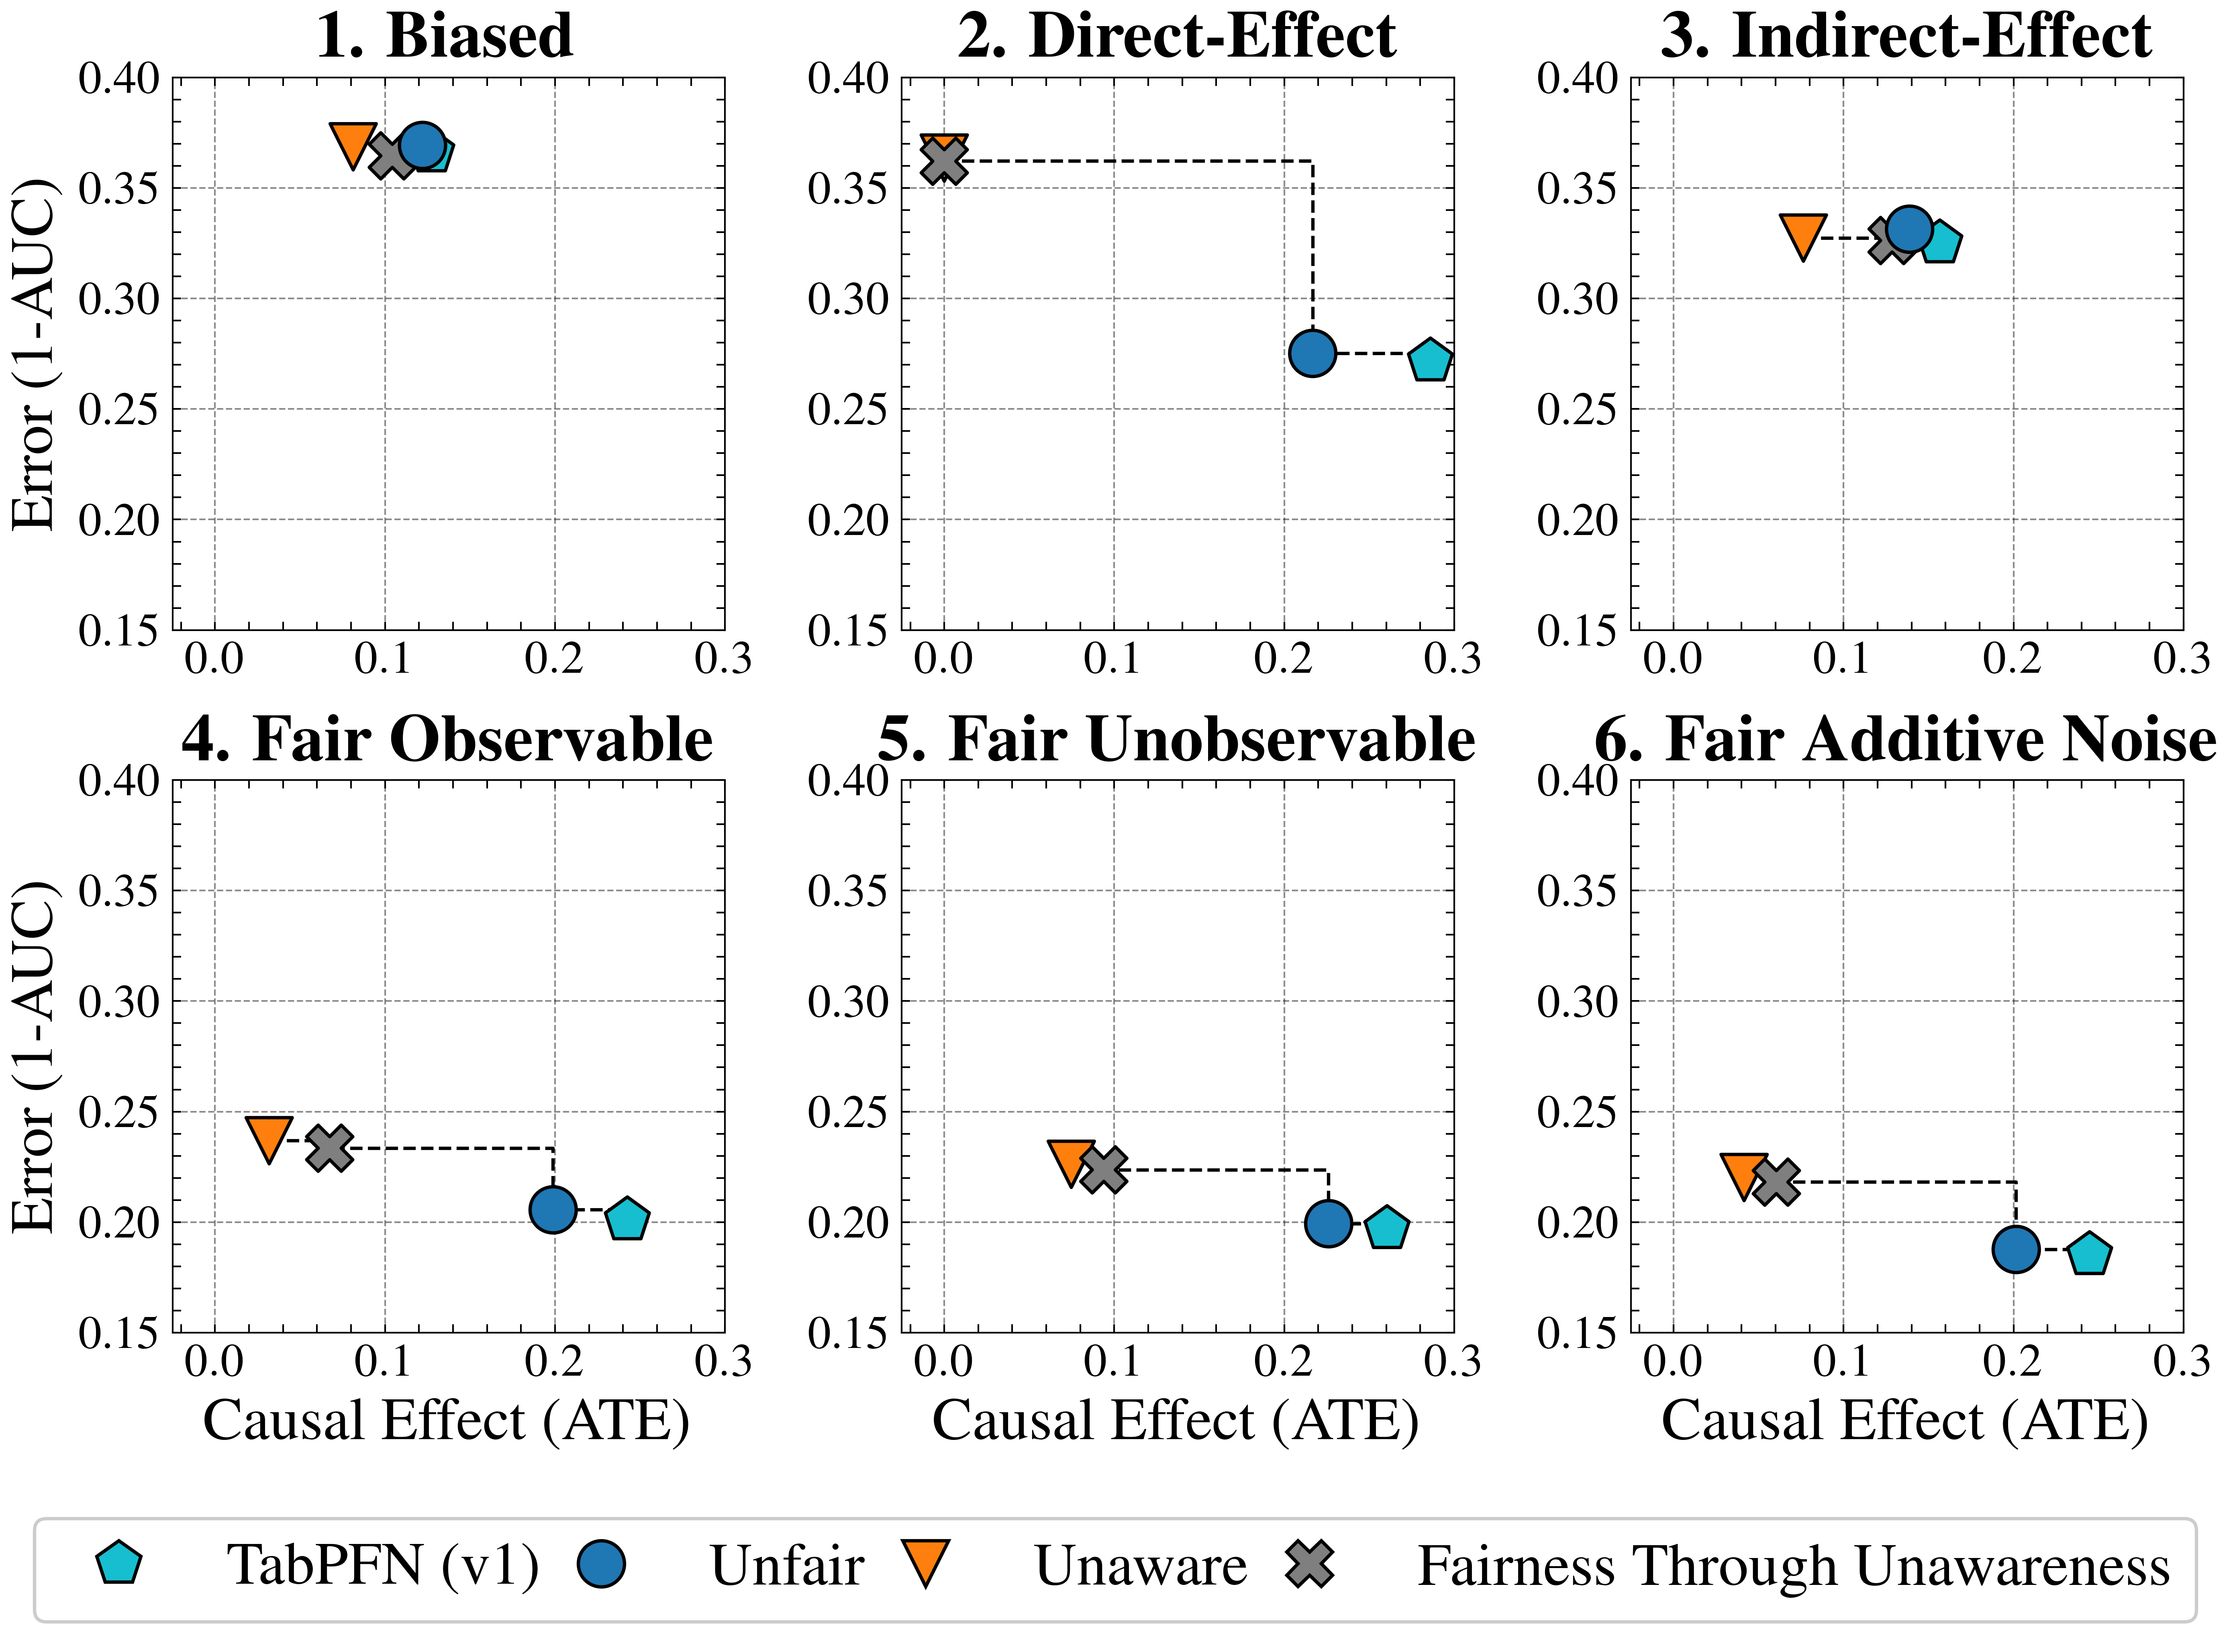
## Scatter Plot Grid: Error vs. Causal Effect
### Overview
The image presents a grid of six scatter plots, each examining the relationship between "Error (1-AUC)" and "Causal Effect (ATE)" under different conditions: "Biased," "Direct-Effect," "Indirect-Effect," "Fair Observable," "Fair Unobservable," and "Fair Additive Noise." Each plot displays data points for four different methods: "TabPFN (v1)," "Unfair," "Unaware," and "Fairness Through Unawareness." The plots also include dashed lines connecting some of the data points, likely indicating a transition or comparison between different states or interventions.
### Components/Axes
* **Titles:** Each plot has a title indicating the condition being examined: "1. Biased," "2. Direct-Effect," "3. Indirect-Effect," "4. Fair Observable," "5. Fair Unobservable," and "6. Fair Additive Noise."
* **X-axis:** Labeled "Causal Effect (ATE)" with a scale from 0.0 to 0.3, incrementing by 0.1.
* **Y-axis:** Labeled "Error (1-AUC)" with a scale from 0.15 to 0.40, incrementing by 0.05.
* **Gridlines:** Each plot has gridlines at intervals of 0.05 on the y-axis and 0.1 on the x-axis.
* **Legend:** Located at the bottom of the image, mapping shapes and colors to methods:
* Light Blue Pentagon: "TabPFN (v1)"
* Blue Circle: "Unfair"
* Orange Down-pointing Triangle: "Unaware"
* Gray X: "Fairness Through Unawareness"
### Detailed Analysis
**Plot 1: Biased**
* "TabPFN (v1)": Causal Effect (ATE) ~0.15, Error (1-AUC) ~0.36
* "Unfair": Causal Effect (ATE) ~0.14, Error (1-AUC) ~0.37
* "Unaware": Causal Effect (ATE) ~0.09, Error (1-AUC) ~0.37
* "Fairness Through Unawareness": Causal Effect (ATE) ~0.10, Error (1-AUC) ~0.36
**Plot 2: Direct-Effect**
* "TabPFN (v1)": Causal Effect (ATE) ~0.29, Error (1-AUC) ~0.27
* "Unfair": Causal Effect (ATE) ~0.22, Error (1-AUC) ~0.28
* "Unaware": Causal Effect (ATE) ~0.01, Error (1-AUC) ~0.37
* "Fairness Through Unawareness": Causal Effect (ATE) ~0.01, Error (1-AUC) ~0.37
* A dashed line connects "Fairness Through Unawareness" to "Unfair" to "TabPFN (v1)".
**Plot 3: Indirect-Effect**
* "TabPFN (v1)": Causal Effect (ATE) ~0.17, Error (1-AUC) ~0.32
* "Unfair": Causal Effect (ATE) ~0.15, Error (1-AUC) ~0.33
* "Unaware": Causal Effect (ATE) ~0.07, Error (1-AUC) ~0.33
* "Fairness Through Unawareness": Causal Effect (ATE) ~0.11, Error (1-AUC) ~0.32
**Plot 4: Fair Observable**
* "TabPFN (v1)": Causal Effect (ATE) ~0.27, Error (1-AUC) ~0.21
* "Unfair": Causal Effect (ATE) ~0.20, Error (1-AUC) ~0.21
* "Unaware": Causal Effect (ATE) ~0.02, Error (1-AUC) ~0.24
* "Fairness Through Unawareness": Causal Effect (ATE) ~0.07, Error (1-AUC) ~0.24
* A dashed line connects "Fairness Through Unawareness" to "Unfair" to "TabPFN (v1)".
**Plot 5: Fair Unobservable**
* "TabPFN (v1)": Causal Effect (ATE) ~0.27, Error (1-AUC) ~0.20
* "Unfair": Causal Effect (ATE) ~0.20, Error (1-AUC) ~0.20
* "Unaware": Causal Effect (ATE) ~0.03, Error (1-AUC) ~0.23
* "Fairness Through Unawareness": Causal Effect (ATE) ~0.07, Error (1-AUC) ~0.23
**Plot 6: Fair Additive Noise**
* "TabPFN (v1)": Causal Effect (ATE) ~0.27, Error (1-AUC) ~0.19
* "Unfair": Causal Effect (ATE) ~0.20, Error (1-AUC) ~0.19
* "Unaware": Causal Effect (ATE) ~0.02, Error (1-AUC) ~0.22
* "Fairness Through Unawareness": Causal Effect (ATE) ~0.07, Error (1-AUC) ~0.23
* A dashed line connects "Unaware" to "Unfair" to "TabPFN (v1)".
### Key Observations
* The "Unaware" method consistently has the lowest "Causal Effect (ATE)" across all conditions.
* The "Biased" condition shows all methods clustered with relatively high "Error (1-AUC)" values.
* The dashed lines in plots 2, 4, and 6 suggest a progression or transformation from the "Fairness Through Unawareness" or "Unaware" method to the "Unfair" method, and finally to the "TabPFN (v1)" method, with corresponding changes in "Causal Effect (ATE)" and "Error (1-AUC)."
* The "Fair Additive Noise" condition appears to yield the lowest "Error (1-AUC)" for "TabPFN (v1)" and "Unfair" methods.
### Interpretation
The plots compare the performance of different methods in terms of "Error (1-AUC)" and "Causal Effect (ATE)" under various fairness conditions. The "Unaware" method consistently exhibits a low "Causal Effect (ATE)," potentially indicating a conservative approach that minimizes intervention. The dashed lines suggest that "Fairness Through Unawareness" and "Unaware" methods are initial states, which are then transformed into "Unfair" and finally "TabPFN (v1)" methods, possibly through some intervention or optimization process. The "Biased" condition highlights a scenario where all methods struggle to achieve both low error and high causal effect. The "Fair Additive Noise" condition seems to be the most favorable, allowing "TabPFN (v1)" and "Unfair" to achieve relatively low error. Overall, the data suggests that the choice of method and the specific fairness condition significantly impact the trade-off between error and causal effect.
DECODING INTELLIGENCE...
EXPERT: gemma-3-27b-it-free VERSION 1
RUNTIME: google-free/gemma-3-27b-it
INTEL_VERIFIED
\n
## Chart: Error (1-AUC) vs. Causal Effect (ATE) for Different Fairness Interventions
### Overview
The image presents six separate scatter plots, each representing a different fairness intervention scenario. Each plot displays the relationship between "Error (1-AUC)" on the y-axis and "Causal Effect (ATE)" on the x-axis. Each plot includes data points for four different methods: TabPFN (v1), Unfair, Unaware, and Fairness Through Unawareness. Each data point is connected to the origin (0,0) with a dashed line. Error bars are also present.
### Components/Axes
* **X-axis Title:** Causal Effect (ATE) - Scale ranges from 0.0 to 0.3.
* **Y-axis Title:** Error (1-AUC) - Scale ranges from 0.15 to 0.40.
* **Plot Titles:**
1. Biased
2. Direct-Effect
3. Indirect-Effect
4. Fair Observable
5. Fair Unobservable
6. Fair Additive Noise
* **Legend:** Located at the bottom-center of the image.
* TabPFN (v1) - Represented by a green square.
* Unfair - Represented by a blue circle.
* Unaware - Represented by an orange downward-pointing triangle.
* Fairness Through Unawareness - Represented by a black cross.
### Detailed Analysis or Content Details
**1. Biased:**
* TabPFN (v1): Approximately (0.15, 0.36).
* Unfair: Approximately (0.25, 0.26).
* Unaware: Approximately (0.18, 0.33).
* Fairness Through Unawareness: Approximately (0.15, 0.28).
**2. Direct-Effect:**
* TabPFN (v1): Approximately (0.18, 0.34).
* Unfair: Approximately (0.25, 0.27).
* Unaware: Approximately (0.22, 0.29).
* Fairness Through Unawareness: Approximately (0.22, 0.26).
**3. Indirect-Effect:**
* TabPFN (v1): Approximately (0.15, 0.32).
* Unfair: Approximately (0.25, 0.28).
* Unaware: Approximately (0.18, 0.31).
* Fairness Through Unawareness: Approximately (0.22, 0.30).
**4. Fair Observable:**
* TabPFN (v1): Approximately (0.15, 0.24).
* Unfair: Approximately (0.25, 0.21).
* Unaware: Approximately (0.18, 0.23).
* Fairness Through Unawareness: Approximately (0.15, 0.21).
**5. Fair Unobservable:**
* TabPFN (v1): Approximately (0.15, 0.24).
* Unfair: Approximately (0.25, 0.20).
* Unaware: Approximately (0.22, 0.23).
* Fairness Through Unawareness: Approximately (0.18, 0.22).
**6. Fair Additive Noise:**
* TabPFN (v1): Approximately (0.15, 0.22).
* Unfair: Approximately (0.25, 0.18).
* Unaware: Approximately (0.22, 0.21).
* Fairness Through Unawareness: Approximately (0.18, 0.20).
In all plots, the dashed lines connect each data point to the origin (0,0). The error bars are relatively small and consistent across all plots.
### Key Observations
* The "Unfair" method consistently exhibits higher error rates than the other methods across all scenarios.
* TabPFN (v1) generally shows the lowest error rates, particularly in the "Fair" scenarios (4, 5, and 6).
* The "Unaware" and "Fairness Through Unawareness" methods perform similarly in most scenarios, with "Fairness Through Unawareness" sometimes showing slightly lower error.
* The causal effect (ATE) appears to have a weak positive correlation with error (1-AUC) for the "Unfair" method.
### Interpretation
The charts demonstrate the impact of different fairness interventions on the trade-off between error and causal effect. The "Unfair" method, as expected, results in the highest error rates, indicating a significant bias in the model's predictions. TabPFN (v1) consistently achieves the lowest error rates, suggesting its effectiveness in mitigating bias while maintaining accuracy. The "Unaware" and "Fairness Through Unawareness" methods offer a compromise between fairness and accuracy, with "Fairness Through Unawareness" potentially providing a slight improvement in fairness without significantly sacrificing accuracy.
The consistent connection of data points to the origin suggests that as the causal effect increases, so does the error, particularly for the "Unfair" method. This implies that simply increasing the causal effect without addressing fairness concerns can lead to higher error rates. The small error bars indicate that the results are relatively stable and reliable.
The different scenarios ("Biased," "Direct-Effect," "Indirect-Effect," etc.) represent different types of fairness challenges. The consistent performance of TabPFN (v1) across these scenarios suggests its robustness and generalizability. The charts provide valuable insights for practitioners seeking to develop fair and accurate machine learning models.
DECODING INTELLIGENCE...
EXPERT: healer-alpha-free VERSION 1
RUNTIME: free/openrouter/healer-alpha
INTEL_VERIFIED
## [Scatter Plot Grid]: Comparison of Model Error vs. Causal Effect Across Six Fairness Scenarios
### Overview
The image displays a 2x3 grid of six scatter plots. Each plot compares the performance of four different modeling approaches on two metrics: **Error (1-AUC)** on the y-axis and **Causal Effect (ATE)** on the x-axis. The plots are titled to represent different underlying data-generating scenarios related to fairness and bias. A shared legend at the bottom identifies the four modeling approaches by unique marker shapes and colors.
### Components/Axes
* **Titles:** Six individual plot titles: "1. Biased", "2. Direct-Effect", "3. Indirect-Effect", "4. Fair Observable", "5. Fair Unobservable", "6. Fair Additive Noise".
* **Y-Axis (All Plots):** Label: "Error (1-AUC)". Scale ranges from 0.15 to 0.40, with major ticks at 0.05 intervals.
* **X-Axis (All Plots):** Label: "Causal Effect (ATE)". Scale ranges from 0.0 to 0.3, with major ticks at 0.1 intervals.
* **Legend (Bottom Center):** Contains four entries:
* **Cyan Pentagon:** "TabPFN (v1)"
* **Blue Circle:** "Unfair"
* **Orange Inverted Triangle:** "Unaware"
* **Gray 'X':** "Fairness Through Unawareness"
* **Plot Elements:** Each plot contains the four markers corresponding to the legend. Some plots include dashed lines connecting specific pairs of markers.
### Detailed Analysis
**1. Biased**
* **Trend:** All four models are clustered tightly in the top-left quadrant of the plot.
* **Data Points (Approximate):**
* **Unaware (Orange Triangle):** ATE ≈ 0.08, Error ≈ 0.37
* **Fairness Through Unawareness (Gray X):** ATE ≈ 0.10, Error ≈ 0.36
* **Unfair (Blue Circle):** ATE ≈ 0.12, Error ≈ 0.37
* **TabPFN (v1) (Cyan Pentagon):** ATE ≈ 0.13, Error ≈ 0.36
* **Observation:** Models show low causal effect and high error. Performance is very similar across all methods.
**2. Direct-Effect**
* **Trend:** A clear separation between two groups of models. A dashed line connects the high-error/low-ATE group to the low-error/high-ATE group.
* **Data Points (Approximate):**
* **Group 1 (High Error, Low ATE):**
* **Unaware (Orange Triangle):** ATE ≈ 0.00, Error ≈ 0.36
* **Fairness Through Unawareness (Gray X):** ATE ≈ 0.00, Error ≈ 0.36
* **Group 2 (Low Error, High ATE):**
* **Unfair (Blue Circle):** ATE ≈ 0.22, Error ≈ 0.27
* **TabPFN (v1) (Cyan Pentagon):** ATE ≈ 0.28, Error ≈ 0.27
* **Observation:** The "Unfair" and "TabPFN" models achieve significantly lower error and higher causal effect compared to the "Unaware" and "Fairness Through Unawareness" models in this scenario.
**3. Indirect-Effect**
* **Trend:** All models are clustered in the center of the plot.
* **Data Points (Approximate):**
* **Unaware (Orange Triangle):** ATE ≈ 0.08, Error ≈ 0.33
* **Fairness Through Unawareness (Gray X):** ATE ≈ 0.13, Error ≈ 0.32
* **Unfair (Blue Circle):** ATE ≈ 0.14, Error ≈ 0.33
* **TabPFN (v1) (Cyan Pentagon):** ATE ≈ 0.16, Error ≈ 0.32
* **Observation:** Models show moderate causal effect and error. Performance is again similar across methods, with a slight trend of increasing ATE from Unaware to TabPFN.
**4. Fair Observable**
* **Trend:** Similar to plot 2, with a dashed line connecting two distinct groups.
* **Data Points (Approximate):**
* **Group 1 (Higher Error, Lower ATE):**
* **Unaware (Orange Triangle):** ATE ≈ 0.03, Error ≈ 0.24
* **Fairness Through Unawareness (Gray X):** ATE ≈ 0.06, Error ≈ 0.23
* **Group 2 (Lower Error, Higher ATE):**
* **Unfair (Blue Circle):** ATE ≈ 0.20, Error ≈ 0.21
* **TabPFN (v1) (Cyan Pentagon):** ATE ≈ 0.24, Error ≈ 0.20
* **Observation:** The "Unfair" and "TabPFN" models again outperform the others, achieving both lower error and higher causal effect.
**5. Fair Unobservable**
* **Trend:** A pattern very similar to plots 2 and 4, with a dashed line connecting two groups.
* **Data Points (Approximate):**
* **Group 1 (Higher Error, Lower ATE):**
* **Unaware (Orange Triangle):** ATE ≈ 0.07, Error ≈ 0.23
* **Fairness Through Unawareness (Gray X):** ATE ≈ 0.09, Error ≈ 0.22
* **Group 2 (Lower Error, Higher ATE):**
* **Unfair (Blue Circle):** ATE ≈ 0.22, Error ≈ 0.20
* **TabPFN (v1) (Cyan Pentagon):** ATE ≈ 0.26, Error ≈ 0.20
* **Observation:** Consistent pattern: "Unfair" and "TabPFN" models cluster together with better performance (lower error, higher ATE) than the other two methods.
**6. Fair Additive Noise**
* **Trend:** The same two-group pattern with a connecting dashed line is present.
* **Data Points (Approximate):**
* **Group 1 (Higher Error, Lower ATE):**
* **Unaware (Orange Triangle):** ATE ≈ 0.04, Error ≈ 0.22
* **Fairness Through Unawareness (Gray X):** ATE ≈ 0.06, Error ≈ 0.22
* **Group 2 (Lower Error, Higher ATE):**
* **Unfair (Blue Circle):** ATE ≈ 0.20, Error ≈ 0.19
* **TabPFN (v1) (Cyan Pentagon):** ATE ≈ 0.24, Error ≈ 0.19
* **Observation:** The performance gap between the two groups is maintained. "Unfair" and "TabPFN" show the lowest error and highest causal effect in this set.
### Key Observations
1. **Consistent Grouping:** Across five of the six scenarios (2-6), the "Unfair" (blue circle) and "TabPFN (v1)" (cyan pentagon) models consistently cluster together, demonstrating lower error (1-AUC) and higher causal effect (ATE) than the "Unaware" (orange triangle) and "Fairness Through Unawareness" (gray X) models.
2. **Scenario Impact:** The "Biased" scenario (Plot 1) is an outlier where all models perform poorly and similarly. The "Indirect-Effect" scenario (Plot 3) shows a tighter cluster with less separation between model groups.
3. **Trade-off Visualization:** The dashed lines in plots 2, 4, 5, and 6 visually emphasize the performance trade-off or gap between the two distinct groups of modeling approaches.
4. **Metric Relationship:** There is a general inverse relationship visible: models with lower Error (1-AUC) tend to have higher Causal Effect (ATE), particularly in the "Fair" scenarios.
### Interpretation
This visualization analyzes the performance of different algorithmic fairness approaches under various causal data-generating processes. The key insight is that simply being "unaware" of a sensitive attribute (the "Unaware" and "Fairness Through Unawareness" methods) does not necessarily lead to better outcomes. In fact, in scenarios where fairness is defined by causal effects (Direct, Observable, Unobservable, Additive Noise), models that do not explicitly try to hide the sensitive attribute ("Unfair" and the baseline "TabPFN") achieve a better balance of predictive accuracy (lower 1-AUC) and reduced discriminatory impact (higher ATE).
The plots suggest that the "Unfair" model and the "TabPFN" baseline are robust across these specific fairness scenarios, while the "unawareness" strategies consistently underperform. The "Biased" scenario represents a case where the underlying data structure makes it difficult for any model to achieve good performance on both metrics simultaneously. This analysis underscores the importance of choosing a fairness intervention that aligns with the specific causal structure of the problem, as naive approaches like "fairness through unawareness" can be ineffective or even counterproductive.
DECODING INTELLIGENCE...
EXPERT: nemotron-free VERSION 1
RUNTIME: free/nvidia/nemotron-nano-12b-v2-vl:free
INTEL_VERIFIED
## Scatter Plot Grid: Method Performance Across Fairness Scenarios
### Overview
The image presents six scatter plots arranged in a 2x3 grid, comparing the performance of different fairness-aware machine learning methods across six scenarios: Biased, Direct-Effect, Indirect-Effect, Fair Observable, Fair Unobservable, and Fair Additive Noise. Each plot visualizes the relationship between **Causal Effect (ATE)** (x-axis) and **Error (1-AUC)** (y-axis), with data points connected by dashed lines to indicate trends.
---
### Components/Axes
- **X-axis**: Causal Effect (ATE) ranging from 0.0 to 0.3 in increments of 0.1.
- **Y-axis**: Error (1-AUC) ranging from 0.15 to 0.40 in increments of 0.05.
- **Legend** (bottom-center):
- **TabPFN (v1)**: Cyan pentagon (□)
- **Unfair**: Blue circle (●)
- **Unaware**: Orange triangle (▲)
- **Fairness Through Unawareness**: Gray cross (✘)
- **Plot Titles**: Each subplot is labeled with a scenario (e.g., "1. Biased", "2. Direct-Effect").
---
### Detailed Analysis
#### 1. Biased
- **Trend**: All methods cluster near the top-right (high error, low ATE).
- **Data Points**:
- TabPFN (v1): ~0.12 ATE, ~0.37 Error
- Unfair: ~0.10 ATE, ~0.36 Error
- Unaware: ~0.11 ATE, ~0.35 Error
- Fairness Through Unawareness: ~0.13 ATE, ~0.36 Error
#### 2. Direct-Effect
- **Trend**: Error decreases as ATE increases for most methods.
- **Data Points**:
- Unfair: ~0.15 ATE, ~0.35 Error
- TabPFN (v1): ~0.20 ATE, ~0.28 Error
- Unaware: ~0.18 ATE, ~0.29 Error
- Fairness Through Unawareness: ~0.22 ATE, ~0.27 Error
#### 3. Indirect-Effect
- **Trend**: Similar to Direct-Effect but with tighter clustering.
- **Data Points**:
- Unfair: ~0.14 ATE, ~0.34 Error
- TabPFN (v1): ~0.19 ATE, ~0.29 Error
- Unaware: ~0.17 ATE, ~0.28 Error
- Fairness Through Unawareness: ~0.21 ATE, ~0.27 Error
#### 4. Fair Observable
- **Trend**: All methods show lower errors compared to biased scenarios.
- **Data Points**:
- Unfair: ~0.18 ATE, ~0.21 Error
- TabPFN (v1): ~0.22 ATE, ~0.20 Error
- Unaware: ~0.19 ATE, ~0.22 Error
- Fairness Through Unawareness: ~0.23 ATE, ~0.21 Error
#### 5. Fair Unobservable
- **Trend**: Similar to Fair Observable but with slightly higher errors.
- **Data Points**:
- Unfair: ~0.17 ATE, ~0.22 Error
- TabPFN (v1): ~0.21 ATE, ~0.21 Error
- Unaware: ~0.19 ATE, ~0.23 Error
- Fairness Through Unawareness: ~0.22 ATE, ~0.22 Error
#### 6. Fair Additive Noise
- **Trend**: Error increases slightly compared to Fair Observable/Unobservable.
- **Data Points**:
- Unfair: ~0.16 ATE, ~0.23 Error
- TabPFN (v1): ~0.20 ATE, ~0.22 Error
- Unaware: ~0.18 ATE, ~0.24 Error
- Fairness Through Unawareness: ~0.21 ATE, ~0.23 Error
---
### Key Observations
1. **Biased Scenario**: All methods exhibit high error rates (~0.35–0.37), with TabPFN (v1) and Unaware performing marginally better.
2. **Direct/Indirect-Effect Scenarios**:
- Unfair methods consistently show the highest errors.
- TabPFN (v1) and Unaware methods demonstrate lower errors, with Fairness Through Unawareness slightly outperforming others in Indirect-Effect.
3. **Fair Scenarios**:
- All methods achieve lower errors (~0.20–0.24), with TabPFN (v1) and Unaware methods maintaining the best performance.
- Fairness Through Unawareness shows diminishing returns in Fair Additive Noise.
---
### Interpretation
The data suggests that **TabPFN (v1)** and **Unaware** methods generally outperform **Unfair** and **Fairness Through Unawareness** in reducing error rates across fairness scenarios. Notably:
- **Causal Effect (ATE)** inversely correlates with error in most scenarios, indicating that higher causal effects improve model performance.
- **Fairness Through Unawareness** underperforms in indirect-effect and additive noise scenarios, suggesting limitations in handling complex fairness constraints.
- **TabPFN (v1)** consistently achieves the lowest errors in fair scenarios, highlighting its robustness in balanced data distributions.
This analysis underscores the importance of method selection based on the fairness profile of the dataset and the nature of causal relationships.
DECODING INTELLIGENCE...