## Diagram: LLM with SymCode Workflow
### Overview
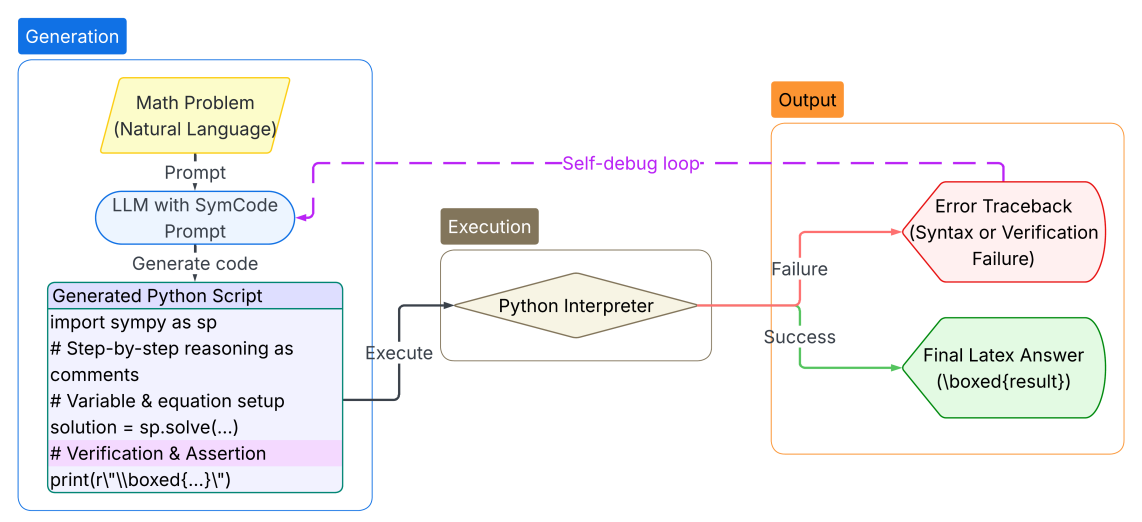
The image is a flowchart illustrating the workflow of a Large Language Model (LLM) integrated with SymCode for solving math problems. The diagram outlines the process from problem input to output, including a self-debugging loop.
### Components/Axes
The diagram is divided into three main sections, each enclosed in a rounded rectangle:
1. **Generation** (top-left, blue outline): This section describes the process of generating Python code from a math problem.
2. **Execution** (center, brown outline): This section represents the execution of the generated code.
3. **Output** (top-right, orange outline): This section shows the possible outputs of the execution, either an error traceback or a final LaTeX answer.
The diagram also includes the following elements:
* **Math Problem (Natural Language)**: A yellow rounded rectangle representing the initial input.
* **LLM with SymCode Prompt**: A blue rounded rectangle representing the LLM processing the prompt.
* **Generated Python Script**: A light-purple rounded rectangle containing example Python code.
* **Python Interpreter**: A diamond shape representing the execution environment.
* **Error Traceback (Syntax or Verification Failure)**: A red rounded rectangle representing a failure output.
* **Final Latex Answer (\boxed{result})**: A green rounded rectangle representing a successful output.
* **Arrows**: Indicate the flow of the process.
* **Self-debug loop**: A dashed purple line indicating a feedback loop.
### Detailed Analysis or Content Details
**1. Generation:**
* **Math Problem (Natural Language)**: The process starts with a math problem expressed in natural language.
* **Prompt**: The problem is then passed as a prompt to the LLM with SymCode.
* **LLM with SymCode Prompt**: The LLM processes the prompt and generates Python code.
* **Generate code**: The LLM generates code.
* **Generated Python Script**: The generated code includes:
* `import sympy as sp`
* `# Step-by-step reasoning as comments`
* `# Variable & equation setup`
* `solution = sp.solve(...)`
* `# Verification & Assertion`
* `print(r"\\boxed{...}\")`
**2. Execution:**
* **Execute**: The generated Python script is executed by the Python interpreter.
* **Python Interpreter**: The Python interpreter processes the code.
**3. Output:**
* The execution can result in two possible outcomes:
* **Failure**: If the code encounters a syntax or verification failure, an "Error Traceback" is generated.
* **Success**: If the code executes successfully, a "Final Latex Answer (\boxed{result})" is produced.
**Self-debug loop:**
* A dashed purple line labeled "Self-debug loop" connects the "Error Traceback" back to the "LLM with SymCode Prompt", indicating that the LLM can use the error information to refine the generated code.
### Key Observations
* The diagram illustrates a closed-loop system where the LLM can learn from its mistakes and improve its code generation.
* The use of SymCode suggests that the LLM is specifically designed for solving mathematical problems.
* The inclusion of comments and verification steps in the generated code indicates a focus on code quality and correctness.
### Interpretation
The diagram presents a sophisticated approach to automated problem-solving using LLMs. By integrating SymCode and a self-debugging loop, the system aims to generate accurate and reliable solutions to mathematical problems. The process emphasizes not only finding the solution but also providing a clear and verifiable reasoning process. The self-debug loop is a critical component, allowing the LLM to iteratively improve its performance based on feedback from the execution environment. This approach has the potential to significantly enhance the capabilities of LLMs in solving complex mathematical problems.
```