\n
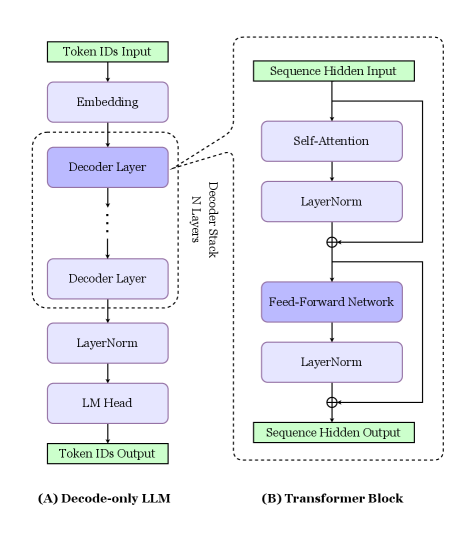
## Diagram: Decode-only LLM and Transformer Block Architecture
### Overview
The image presents a diagram illustrating the architecture of a decode-only Large Language Model (LLM) and a Transformer Block, which is a core component of the LLM. The diagram shows the flow of data through these components, highlighting the key layers and connections. The diagram is split into two main sections, labeled (A) and (B).
### Components/Axes
The diagram consists of two main sections:
* **(A) Decode-only LLM:** This section depicts the overall structure of a decode-only LLM. It includes components like "Token IDs Input", "Embedding", "Decoder Layer" (repeated N times), "LayerNorm", "LM Head", and "Token IDs Output". A dashed box surrounds the repeated "Decoder Layer" components, labeled "Decoder Stack".
* **(B) Transformer Block:** This section details the internal structure of a single "Decoder Layer" from section (A). It includes components like "Self-Attention", "LayerNorm", "Feed-Forward Network", and another "LayerNorm". Addition symbols (+) are used to indicate residual connections.
There are no axes in the traditional sense, but the diagram uses arrows to indicate the direction of data flow.
### Detailed Analysis or Content Details
**(A) Decode-only LLM:**
* **Token IDs Input:** A green rectangle at the top-left, representing the input to the model.
* **Embedding:** A light-blue rectangle below "Token IDs Input", receiving input from it via a downward arrow.
* **Decoder Stack:** A dashed box containing multiple "Decoder Layer" components. The number of layers is denoted by "N Layers" written vertically alongside the stack.
* **Decoder Layer:** A purple rectangle within the "Decoder Stack". The diagram shows multiple instances of this layer stacked vertically.
* **LayerNorm:** A light-purple rectangle below the "Decoder Stack", receiving output from the stack via a downward arrow.
* **LM Head:** A blue rectangle below "LayerNorm", receiving input from it via a downward arrow.
* **Token IDs Output:** A green rectangle at the bottom, representing the output of the model, receiving input from "LM Head" via a downward arrow.
**(B) Transformer Block:**
* **Sequence Hidden Input:** A green rectangle at the top-right, representing the input to the Transformer Block.
* **Self-Attention:** A light-blue rectangle below "Sequence Hidden Input", receiving input from it via a downward arrow.
* **LayerNorm:** A light-purple rectangle to the right of "Self-Attention", receiving input from it via a curved arrow and adding it to the original input (residual connection, indicated by the + symbol).
* **Feed-Forward Network:** A purple rectangle below "LayerNorm", receiving input from it via a downward arrow.
* **LayerNorm:** A light-purple rectangle to the right of "Feed-Forward Network", receiving input from it via a curved arrow and adding it to the original input (residual connection, indicated by the + symbol).
* **Sequence Hidden Output:** A green rectangle at the bottom-right, representing the output of the Transformer Block, receiving input from the second "LayerNorm" via a downward arrow.
### Key Observations
* The "Decoder Layer" in (A) is expanded into the "Transformer Block" in (B), showing its internal structure.
* Residual connections (addition symbols) are used in the Transformer Block to improve gradient flow during training.
* The diagram highlights the sequential nature of the LLM, with data flowing from input to output through a series of layers.
* The use of "LayerNorm" suggests normalization is applied at multiple points within the architecture.
### Interpretation
The diagram illustrates the fundamental building blocks of a decode-only LLM, which are commonly used in tasks like text generation. The Transformer Block, as shown in (B), is the core computational unit responsible for processing the input sequence and extracting relevant features. The stacking of multiple "Decoder Layers" (N layers) allows the model to learn complex relationships in the data. The residual connections are crucial for training deep neural networks, preventing the vanishing gradient problem. The diagram effectively conveys the modularity and hierarchical structure of these models, demonstrating how a complex system is built from simpler, interconnected components. The green input and output rectangles clearly delineate the boundaries of each component, emphasizing the flow of information. The diagram is a simplified representation, omitting details like attention mechanisms within the "Self-Attention" layer, but it provides a clear overview of the overall architecture.