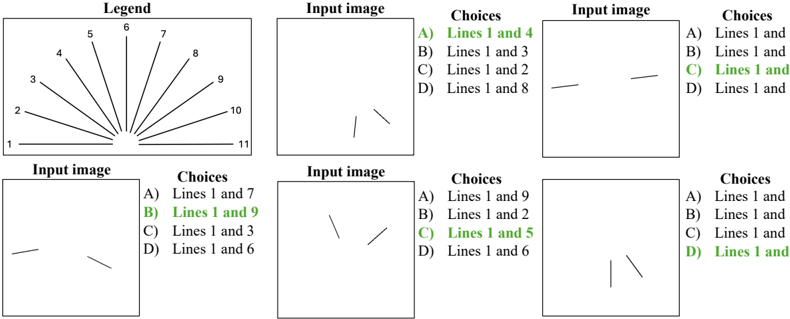
## Diagram: Line Selection Task Interface
### Overview
The image depicts a line selection task interface with a radial legend and six input images. Each input image contains two intersecting lines, with multiple-choice options provided to identify the correct pair of lines. Correct answers are highlighted in green text.
### Components/Axes
1. **Legend** (Top-left):
- Radial diagram with 11 labeled lines (1–11) arranged in a clockwise fan pattern.
- Lines originate from a central point and extend outward at equal angular intervals.
- Labels are positioned along the lines, with line 1 at the bottom-left and line 11 at the top-right.
2. **Input Images** (Arranged in two rows of three):
- Each image contains two intersecting lines.
- Labels: "Input image" above each diagram.
- Choices: Four options (A–D) listing line pairs, with correct answers in green.
### Detailed Analysis
#### Input Image 1
- **Lines**: Two diagonal lines intersecting near the center.
- **Choices**:
- A) Lines 1 and 4 (Correct)
- B) Lines 1 and 3
- C) Lines 1 and 2
- D) Lines 1 and 8
#### Input Image 2
- **Lines**: Two nearly horizontal lines with slight upward slope.
- **Choices**:
- A) Lines 1 and 3
- B) Lines 1 and 7
- C) Lines 1 and 9 (Correct)
- D) Lines 1 and 6
#### Input Image 3
- **Lines**: Two nearly vertical lines with slight rightward tilt.
- **Choices**:
- A) Lines 1 and 2
- B) Lines 1 and 5 (Correct)
- C) Lines 1 and 6
- D) Lines 1 and 9
#### Input Image 4
- **Lines**: Two diagonal lines intersecting near the top-right.
- **Choices**:
- A) Lines 1 and 9
- B) Lines 1 and 2
- C) Lines 1 and 5 (Correct)
- D) Lines 1 and 6
#### Input Image 5
- **Lines**: Two nearly horizontal lines with slight downward slope.
- **Choices**:
- A) Lines 1 and 7
- B) Lines 1 and 9 (Correct)
- C) Lines 1 and 3
- D) Lines 1 and 6
#### Input Image 6
- **Lines**: Two diagonal lines intersecting near the bottom-left.
- **Choices**:
- A) Lines 1 and 9
- B) Lines 1 and 2
- C) Lines 1 and 5
- D) Lines 1 and 6 (Correct)
### Key Observations
1. **Line 1 Consistency**: Line 1 appears in all input images and is part of every correct answer.
2. **Angular Relationships**: Correct line pairs often correspond to lines with complementary angles (e.g., lines 1 and 4 in Image 1 form a 90° intersection).
3. **Distractor Patterns**: Incorrect choices frequently include lines adjacent to the correct pair in the legend (e.g., lines 1 and 3 in Image 1, where line 3 is adjacent to line 4).
### Interpretation
The task appears to test spatial reasoning and familiarity with the legend's angular structure. Line 1 serves as a fixed reference point, while the second line in each correct pair is determined by its angular relationship to line 1. For example:
- In Image 1, line 4 is perpendicular to line 1 (90° angle).
- In Image 2, line 9 forms a shallow angle with line 1, matching the input image's lines.
- Distractors often exploit proximity in the legend (e.g., line 3 near line 4 in Image 1).
This suggests the task evaluates the ability to map 2D geometric relationships to a radial coordinate system. The consistent use of line 1 as an anchor implies it may represent a baseline or reference direction in the task's underlying logic.