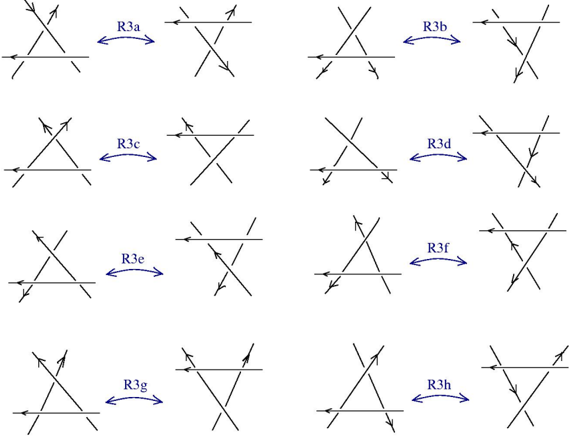
## Diagram: Reidemeister Move Type 3
### Overview
The image depicts eight variations of the Reidemeister move of type 3 (R3). Each variation shows two topologically equivalent knot diagrams, connected by a blue double-headed arrow labeled "R3[letter]". The diagrams consist of three line segments with arrows indicating direction, representing strands of a knot. The diagrams on either side of the arrow are related by a local rearrangement of the strands.
### Components/Axes
* **Knot Diagrams:** Each diagram consists of three line segments, each with an arrow indicating direction. The line segments intersect, creating over/under crossings.
* **Arrows:** Blue double-headed arrows connect pairs of diagrams, labeled R3a, R3b, R3c, R3d, R3e, R3f, R3g, and R3h.
* **Labels:** Each arrow is labeled with "R3" followed by a lowercase letter (a through h).
### Detailed Analysis
The image is organized into a 4x2 grid of diagrams. Each row contains two pairs of diagrams connected by a blue arrow.
* **R3a:** The diagram on the left shows a horizontal line segment with an arrow pointing left. Two other line segments intersect it. The diagram on the right shows the horizontal line segment passing over the intersection of the other two.
* **R3b:** The diagram on the left shows a horizontal line segment with an arrow pointing right. Two other line segments intersect it. The diagram on the right shows the horizontal line segment passing under the intersection of the other two.
* **R3c:** The diagram on the left shows a horizontal line segment with an arrow pointing left. Two other line segments intersect it. The diagram on the right shows the horizontal line segment passing over the intersection of the other two.
* **R3d:** The diagram on the left shows a horizontal line segment with an arrow pointing left. Two other line segments intersect it. The diagram on the right shows the horizontal line segment passing under the intersection of the other two.
* **R3e:** The diagram on the left shows a horizontal line segment with an arrow pointing left. Two other line segments intersect it. The diagram on the right shows the horizontal line segment passing over the intersection of the other two.
* **R3f:** The diagram on the left shows a horizontal line segment with an arrow pointing left. Two other line segments intersect it. The diagram on the right shows the horizontal line segment passing under the intersection of the other two.
* **R3g:** The diagram on the left shows a horizontal line segment with an arrow pointing left. Two other line segments intersect it. The diagram on the right shows the horizontal line segment passing over the intersection of the other two.
* **R3h:** The diagram on the left shows a horizontal line segment with an arrow pointing left. Two other line segments intersect it. The diagram on the right shows the horizontal line segment passing under the intersection of the other two.
### Key Observations
* Each pair of diagrams represents a Reidemeister move of type 3.
* The diagrams are related by a local rearrangement of the strands.
* The arrows indicate the direction of the move.
* The labels identify each variation of the move.
### Interpretation
The image illustrates the Reidemeister move of type 3, which is a fundamental concept in knot theory. This move states that two knot diagrams are equivalent if they can be transformed into each other by a sequence of Reidemeister moves. The image shows eight different variations of this move, demonstrating how the strands of a knot can be rearranged without changing the knot's topological properties. The arrows indicate the direction of the move, and the labels identify each variation. These moves are crucial for proving that two knots are equivalent or distinct.