## Bar Chart: Accuracy by Prompting Method and Trace Correctness
### Overview
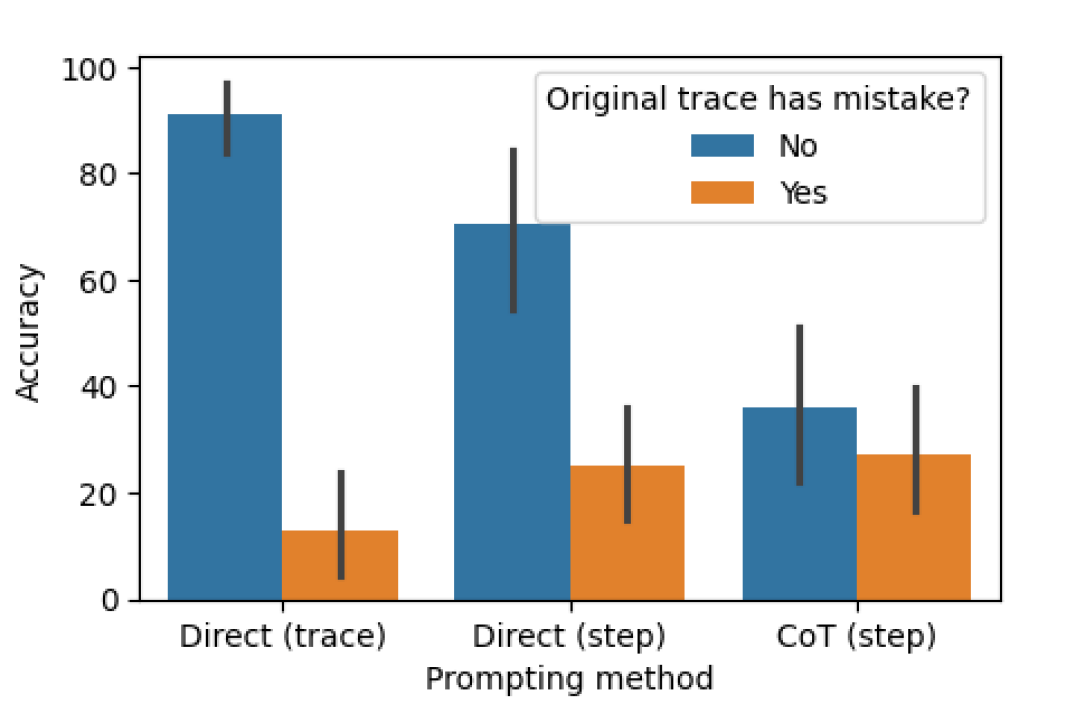
This is a grouped bar chart comparing the accuracy of three different prompting methods ("Direct (trace)", "Direct (step)", and "CoT (step)") under two conditions: when the original trace has no mistake ("No") and when it does have a mistake ("Yes"). The chart includes error bars for each data point.
### Components/Axes
* **Chart Type:** Grouped bar chart with error bars.
* **X-Axis (Horizontal):** Labeled "Prompting method". It contains three categorical groups:
1. `Direct (trace)`
2. `Direct (step)`
3. `CoT (step)`
* **Y-Axis (Vertical):** Labeled "Accuracy". It is a linear scale ranging from 0 to 100, with major tick marks at intervals of 20 (0, 20, 40, 60, 80, 100).
* **Legend:** Located in the top-right quadrant of the chart area. It is titled "Original trace has mistake?" and defines two data series:
* **Blue Bar:** "No" (Original trace has no mistake).
* **Orange Bar:** "Yes" (Original trace has a mistake).
* **Error Bars:** Vertical black lines extending above and below the top of each bar, indicating variability or uncertainty in the accuracy measurement.
### Detailed Analysis
Data is presented for each of the three prompting methods, split by the "Original trace has mistake?" condition. Values are approximate visual estimates.
**1. Direct (trace)**
* **Condition "No" (Blue Bar):** Accuracy is approximately **91**. The error bar extends from roughly **83** to **99**.
* **Condition "Yes" (Orange Bar):** Accuracy is approximately **13**. The error bar extends from roughly **4** to **22**.
* **Trend:** This method shows the highest accuracy when the trace is correct but the lowest accuracy when the trace contains a mistake. The gap between the two conditions is the largest among all methods.
**2. Direct (step)**
* **Condition "No" (Blue Bar):** Accuracy is approximately **71**. The error bar extends from roughly **55** to **87**.
* **Condition "Yes" (Orange Bar):** Accuracy is approximately **25**. The error bar extends from roughly **15** to **35**.
* **Trend:** Accuracy is lower than "Direct (trace)" for correct traces but higher for mistaken traces. The performance gap between conditions remains substantial.
**3. CoT (step)**
* **Condition "No" (Blue Bar):** Accuracy is approximately **36**. The error bar extends from roughly **22** to **50**.
* **Condition "Yes" (Orange Bar):** Accuracy is approximately **27**. The error bar extends from roughly **17** to **37**.
* **Trend:** This method shows the lowest accuracy for correct traces but the highest accuracy for mistaken traces among the three methods. The performance gap between the two conditions is the smallest.
### Key Observations
1. **Inverse Performance Trend:** There is a clear inverse relationship between performance on correct traces and performance on mistaken traces across the methods. As the blue bar ("No" mistake) decreases from left to right, the orange bar ("Yes" mistake) increases.
2. **Impact of Mistakes:** For all methods, the presence of a mistake in the original trace ("Yes") results in lower accuracy compared to when there is no mistake ("No"). However, the severity of this drop varies dramatically.
3. **Error Bar Overlap:** The error bars for the "CoT (step)" method's "No" and "Yes" conditions overlap significantly, suggesting the difference in accuracy for this method may not be statistically distinct. In contrast, the error bars for "Direct (trace)" show no overlap, indicating a very clear and significant difference.
4. **Highest Variability:** The "Direct (step)" method for the "No" condition appears to have the largest error bar, indicating the highest uncertainty or variability in its accuracy measurement.
### Interpretation
The data suggests a fundamental trade-off between peak performance and robustness to errors in the underlying reasoning trace.
* **"Direct (trace)"** is highly effective when the provided reasoning trace is flawless, achieving near-perfect accuracy. However, it is extremely brittle; its performance collapses when the trace contains a mistake. This implies it relies heavily on the correctness of the given trace without self-correction.
* **"Direct (step)"** represents a middle ground. It sacrifices some peak performance on correct traces for improved resilience when mistakes are present.
* **"CoT (step)"** demonstrates the most robust behavior. While its overall accuracy is lower, it is the least affected by mistakes in the original trace. This suggests the step-by-step Chain-of-Thought (CoT) prompting method may enable the model to identify and potentially correct errors in the reasoning process, leading to more consistent, if not always higher, performance.
The chart illustrates that the choice of prompting method should be guided by the expected reliability of the input reasoning trace. For high-quality, verified traces, "Direct (trace)" is optimal. In noisier environments where traces may contain errors, "CoT (step)" offers more predictable and stable performance. The "Direct (step)" method offers a compromise between these two extremes.