## Diagram and 3D Plot Analysis: Material Transformation and Stress Distribution
### Overview
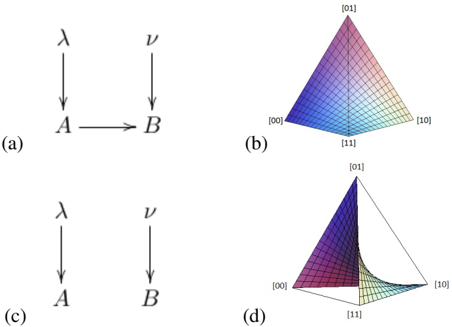
The image contains two distinct sections:
1. **Diagrams (a) and (c)**: Arrows labeled with variables (λ, ν) and states (A, B) suggesting directional relationships or transformations.
2. **3D Plots (b) and (d)**: Tetrahedral structures with color gradients and labeled axes ([00], [10], [11], [01]), likely representing crystallographic orientations or stress/strain distributions.
---
### Components/Axes
#### Diagrams (a) and (c):
- **Labels**:
- **A** and **B**: States or phases (e.g., initial/final configurations).
- **λ** and **ν**: Parameters (e.g., wavelength, Poisson’s ratio, or transformation coefficients).
- **Flow**:
- Diagram (a): A → B with λ and ν acting as directional forces.
- Diagram (c): A ← B with λ and ν reversed, implying a feedback or iterative process.
#### 3D Plots (b) and (d):
- **Axes**:
- **X-axis**: [00] (reference plane).
- **Y-axis**: [10] (primary crystallographic direction).
- **Z-axis**: [11] and [01] (secondary crystallographic directions).
- **Color Gradient**:
- **Blue to Red**: Likely represents magnitude (e.g., stress intensity, strain energy).
- **White Regions**: Absence of data or neutral zones.
---
### Detailed Analysis
#### Diagrams (a) and (c):
- **Diagram (a)**:
- λ and ν act as **input forces** driving the transformation from A to B.
- Spatial grounding: λ is positioned above A, ν above B, suggesting sequential application.
- **Diagram (c)**:
- λ and ν now act as **output forces** from B to A, indicating a reverse process or equilibrium state.
- Spatial grounding: λ and ν are positioned below A and B, respectively, emphasizing feedback.
#### 3D Plots (b) and (d):
- **Plot (b)**:
- Color gradient transitions from **blue ([00])** to **red ([01])**, peaking at [11].
- Suggests highest intensity (e.g., stress) at [11] orientation.
- **Plot (d)**:
- Color gradient shifts to **purple ([00])** and **yellow ([10])**, with a white void at [11].
- Indicates reduced intensity or material failure at [11] under altered conditions.
---
### Key Observations
1. **Reversal of Forces**: Diagram (c) inverts the direction of λ and ν compared to (a), implying a dynamic system (e.g., cyclic loading).
2. **Stress Concentration**: 3D Plot (b) highlights [11] as a critical zone, while Plot (d) shows material degradation at this orientation.
3. **Color Correlation**: Blue (low intensity) and red (high intensity) align with typical stress visualization conventions.
---
### Interpretation
- **Material Behavior**: The diagrams likely model phase transformations (A → B) under mechanical parameters (λ, ν), while the 3D plots visualize resultant stress/strain distributions.
- **Critical Failure**: The white void in Plot (d) at [11] suggests a fracture or phase boundary under specific conditions.
- **Dynamic Equilibrium**: The bidirectional arrows in (a) and (c) may represent hysteresis or reversible transformations in the material.
---
**Note**: No explicit numerical data or legends are present in the image. Trends and interpretations are based on standard conventions for stress/strain visualization and crystallographic analysis.