\n
## Diagram: Proof Tree for Algebraic Identity
### Overview
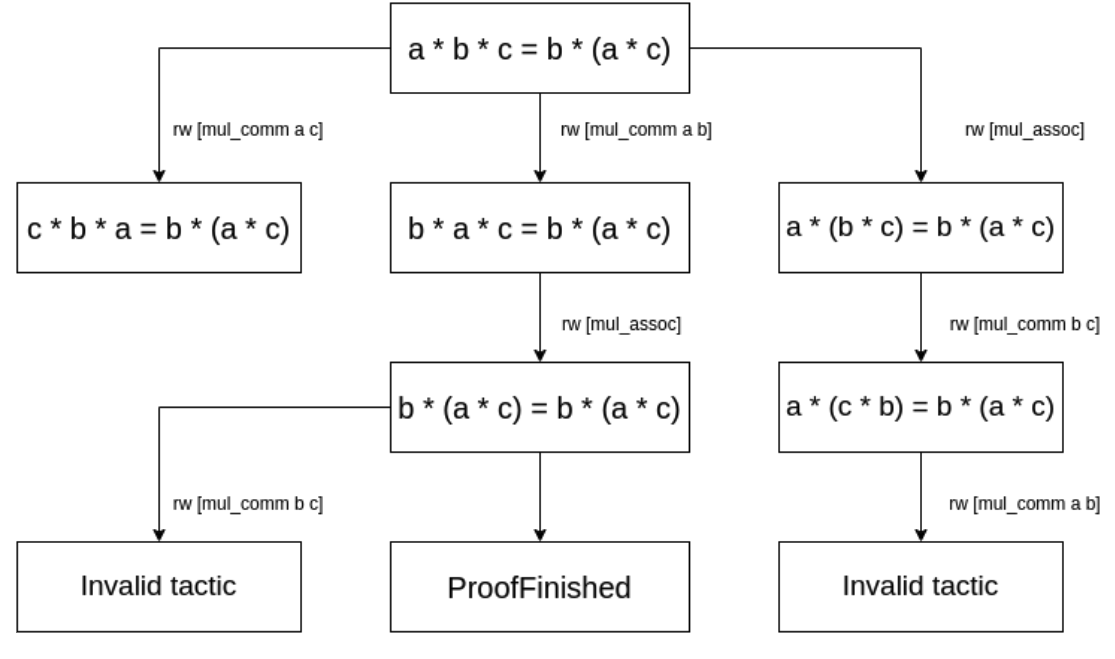
The image displays a hierarchical proof tree diagram illustrating different derivation paths for proving the algebraic identity `a * b * c = b * (a * c)`. The diagram shows how applying different rewrite rules (commutativity and associativity of multiplication) to the initial equation leads to various intermediate states, with only one path successfully concluding with "ProofFinished."
### Components/Axes
The diagram is structured as a tree with a root node at the top and leaf nodes at the bottom. It consists of rectangular boxes containing mathematical equations or status messages, connected by directional arrows. Each arrow is labeled with a rewrite rule (`rw`) that specifies the transformation applied to reach the next state.
**Nodes (Boxes) and their Content:**
1. **Root Node (Top Center):** `a * b * c = b * (a * c)`
2. **Second Level (Left to Right):**
* Left: `c * b * a = b * (a * c)`
* Center: `b * a * c = b * (a * c)`
* Right: `a * (b * c) = b * (a * c)`
3. **Third Level (Left to Right):**
* Left: `Invalid tactic` (connected from the left node of Level 2)
* Center: `b * (a * c) = b * (a * c)` (connected from the center node of Level 2)
* Right: `a * (c * b) = b * (a * c)` (connected from the right node of Level 2)
4. **Leaf Nodes (Bottom, Left to Right):**
* Left: `Invalid tactic`
* Center: `ProofFinished`
* Right: `Invalid tactic`
**Arrows (Transitions) and their Labels:**
* From Root to Level 2 Left: `rw [mul_comm a c]`
* From Root to Level 2 Center: `rw [mul_comm a b]`
* From Root to Level 2 Right: `rw [mul_assoc]`
* From Level 2 Center to Level 3 Center: `rw [mul_assoc]`
* From Level 2 Right to Level 3 Right: `rw [mul_comm b c]`
* From Level 3 Center to Leaf Center: (Unlabeled arrow, direct progression)
* From Level 3 Center to Leaf Left: `rw [mul_comm b c]`
* From Level 3 Right to Leaf Right: `rw [mul_comm a b]`
### Detailed Analysis
The diagram maps out three distinct proof strategies starting from the same goal.
1. **Left Branch Strategy:**
* **Step 1:** Applies commutativity to swap `a` and `c` (`mul_comm a c`), transforming the left side from `a * b * c` to `c * b * a`. The right side remains unchanged.
* **Step 2:** Attempts to apply commutativity to `b` and `c` (`mul_comm b c`). This leads to an "Invalid tactic" state, indicating this sequence of rewrites does not successfully prove the goal.
2. **Center Branch Strategy (Successful):**
* **Step 1:** Applies commutativity to swap `a` and `b` (`mul_comm a b`), transforming the left side to `b * a * c`.
* **Step 2:** Applies associativity (`mul_assoc`) to the left side, regrouping `b * a * c` into `b * (a * c)`. This results in the equation `b * (a * c) = b * (a * c)`, which is a tautology (both sides are identical).
* **Conclusion:** The proof is complete, as indicated by the "ProofFinished" node. An alternative path from this tautology state attempts to apply `mul_comm b c`, which is deemed an "Invalid tactic."
3. **Right Branch Strategy:**
* **Step 1:** Applies associativity (`mul_assoc`) to the left side, regrouping `a * b * c` into `a * (b * c)`.
* **Step 2:** Applies commutativity to swap `b` and `c` (`mul_comm b c`) inside the parentheses, resulting in `a * (c * b)`.
* **Step 3:** Attempts to apply commutativity to `a` and `b` (`mul_comm a b`). This leads to an "Invalid tactic" state.
### Key Observations
* **Single Successful Path:** Only the center branch, which uses commutativity followed by associativity, results in a successful proof.
* **Tautology as Goal:** The successful path reaches a state where both sides of the equation are syntactically identical (`b * (a * c) = b * (a * c)`), which is the logical endpoint of the proof.
* **Invalid Tactics:** Three separate paths terminate in "Invalid tactic," showing that not all sequences of valid algebraic manipulations necessarily lead to the desired proof state within this formal system.
* **Symmetry in Failure:** The left and right branches both fail after two rewrite steps, while the center branch succeeds. The failure in the left branch occurs after attempting a commutativity rewrite on the already-transformed expression.
### Interpretation
This diagram is a visual representation of a **formal proof search** in automated theorem proving or interactive theorem assistants. It demonstrates the concept of a **proof state space**, where each node is an equation (or goal) and each edge is a transformation rule.
* **What it demonstrates:** The tree illustrates that proving a seemingly simple algebraic identity requires choosing the correct sequence of rewrite rules. It highlights the difference between *applying valid rules* and *finding a valid proof*. Commutativity and associativity are fundamental properties, but their application order matters.
* **Relationship between elements:** The root is the initial goal. Each level represents a step in the proof search. The leaf nodes represent terminal states: either success ("ProofFinished") or failure ("Invalid tactic"), where no further applicable rules lead toward the goal.
* **Underlying Logic:** The successful path reveals the core logical strategy: first, use commutativity to position the term `b` at the front of the left-hand side, then use associativity to group the remaining terms `(a * c)` together, matching the right-hand side exactly. The failed paths show alternative, but ultimately unproductive, rearrangements of the terms.
* **Context:** This type of visualization is crucial for understanding how automated provers work, debugging proof strategies, and teaching the mechanics of formal logic. It makes the abstract process of symbolic manipulation concrete and traceable.