## Line Chart: Success Rate vs. Problem Size by Difficulty
### Overview
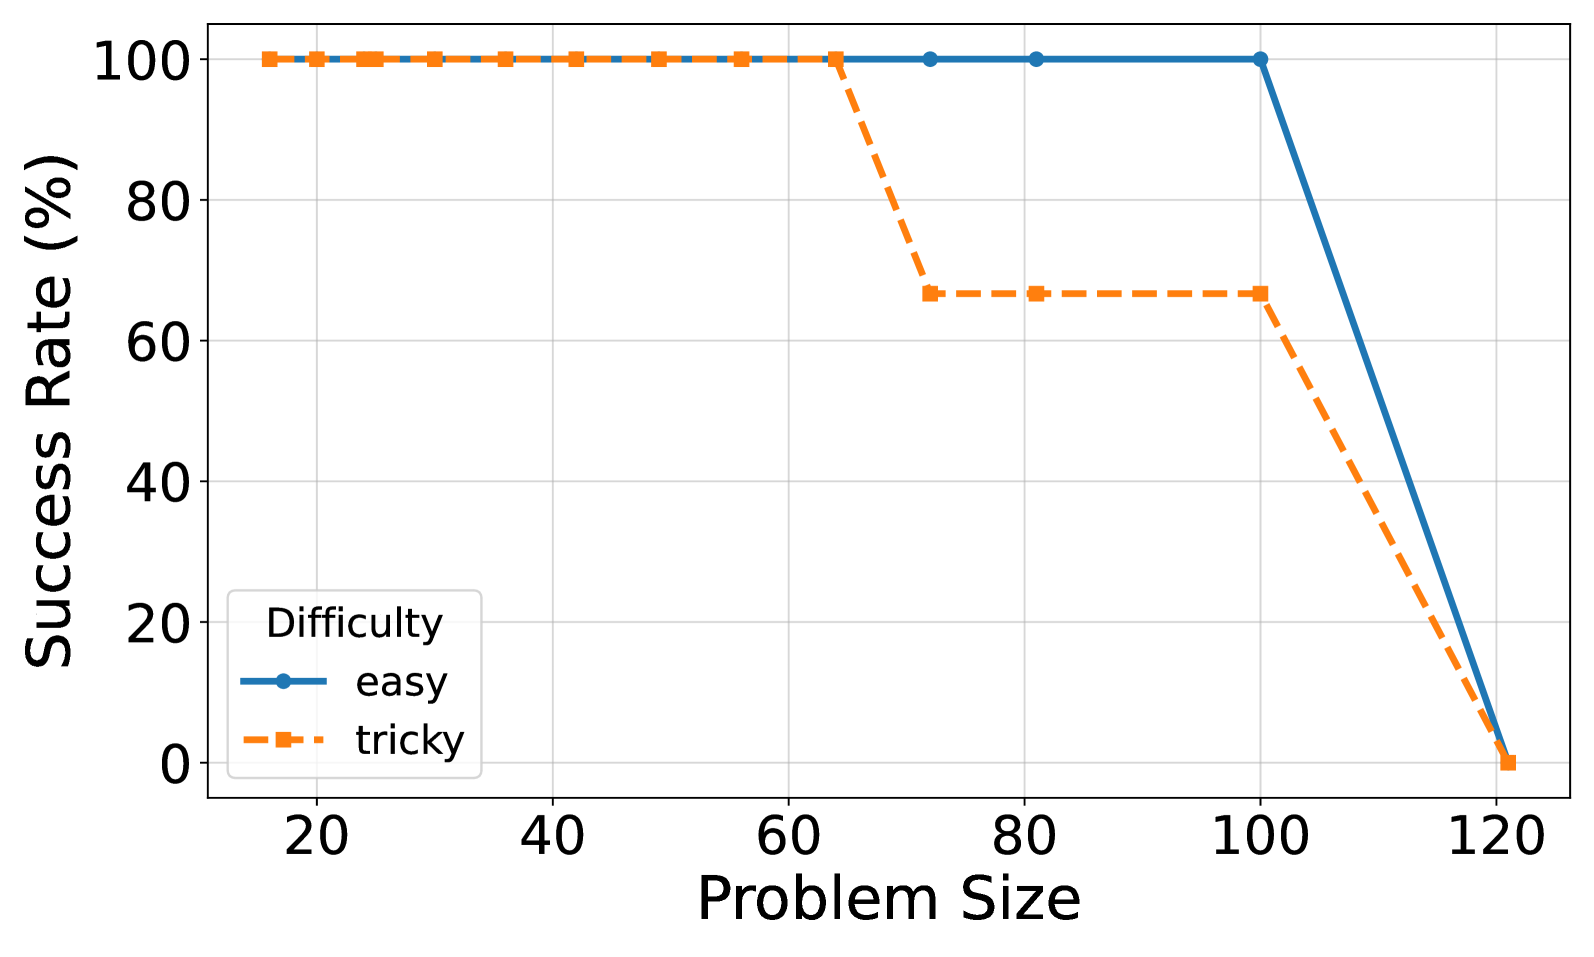
This is a line chart comparing the success rate (in percentage) of solving problems of varying sizes, categorized by two difficulty levels: "easy" and "tricky". The chart demonstrates how performance degrades as problem size increases, with a notably sharper decline for the "tricky" category.
### Components/Axes
* **X-Axis (Horizontal):** Labeled "Problem Size". The scale runs from approximately 15 to 120, with major tick marks at 20, 40, 60, 80, 100, and 120.
* **Y-Axis (Vertical):** Labeled "Success Rate (%)". The scale runs from 0 to 100, with major tick marks at 0, 20, 40, 60, 80, and 100.
* **Legend:** Located in the bottom-left quadrant of the chart area. It contains two entries:
* **"easy"**: Represented by a solid blue line with circular markers.
* **"tricky"**: Represented by a dashed orange line with square markers.
* **Grid:** A light gray grid is present, aligning with the major tick marks on both axes.
### Detailed Analysis
**Data Series: "easy" (Blue Solid Line with Circles)**
* **Trend:** The line remains perfectly flat at the top of the chart before a steep, near-vertical drop at the end.
* **Data Points (Approximate):**
* Problem Size ~15 to 100: Success Rate = 100%
* Problem Size 120: Success Rate = 0%
**Data Series: "tricky" (Orange Dashed Line with Squares)**
* **Trend:** The line starts flat, experiences a sharp drop to a lower plateau, holds steady, and then drops sharply again to meet the "easy" line at the final point.
* **Data Points (Approximate):**
* Problem Size ~15 to ~65: Success Rate = 100%
* Problem Size ~70: Success Rate drops sharply to ~67%
* Problem Size ~70 to 100: Success Rate holds steady at ~67%
* Problem Size 120: Success Rate = 0%
### Key Observations
1. **Performance Plateau:** Both difficulty levels maintain a 100% success rate for smaller problem sizes (up to ~65 for "tricky" and up to 100 for "easy").
2. **Differential Degradation:** The "tricky" problems show an earlier and more complex failure mode. Their success rate drops significantly at a problem size of around 70, plateaus, and then collapses. The "easy" problems maintain perfect performance much longer but then fail completely and abruptly.
3. **Convergence at Failure:** At the largest problem size shown (120), both difficulty levels have a 0% success rate, indicating a common point of total system failure or intractability.
4. **Sharp Transitions:** The changes in success rate are not gradual slopes but appear as sharp, almost step-like drops, suggesting critical thresholds in problem size.
### Interpretation
The data suggests a system or algorithm whose performance is highly reliable up to a certain problem scale, after which it fails catastrophically. The key insight is the difference in failure profiles between "easy" and "tricky" problems.
* **"Easy" problems** exhibit a **cliff-edge failure**: the system handles them perfectly until it suddenly cannot handle them at all (at size 100). This implies a hard resource limit or a fundamental algorithmic constraint that is triggered at a specific size.
* **"Tricky" problems** reveal a **two-stage failure**: an initial drop to a degraded but stable performance level (~67%), followed by a final collapse. This indicates that "tricky" problems likely exploit a specific weakness or complexity in the system that becomes active at a lower threshold (size ~70). The plateau suggests the system can still partially cope with this added complexity for a range of sizes before being overwhelmed entirely.
The chart effectively communicates that problem difficulty isn't just about a uniform lower success rate; it changes the *pattern* of failure. For practical purposes, this means the system is robust for "easy" tasks up to a known limit, but for "tricky" tasks, one must expect degraded performance much sooner, and planning should account for this two-phase degradation. The universal failure at size 120 defines the absolute upper bound of the system's capability for this class of problems.