## Line Chart: Attack Success Rate vs. Ablating Head Numbers
### Overview
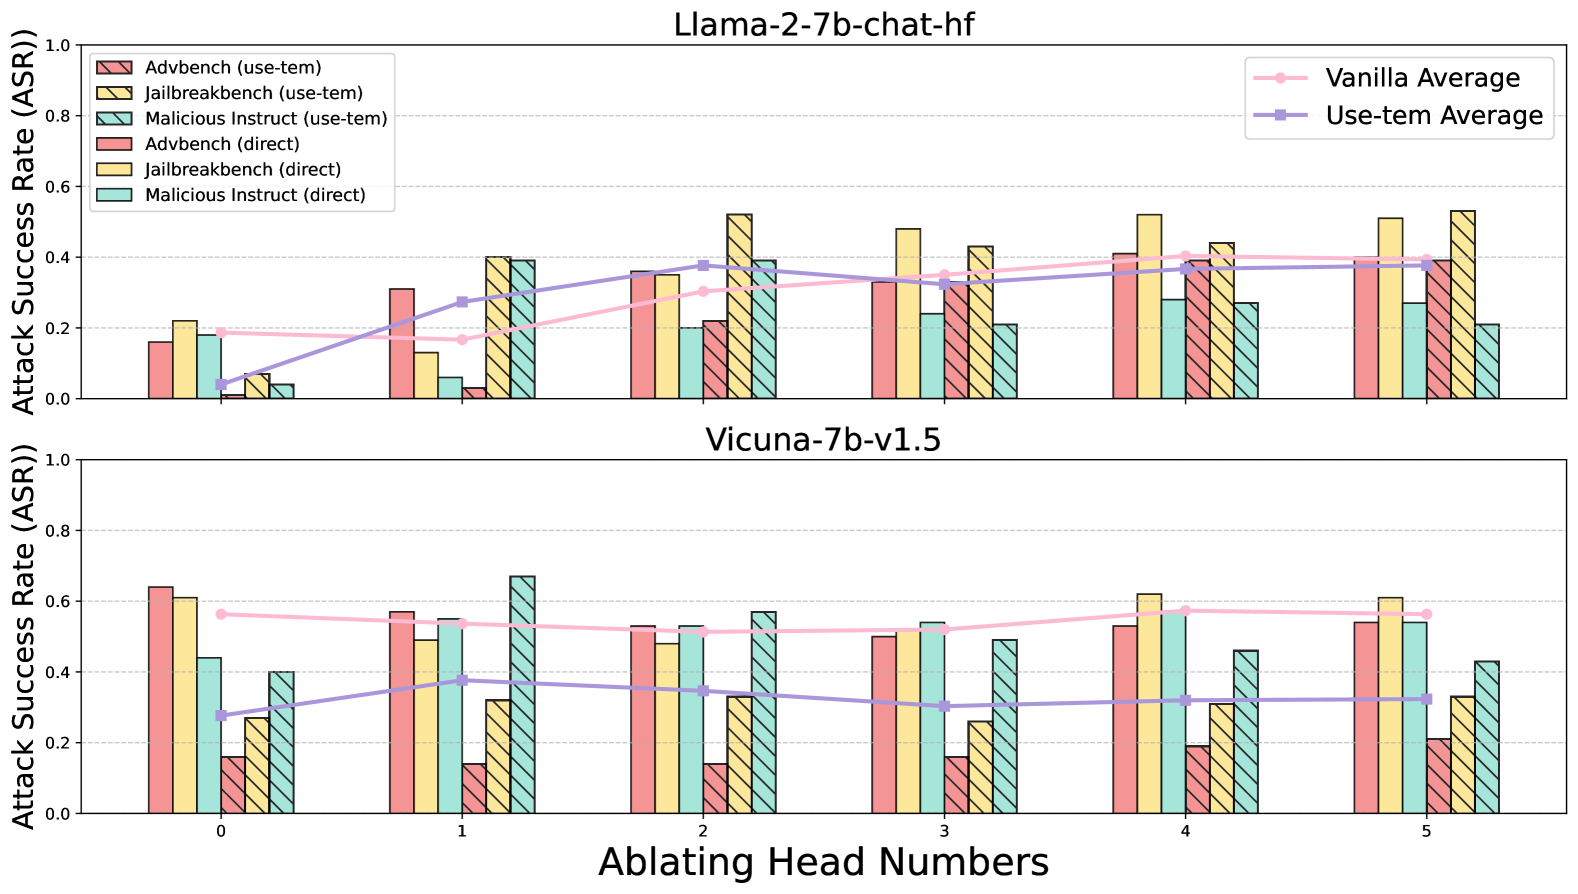
The image presents two line charts, stacked vertically. Both charts depict the Attack Success Rate (ASR) against "Ablating Head Numbers" (ranging from 0 to 5). The top chart focuses on the "Llama-2-7b-chat-hf" model, while the bottom chart focuses on the "Vicuna-7b-v1.5" model. Each chart displays multiple data series representing different attack methods, along with average lines for "Vanilla" and "Use-tem" approaches. The charts are designed to compare the vulnerability of these models to various attacks as head numbers are ablated.
### Components/Axes
* **X-axis:** "Ablating Head Numbers" - Discrete values from 0 to 5.
* **Y-axis:** "Attack Success Rate (ASR)" - Scale from 0.0 to 1.0.
* **Legend (Top Chart):**
* Red: "Advbench (use-tem)"
* Green: "Jailbreakbench (use-tem)"
* Blue: "Malicious Instruct (use-tem)"
* Orange: "Advbench (direct)"
* Yellow: "Jailbreakbench (direct)"
* Gray: "Malicious Instruct (direct)"
* Pink: "Vanilla Average"
* Light Blue: "Use-tem Average"
* **Legend (Bottom Chart):** Same color scheme and labels as the top chart.
* **Titles:**
* Top Chart: "Llama-2-7b-chat-hf"
* Bottom Chart: "Vicuna-7b-v1.5"
### Detailed Analysis or Content Details
**Llama-2-7b-chat-hf (Top Chart):**
* **Advbench (use-tem) - Red:** Starts at approximately 0.12 at Ablating Head Number 0, rises to a peak of around 0.45 at Ablating Head Number 2, then declines to approximately 0.35 at Ablating Head Number 5.
* **Jailbreakbench (use-tem) - Green:** Begins at approximately 0.18 at Ablating Head Number 0, increases to a peak of around 0.48 at Ablating Head Number 1, then fluctuates between 0.35 and 0.45 for the remaining head numbers.
* **Malicious Instruct (use-tem) - Blue:** Starts at approximately 0.15 at Ablating Head Number 0, increases to around 0.35 at Ablating Head Number 2, and remains relatively stable around 0.30-0.35 for the rest of the values.
* **Advbench (direct) - Orange:** Starts at approximately 0.08 at Ablating Head Number 0, increases to around 0.25 at Ablating Head Number 2, and then declines to approximately 0.18 at Ablating Head Number 5.
* **Jailbreakbench (direct) - Yellow:** Begins at approximately 0.12 at Ablating Head Number 0, increases to around 0.30 at Ablating Head Number 1, and then fluctuates between 0.20 and 0.30.
* **Malicious Instruct (direct) - Gray:** Starts at approximately 0.10 at Ablating Head Number 0, increases to around 0.25 at Ablating Head Number 2, and then declines to approximately 0.20 at Ablating Head Number 5.
* **Vanilla Average - Pink:** Starts at approximately 0.15 at Ablating Head Number 0, increases to around 0.25 at Ablating Head Number 1, and then remains relatively stable around 0.25-0.30.
* **Use-tem Average - Light Blue:** Starts at approximately 0.18 at Ablating Head Number 0, increases to around 0.35 at Ablating Head Number 1, and then remains relatively stable around 0.35-0.40.
**Vicuna-7b-v1.5 (Bottom Chart):**
* **Advbench (use-tem) - Red:** Starts at approximately 0.55 at Ablating Head Number 0, decreases to around 0.45 at Ablating Head Number 5.
* **Jailbreakbench (use-tem) - Green:** Starts at approximately 0.60 at Ablating Head Number 0, decreases to around 0.50 at Ablating Head Number 5.
* **Malicious Instruct (use-tem) - Blue:** Starts at approximately 0.50 at Ablating Head Number 0, decreases to around 0.40 at Ablating Head Number 5.
* **Advbench (direct) - Orange:** Starts at approximately 0.50 at Ablating Head Number 0, decreases to around 0.40 at Ablating Head Number 5.
* **Jailbreakbench (direct) - Yellow:** Starts at approximately 0.55 at Ablating Head Number 0, decreases to around 0.45 at Ablating Head Number 5.
* **Malicious Instruct (direct) - Gray:** Starts at approximately 0.50 at Ablating Head Number 0, decreases to around 0.40 at Ablating Head Number 5.
* **Vanilla Average - Pink:** Remains relatively stable around 0.50-0.55 across all Ablating Head Numbers.
* **Use-tem Average - Light Blue:** Remains relatively stable around 0.55-0.60 across all Ablating Head Numbers.
### Key Observations
* For Llama-2-7b-chat-hf, the "use-tem" attack methods generally exhibit higher ASRs than the "direct" methods. The ASR for most attacks increases initially with ablation, peaking around Ablating Head Number 1 or 2, and then tends to decrease.
* For Vicuna-7b-v1.5, the ASRs are generally higher than those for Llama-2-7b-chat-hf. The ASRs for all attack methods decrease as head numbers are ablated, but the changes are less pronounced than in the Llama-2 model.
* The "Vanilla Average" and "Use-tem Average" lines provide a baseline for comparison. The "Use-tem Average" consistently shows a higher ASR than the "Vanilla Average" for Llama-2-7b-chat-hf.
### Interpretation
The charts demonstrate the impact of ablating head numbers on the vulnerability of two language models to different attack strategies. The initial increase in ASR with ablation suggests that removing heads can, counterintuitively, initially increase susceptibility to attacks, potentially by disrupting the model's internal representations. The subsequent decrease in ASR may indicate that further ablation degrades the model's ability to effectively respond to attacks.
The difference in behavior between the two models suggests that their architectures and training data lead to different vulnerabilities. The higher ASRs for Vicuna-7b-v1.5 indicate that it may be more susceptible to these attacks overall. The consistent difference between "use-tem" and "direct" attacks for Llama-2-7b-chat-hf suggests that the "use-tem" approach is more effective at exploiting vulnerabilities in this model.
The data suggests that head ablation is not a straightforward method for improving model robustness. While it can reduce ASR in some cases, it can also initially increase vulnerability. Further investigation is needed to understand the complex relationship between head numbers, model architecture, and attack success rates.