TECHNICAL ASSET FINGERPRINT
fa3780a36c1053e059c743ff
Click to view fullscreen
Press ESC or click to close
FOUND IN PAPERS
EXPERT: healer-alpha-free VERSION 1
RUNTIME: free/openrouter/healer-alpha
INTEL_VERIFIED
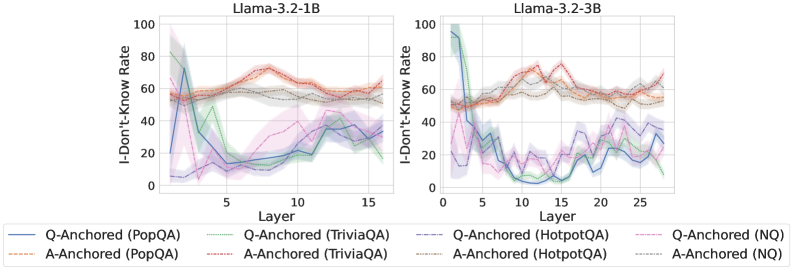
## Line Charts: I-Don't-Know Rate Across Model Layers
### Overview
The image displays two side-by-side line charts comparing the "I-Don't-Know Rate" across the internal layers of two different Large Language Models (LLMs): Llama-3.2-1B (left) and Llama-3.2-3B (right). The charts track this rate for questions from four different datasets (PopQA, TriviaQA, HotpotQA, NQ) under two different experimental conditions ("Q-Anchored" and "A-Anchored").
### Components/Axes
* **Chart Titles:** "Llama-3.2-1B" (left chart), "Llama-3.2-3B" (right chart).
* **Y-Axis (Both Charts):** Label: "I-Don't-Know Rate". Scale: 0 to 100, with major tick marks at 0, 20, 40, 60, 80, 100.
* **X-Axis (Left Chart):** Label: "Layer". Scale: 0 to 15, with major tick marks at 0, 5, 10, 15.
* **X-Axis (Right Chart):** Label: "Layer". Scale: 0 to 25, with major tick marks at 0, 5, 10, 15, 20, 25.
* **Legend (Bottom Center, spanning both charts):** Contains 8 entries, each a combination of line style/color and label.
* **Q-Anchored Series (Solid Lines):**
* Blue solid line: `Q-Anchored (PopQA)`
* Green solid line: `Q-Anchored (TriviaQA)`
* Purple solid line: `Q-Anchored (HotpotQA)`
* Pink solid line: `Q-Anchored (NQ)`
* **A-Anchored Series (Dashed Lines):**
* Orange dashed line: `A-Anchored (PopQA)`
* Red dashed line: `A-Anchored (TriviaQA)`
* Gray dashed line: `A-Anchored (HotpotQA)`
* Brown dashed line: `A-Anchored (NQ)`
* **Visual Elements:** Each data line is accompanied by a semi-transparent shaded area of the same color, likely representing a confidence interval or variance across multiple runs.
### Detailed Analysis
**Llama-3.2-1B (Left Chart):**
* **Q-Anchored (Solid Lines) Trend:** All four solid lines show a similar pattern: a very high initial rate (between ~60-95) at Layer 0-1, followed by a steep decline to a trough between Layers 3-7 (rates dropping to ~10-30), and then a gradual, oscillating increase towards the final layers (ending between ~20-40).
* `Q-Anchored (PopQA)` (Blue): Starts highest (~95), drops sharply to ~15 by Layer 5, then slowly rises to ~35 by Layer 15.
* `Q-Anchored (TriviaQA)` (Green): Starts ~80, drops to ~10 by Layer 7, rises to ~25 by Layer 15.
* `Q-Anchored (HotpotQA)` (Purple): Starts ~60, drops to ~15 by Layer 5, rises to ~40 by Layer 15.
* `Q-Anchored (NQ)` (Pink): Starts ~70, drops to ~20 by Layer 5, rises to ~30 by Layer 15.
* **A-Anchored (Dashed Lines) Trend:** All four dashed lines are relatively stable and clustered together in the upper half of the chart. They start between ~50-60, show a slight rise to a peak around Layers 8-12 (rates ~60-75), and then a slight decline towards the end (ending ~50-60).
* `A-Anchored (PopQA)` (Orange): Fluctuates between ~55-70.
* `A-Anchored (TriviaQA)` (Red): Shows the highest peak, reaching ~75 around Layer 10.
* `A-Anchored (HotpotQA)` (Gray): Remains the most stable, hovering around ~55-60.
* `A-Anchored (NQ)` (Brown): Follows a similar path to the orange line, ~50-65.
**Llama-3.2-3B (Right Chart):**
* **Q-Anchored (Solid Lines) Trend:** The pattern is similar to the 1B model but more pronounced and extended over more layers. A high start, a deep trough in the early-middle layers (Layers 5-15), and a recovery in later layers.
* `Q-Anchored (PopQA)` (Blue): Starts ~95, plummets to near 0 by Layer 10, recovers to ~30 by Layer 25.
* `Q-Anchored (TriviaQA)` (Green): Starts ~90, drops to ~5 by Layer 12, recovers to ~20 by Layer 25.
* `Q-Anchored (HotpotQA)` (Purple): Starts ~50, drops to ~10 by Layer 8, recovers to ~40 by Layer 25.
* `Q-Anchored (NQ)` (Pink): Starts ~60, drops to ~15 by Layer 7, recovers to ~35 by Layer 25.
* **A-Anchored (Dashed Lines) Trend:** Again, these lines are stable and high, showing less variation across layers compared to the Q-Anchored lines. They occupy the ~50-80 range.
* `A-Anchored (PopQA)` (Orange): Fluctuates between ~55-75.
* `A-Anchored (TriviaQA)` (Red): Shows the highest values, peaking near ~80 around Layer 15.
* `A-Anchored (HotpotQA)` (Gray): Stable around ~55-65.
* `A-Anchored (NQ)` (Brown): Stable around ~50-60.
### Key Observations
1. **Fundamental Dichotomy:** There is a stark, consistent difference between the Q-Anchored (solid) and A-Anchored (dashed) conditions across both models and all datasets. Q-Anchored lines are dynamic (high-low-high), while A-Anchored lines are static (consistently high).
2. **Layer-Wise Pattern for Q-Anchoring:** The "I-Don't-Know Rate" for Q-Anchored evaluation follows a clear U-shaped (or V-shaped) curve across layers: highest at the input/output layers and lowest in the middle layers.
3. **Model Scale Effect:** The 3B model (right) exhibits a deeper and more prolonged trough for the Q-Anchored lines compared to the 1B model (left), suggesting the larger model's middle layers are even more confident (lower "I-Don't-Know" rate) when processing the question anchor.
4. **Dataset Variation:** The `TriviaQA` dataset (green/red) often shows the most extreme values—both the lowest troughs for Q-Anchored and the highest peaks for A-Anchored. `HotpotQA` (purple/gray) tends to be the most moderate.
### Interpretation
This data visualizes a probe into the internal "confidence" or "knowledge retrieval" process of Llama models. The "I-Don't-Know Rate" likely measures how often a model's internal representations at a given layer, when probed, fail to contain the answer.
* **Q-Anchored vs. A-Anchored:** The condition labels suggest an experimental setup. "Q-Anchored" likely means the model is prompted or conditioned with the Question, and layers are probed for the Answer. "A-Anchored" likely means it's conditioned with the Answer, and layers are probed for the Question. The results show that when the model is given the question, its middle layers are highly knowledgeable (low "I-Don't-Know" rate), but this knowledge fades at the very beginning and end of the network. Conversely, when given the answer, the model's layers consistently struggle to recall the associated question (high "I-Don't-Know" rate) throughout the network.
* **The "Valley of Knowledge":** The U-shaped curve for Q-Anchoring suggests a functional specialization within the transformer layers. The initial layers process raw input, the middle layers (the "valley") are where deep semantic understanding and fact retrieval occur, and the final layers are specialized for output generation. The deeper valley in the 3B model implies this knowledge-retrieval function is more concentrated or robust in larger models.
* **Asymmetry of Recall:** The stark contrast between the two conditions reveals a fundamental asymmetry: it's easier for the model to retrieve an answer from a question (concentrated in middle layers) than it is to retrieve a question from an answer (uniformly difficult). This aligns with how these models are trained—primarily to generate answers given questions.
DECODING INTELLIGENCE...