# Technical Data Extraction: LLaMA Model Training Performance Comparison
This document provides a comprehensive extraction of data from a set of four line charts comparing the training performance (Perplexity vs. Tokens Seen) of different optimization methods across various LLaMA model sizes.
## 1. Document Overview
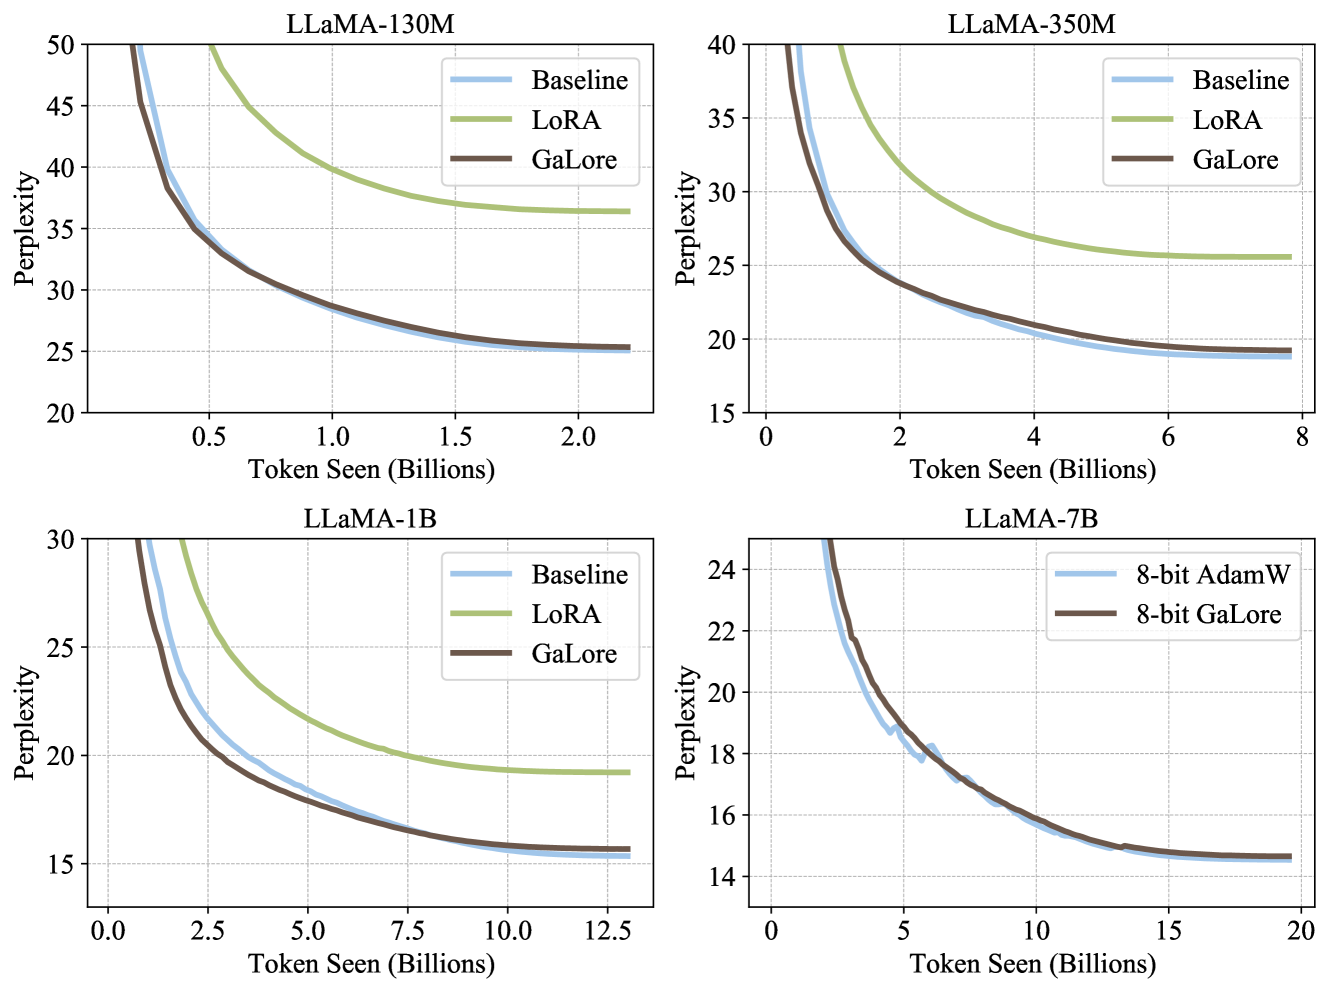
The image consists of four sub-plots arranged in a 2x2 grid. Each plot represents a different model scale: **LLaMA-130M**, **LLaMA-350M**, **LLaMA-1B**, and **LLaMA-7B**. The primary metric for all charts is **Perplexity** (y-axis), and the independent variable is **Token Seen (Billions)** (x-axis).
### Common Legend and Color Coding
Across the first three charts (130M, 350M, 1B), the following legend applies:
* **Baseline (Light Blue):** Represents the standard full-parameter training.
* **LoRA (Light Green):** Low-Rank Adaptation method.
* **GaLore (Dark Brown):** Gradient Low-Rank Projection method.
In the fourth chart (7B), the legend changes to:
* **8-bit AdamW (Light Blue)**
* **8-bit GaLore (Dark Brown)**
---
## 2. Detailed Chart Analysis
### Sub-plot 1: LLaMA-130M
* **X-axis:** Token Seen (Billions) [Range: 0.0 to 2.0+]
* **Y-axis:** Perplexity [Range: 20 to 50]
* **Trend Analysis:**
* **LoRA (Green):** Slopes downward but plateaus significantly higher than the others, ending near ~36.
* **Baseline (Blue) & GaLore (Brown):** Both show a steep downward curve, converging almost perfectly.
* **Final Data Points (approx. 2.2B tokens):**
* LoRA: ~36.5
* Baseline: ~25.3
* GaLore: ~25.3
### Sub-plot 2: LLaMA-350M
* **X-axis:** Token Seen (Billions) [Range: 0 to 8]
* **Y-axis:** Perplexity [Range: 15 to 40]
* **Trend Analysis:**
* **LoRA (Green):** Slopes downward, plateauing around ~25.5.
* **Baseline (Blue):** Slopes downward, reaching the lowest perplexity.
* **GaLore (Brown):** Follows the Baseline very closely, though it stays slightly above the Baseline in the final stages.
* **Final Data Points (approx. 8B tokens):**
* LoRA: ~25.5
* GaLore: ~19.2
* Baseline: ~18.8
### Sub-plot 3: LLaMA-1B
* **X-axis:** Token Seen (Billions) [Range: 0.0 to 12.5+]
* **Y-axis:** Perplexity [Range: 15 to 30]
* **Trend Analysis:**
* **LoRA (Green):** Slopes downward, plateauing near ~19.
* **Baseline (Blue):** Slopes downward. Interestingly, in this model size, the Baseline curve is slightly *above* GaLore during the mid-training phase (2.5B - 7.5B tokens) before converging.
* **GaLore (Brown):** Slopes downward aggressively, showing superior performance to LoRA and matching/slightly exceeding Baseline efficiency.
* **Final Data Points (approx. 13B tokens):**
* LoRA: ~19.2
* GaLore: ~15.6
* Baseline: ~15.4
### Sub-plot 4: LLaMA-7B
* **X-axis:** Token Seen (Billions) [Range: 0 to 20]
* **Y-axis:** Perplexity [Range: 14 to 24]
* **Trend Analysis:**
* **8-bit AdamW (Blue):** Shows a jagged downward trend (indicating some instability or noise in 8-bit training) but reaches a low perplexity.
* **8-bit GaLore (Brown):** Shows a much smoother downward curve compared to 8-bit AdamW, tracking the same final performance level.
* **Final Data Points (approx. 20B tokens):**
* 8-bit AdamW: ~14.6
* 8-bit GaLore: ~14.6
---
## 3. Summary of Key Findings
1. **GaLore vs. LoRA:** In all tested model sizes (130M, 350M, 1B), **GaLore** significantly outperforms **LoRA**, achieving a much lower perplexity that is nearly identical to the full-parameter **Baseline**.
2. **GaLore vs. Baseline:** GaLore effectively recovers the performance of full-parameter training (Baseline) across all scales.
3. **8-bit Optimization (7B Model):** In the 7B model, **8-bit GaLore** achieves the same final perplexity as **8-bit AdamW** but exhibits a significantly smoother convergence curve with less volatility during the training process.
4. **Scaling:** As model size increases, the final perplexity achieved within the token limit decreases (e.g., 130M ends at ~25, while 7B ends at ~14.6).