## A Bayesian Interval Dose-Finding Design Addressing Ockham's Razor: mTPI-2
Wentian Guo 1 , Sue-Jane Wang 2 , # , Shengjie Yang 3 , Suiheng Lin 1 , Yuan Ji 3 , 4 , ∗∗
1 Department of Biostatistics, School of Public Health Fudan University, P.R. China 2 Office of Biostatistics/Office of Translational Sciences Center for Drug Evaluation and Research U.S. Food and Drug Administration 3
Program for Computational Genomics & Medicine NorthShore University HealthSystem 4 Department of Public Health Sciences The University of Chicago
# Disclaimer: This article reflects the views of the author and should not be construed to represent the views or policies of the U.S. Food and Drug Administration September 29, 2016
∗ koaeraser@gmail.com
## Abstract
There has been an increasing interest in using interval-based Bayesian designs for dose finding, one of which is the modified toxicity probability interval (mTPI) method. We show that the decision rules in mTPI correspond to an optimal rule under a formal Bayesian decision theoretic framework. However, the probability models in mTPI are overly sharpened by the Ockham's razor, which, while in general helps with parsimonious statistical inference, leads to suboptimal decisions in small-sample inference such as dose finding. We propose a new framework that blunts the Ockham's razor, and demonstrate the superior performance of the new method, called mTPI-2. An online web tool is provided for users who can generate the design, conduct clinical trials, and examine operating characteristics of the designs through big data and crowd sourcing.
Keywords: Bayes rule; Big data; Crowd sourcing; Decision theory; Phase I clinical trial.
## 1 Introduction
Often, phase I trials in diseases like cancer, osteoarthritis, and psoriasis aim to find the maximum tolerated dose (MTD), the highest dose with toxicity rate lower than or close to a pre-specified target level, p T . As in most statistical inference, an estimated MTD is usually produced to represent the true and unknown MTD. However, the estimation is always with noise and the probability of toxicity for the estimated MTD is never exactly the same as p T . For this reason, the statistical community has been considering intervalbased inference to account for the variabilities in the toxicity estimates. For example, Cheung and Chappell (2002) propose to treat any dose with toxicity probability in the 'indifference interval' ( p T -δ, p T + δ ) as an estimated MTD, as long as a small δ ∈ (0 , 1) is agreed upon at the design stage by the clinical team. Later, in Ji et al. (2007, 2010) and Ji and Wang (2013), the authors further developed toxicity probability interval (TPI) and modified TPI (mTPI) methods, in which they formally proposed a decision theoretic framework linking the dose-finding decisions of 'Stay' (S), 'De-escalation' (D), and 'Escalation' (E) with the equivalence interval EI = ( p T - 1 , p T + 2 ), over-dosing interval OI = ( p T + 2 , 1), and under-dosing interval UI = (0 , p T - 1 ), respectively. For a given dose d , the authors calculate Pr ( p d ∈ EI | data ), Pr ( p d ∈ OI | data ), and Pr ( p d ∈ UI | data ), three posterior probabilities that the toxicity rate p d belongs to each of the three dosing intervals. The authors associate the dose-finding decisions with these three posterior probabilities. Distinctively, inference in mTPI is directly linked to the posterior probabilities of the three dosing intervals, which is different from a class of other interval designs (Ivanova et al., 2007; Oron et al., 2011; Liu and Yuan, 2015) that use a point estimate ˆ p d and compare ˆ p d with three dosing intervals. That is,
these interval designs do not directly calculate posterior probabilities of the intervals. They use the intervals as a thresholding device where their inference is still based on a point estimate of p d .
Interval-based designs, such as mTPI (Ji et al., 2010) are based on parametric models and use model-based inference for decision making. In Ji and Wang (2013) and Yang et al. (2015) the superiority of the intervalbased designs over the standard rule-based designs, such as the 3+3 design is established using massive simulations and crowd sourcing. One critical and distinctive feature of mTPI is its ability to precalculate all the dose finding decisions in advance, allowing investigators to examine the decisions before the trial starts. Therefore, even though a model-based design, mTPI exhibits the same simplicity and transparency as rule-based methods.
However, some decision rules in mTPI could be debated in practice. For example, when the target toxicity probability p T = 0 . 3, and 3 out of 6 patients treated at a dose experience dose limiting toxicity (DLT) events, mTPI would suggest 'S', stay at the current dose and enroll more patients to be treated at the dose. Since the empirical rate is 3/6, or 50%, practitioners have argued that the decision should be 'D', de-escalation instead of 'S'. Another case is when p T = 0 . 3 and 2 out of 9 patients experience DLT events at a dose, mTPI would suggest 'S' as well. Investigators could argue that the decision should be 'E', escalation since the empirical rate is 2/9, or 22%. For this reason, Yang et al. (2015) proposed an ad-hoc remedy that allows the decision rules in the mTPI design to be modified by users. While this feature allows great flexibility in practice, it lacks solid statistical justification and therefore cannot be properly assessed.
To this end, we propose mTPI-2, an extension of mTPI that solves the undesirable issue in the current decision under mTPI. We show that the suboptimal rules listed above are consequences of the Ockham's razor (Jefferys and Berger, 1992). The Ockham's razor usually helps Bayesian inference to automatically achieve parsimony by favoring simpler models. However, in the case of dose finding with small sample size, the Ockham's razor is too sharp and must be blunted. Otherwise, anti-intuitive decisions, such as those listed above, will be generated as a consequence of parsimonious inference under the Ockham's razor. In mTPI-2, we provide a new framework to blunt the Ockham's razor, which leads to an improved decision table.
The remainder of the paper is organized as follows. Section 2 is devoted to Ockham's razor and its role in interval-based designs. Section 3 proposes mTPI-2 as a solution to blunt the Ockham's razor with a few simple theoretical results. Section 4 examines the numerical performance of mTPI-2, in comparison to the mTPI design using crowd sourcing. Section 5 introduces an online software that implements both methods and Section 6 ends the manuscript with a discussion.
## 2 Ockham's Razor and Interval-Based Designs
As an accepted principle in science, the Ockham's razor states the principle that an explanation of the facts should be no more complicated than necessary (Thorburn, 1918; Jefferys, 1990; Good, 1967; MacKay, 1992; Jefferys and Berger, 1992). A direct impact of Ockham's razor is on model selection, which favors 'smaller' models if data can be fit similarly well by different models.
Usually, in model selection one considers multiple models { M i ; i = 1 , . . . , I } , and for each model M i , a set of parameters θ i . Bayesian inference involving model selection typically requires a prior p ( M i ) for the candidate model i and a prior p ( θ i | M i ) for parameters θ i that characterize the parameters of interests in model M i . Formal posterior inference calculates the posterior probability of the model p ( M i | data ) and selects the model with the largest posterior probability. Numerous papers have shown that the inference based on the posterior probability p ( M i | data ) automatically applies the Ockham's razor, in that models with more parameters and larger parameter space are penalized.
In general, the Ockham's razor helps Bayesian inference by selecting more parsimonious models. However, in the case of interval-based designs for dose finding, such as mTPI, Ockham's razor is too sharp and leads to practically undesirable decisions. To see this, we first conduct a quick review of the mTPI design.
The mTPI design considers three intervals that partition the sample space (0 , 1) for the probability of toxicity p d at a given dose d :
$$M _ { E } \colon & \quad p _ { d } \in ( 0 , p _ { T } - \epsilon _ { 1 } ) \\ M _ { S } \colon & \quad p _ { d } \in ( p _ { T } - \epsilon _ { 1 } , p _ { T } + \epsilon _ { 2 } ) \\ M _ { D } \colon & \quad p _ { d } \in ( p _ { T } + \epsilon _ { 2 } , 1 )$$
The three intervals can be viewed as three models M i with index i ∈ { E,S,D } , where the three letters correspond to the dose-finding decisions if they are selected. For example, when M E is selected as the winning model, the corresponding decision is 'E', to escalate from the current dose. Typically, p T ranges from 0 . 1 to 0 . 3 in phase I trials, and 's are usually small, say ≤ 0 . 05. In mTPI, the observed data are integers ( x d , n d ), where n d and x d represent the numbers of patients treated at dose d and those who have experienced DLT events, respectively. Given p d , the probability of toxicity at dose d , x d | p d ∼ Bin ( n d , p d ) a binomial distribution. The mTPI design assumes that p d ∼ Beta (1 , 1), and the dose-finding decision rule for dose d is given by
where
$$\mathcal { D } _ { m T P I } = \arg \max _ { i \in \{ E , S , D \} } U P M ( i , d ) & & ( 2 )$$
$$U P M ( i , d ) = \frac { P r ( M _ { i } | \{ x _ { d } , n _ { d } \} ) } { S ( M _ { i } ) } & & ( 3 )$$
is the posterior probability of the interval M i divided by the length of the interval.
We first show that the decision rule D mTPI is optimal if intervals M i are considered part of the candidate models in a model-selection framework. To see this, we introduce an additional parameter m d ∈ { M E , M S , M D } , which denotes the indicator of the three candidate models (intervals) to which p d belongs. In particular, Theorem 1 below shows that decision D mTPI corresponds to the Bayes rule, the optimal decision rule that minimizes the posterior expected loss under a 0-1 loss function ( a, m d ) (Berger, 1988), defined by
$$\ell ( a = i , m _ { d } = M _ { j } ) = \left \{ \begin{array} { l l } { 1 , } & { { i f } i \neq j ; } \\ { 0 , } & { { i f } i = j , } \end{array} \quad \text {for $i,j\in\{E,S,D\}$} .
</doctag>$$
The loss function ( a, m d ) states that the loss for taking action i is 0 if model M i is the winning model, and 1 otherwise.
Theorem 1. Given the sampling model x d | p d ∼ Bin ( n d , p d ) and priors
$$\begin{array} { r c l } { p _ { d } | m _ { d } = M _ { i } } & { \sim } & { { \frac { 1 } { S ( M _ { i } ) } I ( p _ { d } \in M _ { i } ) } } \\ { p ( m _ { d } = M _ { i } ) } & { = } & { { \frac { 1 } { 3 } } } \end{array}$$
independently for all doses, and given the 0-1 loss function ( i, M j ) in (4) for three decisions, where i, j ∈ { E,S,D } , decision rule D mTPI in (2) is optimal in the sense that it minimizes the posterior expected loss. Proof is given in the Appendix A.
The Bayes rule D mTPI selects the action i ∈ { E,S,D } corresponding to the model M i with the largest posterior probability. This inference is subject to Ockham's razor. As an example, when x d = 3 and n d = 6, i.e., the decision rule D mTPI boils down to comparing the UPM ( S, d ) and UPM ( D,d ), which involves the calculation of the posterior probability Pr ( M i | x d , n d ) for M S = ( p T - 1 , p T + 2 ) and M D = ( p T + 2 , 1). For each model, the size of the model is the length of the interval in the model. The model size S ( M D ) = (1 -p T - 2 ) is usually larger than the size S ( M S ) = ( 1 + 2 ) since usually p T is close
to 0.3 or 0.16, and 1 , 2 ≤ 0 . 05 . . The posterior probability Pr ( M i | x d , n d ) can be written as a difference of incomplete beta functions evaluated at the boundaries of the two models. Some theoretical discussion of how Pr ( M i | x d , n d ) depends on x d , n d and interval definitions are given in Appendix B. When x d = 3 and n d = 6, it can be shown that the UPM ( S, d ) is larger than UPM ( D,d ) for p T = 0 . 3 and 1 = 2 = 0 . 05. Consequently, even though the empirical rate x d /n d = 0 . 5 is greater than p T = 0 . 3, mTPI still prefers S , to stay at the current dose. In summary, due to the Ockham's razor which prefers more parsimonious model, in this case model M S with a shorter interval length, mTPI chooses to stay at dose d when x d = 3 and n d = 6. Theoretically, the exact proof depends on the convexity of the incomplete beta function, which is still an open question (Swaminathan, 2007) with no conclusion. Instead, we provide a numerical illustration next.
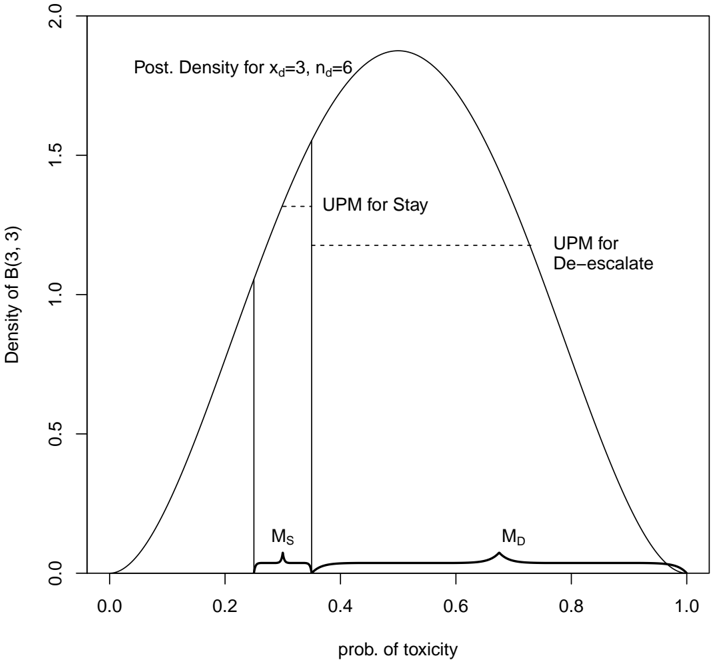
As an example that shows the effect of the Ockham's razor, in Figure 1, mTPI will select decision 'S' even when x d = 3 out of n d = 6 patients experience the DLT events, and the posterior distribution is clearly peaked inside the interval M D .
## 3 A Solution to Blunt the Ockham's Razor: mTPI-2
## 3.1 Decision theoretic framework
We provide a solution to blunt the Ockham's razor for mTPI and avoid the undesirable decisions, such as S when 3 out of 6 patients experience DLT at a given dose. Statistically speaking, there is nothing wrong with the current decision in mTPI as the Bayesian inference takes into account the model complexity when choosing the optimal decision. However, for human clinical trials patient safety often outweighs statistical optimality. To this end, we modify the decision theoretic framework and blunt the Ockham's razor.
We call the new class of designs mTPI-2, since the framework is motivated by that in mTPI. We show next that the framework blunt the Ockham's razor and leads to safer and more desirable decision rules. Importantly, mTPI-2 preserves the same simple and transparent nature exhibited in mTPI, facilitating its practical implementation by both statisticians and clinicians.
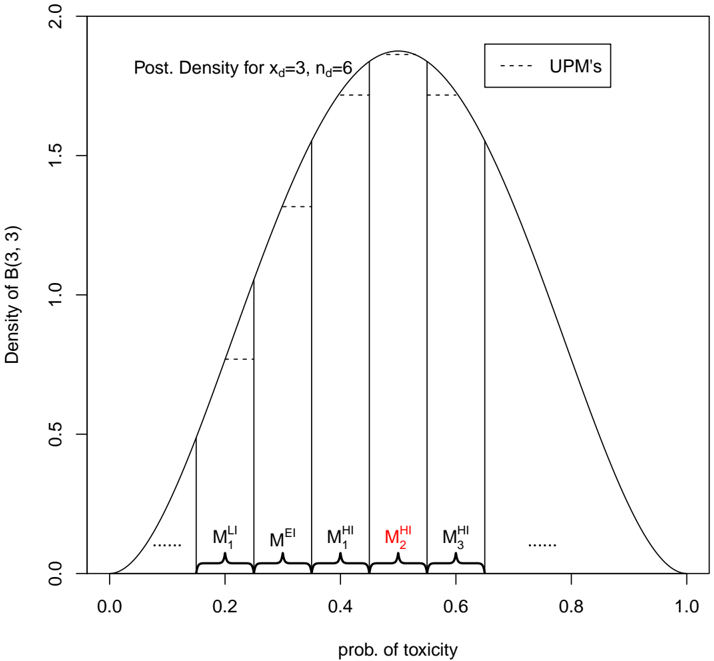
The basic idea is to divide the unit interval (0 , 1) into subintervals with equal length, given by ( 1 + 2 ). This results in multiple intervals with the same length, which are considered multiple equal-sized models. See Figure 2. For clarity, we now denote EI the equivalence interval ( p T - 1 , p T + 2 ), and LI a set of intervals below EI , and HI a set of intervals above EI . For example, when p T = 0 . 3 and 1 = 2 = 0 . 05,
Figure 1: An example demonstrating the effect of the Ockham's razor in mTPI. Shown is the posterior density of p d when x d = 3 and n d = 6. Even though the shape of the density suggests that dose d might be above the MTD, e.g., the posterior mode is to the right of the equivalence interval (shown as the two vertical bars), the UPM for decision S (stay) is still larger than that the UPM for decision D (de-escalate). Therefore, mTPI would still choose to 'Stay' despite that the shape of the posterior density of p d indicates otherwise. This is due to the larger size (longer length) of the interval M D than M S and the Ockham's razor, which prefers the smaller model M S .
<details>
<summary>Image 1 Details</summary>
### Visual Description
## Line Chart: Posterior Density Distribution for Binary Outcome (B(3,3))
### Overview
The chart illustrates the posterior density distribution of a binary outcome (B(3,3)) with parameters `x_d=3` (successes) and `n_d=6` (trials). The x-axis represents the "prob. of toxicity" (probability of a binary event), while the y-axis shows the "Density of B(3,3)" (probability density). Key elements include a main density curve, two horizontal dashed lines labeled "UPM for Stay" and "UPM for De-escalate," and two markers (`M_S` and `M_D`) on the x-axis.
### Components/Axes
- **X-axis**: "prob. of toxicity" (ranges from 0.0 to 1.0).
- **Y-axis**: "Density of B(3,3)" (ranges from 0.0 to 2.0).
- **Legend**: Located in the top-left corner, with labels:
- Solid line: "Post. Density for x_d=3, n_d=6" (main curve).
- Dashed line: "UPM for Stay" (horizontal line at ~0.35 density).
- Dashed line: "UPM for De-escalate" (horizontal line at ~0.65 density).
- **Markers**:
- `M_S`: Vertical line at ~0.3 on the x-axis (left of the peak).
- `M_D`: Vertical line at ~0.7 on the x-axis (right of the peak).
### Detailed Analysis
- **Main Curve**:
- Peaks at ~0.4 on the x-axis (prob. of toxicity).
- Density reaches ~1.8 at the peak.
- Symmetrical distribution around the peak, tapering to ~0.0 at x=0.0 and x=1.0.
- **UPM Lines**:
- "UPM for Stay": Horizontal dashed line at ~0.35 density (intersects the main curve at ~0.3 and ~0.5 on the x-axis).
- "UPM for De-escalate": Horizontal dashed line at ~0.65 density (intersects the main curve at ~0.6 and ~0.8 on the x-axis).
- **Markers**:
- `M_S` (0.3): Likely represents a threshold for "Stay" decisions.
- `M_D` (0.7): Likely represents a threshold for "De-escalate" decisions.
### Key Observations
1. The posterior density is bimodal in terms of decision thresholds, with `M_S` and `M_D` marking critical points for action.
2. The "UPM for Stay" and "UPM for De-escalate" lines suggest decision boundaries based on density thresholds rather than probability values.
3. The peak at ~0.4 indicates the most probable toxicity level under the given parameters.
### Interpretation
This chart models the uncertainty in a binary outcome (e.g., toxicity) using a Beta distribution (B(3,3)), which is common in Bayesian analysis for binary data. The parameters `x_d=3` and `n_d=6` imply 3 successes (e.g., non-toxic outcomes) out of 6 trials.
- **Decision Logic**:
- The "UPM for Stay" (~0.35 density) and "UPM for De-escalate" (~0.65 density) likely represent action thresholds. For example, if the prob. of toxicity exceeds `M_D` (0.7), de-escalation is triggered. If it falls below `M_S` (0.3), the system remains in a "Stay" state.
- The horizontal UPM lines suggest that decisions are based on density rather than direct probability, which may account for uncertainty in the posterior distribution.
- **Notable Patterns**:
- The symmetry of the curve around 0.4 suggests a balanced prior (e.g., equal prior probabilities for toxicity and non-toxicity).
- The markers `M_S` and `M_D` are positioned at the tails of the distribution, indicating conservative decision thresholds to avoid false positives/negatives.
- **Anomalies**:
- The UPM lines intersect the main curve at two points each, implying that the density crosses the threshold twice. This could indicate multimodal behavior or sensitivity to parameter changes.
This analysis highlights how Bayesian posterior distributions can inform decision-making in uncertain scenarios, balancing probabilistic outcomes with actionable thresholds.
</details>
the equivalence interval is EI = (0 . 25 , 0 . 35), the LI intervals are
$$L I = \{ M _ { 1 } ^ { L I } = ( 0 . 1 5 , 0 . 2 5 ) , \, M _ { 2 } ^ { L I } = ( 0 . 0 5 , 0 . 1 5 ) , \, M _ { 3 } ^ { L I } = ( 0 , 0 . 0 5 ) \} ,$$
and the HI intervals are
$$\begin{array} { r c l } H I & = & \{ M _ { 1 } ^ { H I } = ( 0 . 3 5 , 0 . 4 5 ) , \, M _ { 2 } ^ { H I } = ( 0 . 4 5 , 0 . 5 5 ) , \, M _ { 3 } ^ { H I } = ( 0 . 5 5 , 0 . 6 5 ) , \, M _ { 4 } ^ { H I } = ( 0 . 6 5 , 0 . 7 5 ) , \\ & & M _ { 5 } ^ { H I } = ( 0 . 7 5 , 0 . 8 5 ) , M _ { 6 } ^ { H I } = ( 0 . 8 5 , 0 . 9 5 ) , \, M _ { 7 } ^ { H I } = ( 0 . 9 5 , 1 ) \} . \end{array}$$
The same as mTPI, if the equivalence interval M EI = ( p T - 1 , p T + 2 ) has the largest UPM, it is selected as the winning model and the dose-finding decision of mTPI-2 is S , stay. If any interval M HI i or M LI i has the largest UPM, it will be selected as the winning model and the dose-finding decision is D or E , respectively. In Figure 2, for the same posterior density corresponding to x d = 3 and n d = 6, interval M HI 2 exhibits the largest UPM and therefore the decision is now D . Note that the same decision theoretic framework as mTPI is in place except that now there are multiple intervals corresponding to D or E , and the intervals all have the same length, thereby blunting the Ockham's razor.
## 3.2 Optimal rule for mTPI-2
We again consider a 0-1 loss function l ( a, m d ), but with multiple intervals, and multiple decisions. Shown in Table 1 the loss function divides the parameter space (0 , 1) of p d into ( k 1 + k 2 +3) intervals, with ( k 1 +1) intervals below the equivalence interval M EI and ( k 2 +1) intervals above M EI . Except for the two boundary intervals M LI k 1 +1 and M HI k 2 +1 , all the intervals have the same length δ = ( 1 + 2 ). The loss l ( a, m d ) is a function of action a that selects any of the ( k 1 + k 2 +3) intervals as the winning model, and the parameter m d indexes the model, which takes one of the intervals M i .
There are a total of ( k 1 + k 2 + 3) intervals. Consider the statistical decision a to select one interval as the winning interval into which the toxicity probability p d falls. However, selecting a winning interval must be translated into dose-finding decisions. To this end, we consider a deterministic mapping. Define a ∗ ∈ { E,S,D } the three dose-finding decisions for the trial. Based on ethical consideration, whenever the statistical decision a is in set LI , EI , or HI , the corresponding trial decision a ∗ takes value E , S , or D ,
Figure 2: An example demonstrating the new framework of mTPI-2. Here, EI is the equivalence interval ( p T - 1 , p T + 2 ), and LI denotes the intervals below EI , and HI denotes the intervals above EI . Interval M HI 2 exhibits the largest UPM and therefore the decision is now D , to de-escalate.
<details>
<summary>Image 2 Details</summary>
### Visual Description
## Chart/Diagram Type: Posterior Density Distribution for Toxicity Probability
### Overview
The image is a probability density function (PDF) plot titled "Post Density for x_d=3, n_d=6," showing the distribution of toxicity probability (x-axis) against density (y-axis). A dashed line labeled "UPMs" (likely a prior or reference distribution) is overlaid on the main density curve. Five vertical lines with labels (e.g., M1^LJ, M1^EI, etc.) mark specific points of interest on the x-axis.
---
### Components/Axes
- **X-axis**: "prob. of toxicity" (ranges from 0.0 to 1.0, with markers at 0.2, 0.4, 0.6, 0.8).
- **Y-axis**: "Density of B(3,3)" (ranges from 0.0 to 2.0, with markers at 0.0, 0.5, 1.0, 1.5, 2.0).
- **Legend**: Located in the top-right corner, labeled "UPMs" with a dashed line.
- **Vertical Lines**: Five dashed vertical lines with labels:
- M1^LJ (x ≈ 0.2)
- M1^EI (x ≈ 0.35)
- M1^HI (x ≈ 0.45)
- M2^HI (x ≈ 0.55)
- M3^HI (x ≈ 0.65)
---
### Detailed Analysis
- **Main Density Curve**:
- Peaks at x ≈ 0.45 (y ≈ 1.8), indicating the highest density of toxicity probability.
- Symmetrical shape, consistent with a Beta(3,3) distribution (symmetric when α = β).
- The curve tapers off toward both ends (x = 0 and x = 1), with density approaching zero.
- **UPMs Line**:
- A dashed line (likely a prior or reference distribution) that aligns with the main curve but is slightly offset.
- Peaks at x ≈ 0.45, matching the main curve’s peak.
- **Vertical Lines**:
- **M1^LJ** (x ≈ 0.2): Lowest density (~0.3).
- **M1^EI** (x ≈ 0.35): Moderate density (~0.6).
- **M1^HI** (x ≈ 0.45): Highest density (~1.8).
- **M2^HI** (x ≈ 0.55): Slightly lower density (~1.5).
- **M3^HI** (x ≈ 0.65): Lower density (~0.8).
---
### Key Observations
1. **Peak Density**: The highest density occurs at x ≈ 0.45, suggesting the most probable toxicity level is ~45%.
2. **Symmetry**: The Beta(3,3) distribution is symmetric, with equal influence from both sides of the peak.
3. **UPMs Alignment**: The UPMs line closely matches the main curve, indicating it may represent a prior belief or a reference distribution.
4. **Vertical Line Labels**: The labels (e.g., M1^LJ, M1^HI) likely denote different model configurations or thresholds, with M1^HI at the peak.
---
### Interpretation
The graph illustrates the posterior density distribution of toxicity probability given x_d=3 (e.g., 3 toxic samples) and n_d=6 (e.g., 6 total samples). The UPMs line likely represents a prior distribution (e.g., a uniform or Beta prior) that is updated to the posterior distribution shown. The vertical lines (M1^LJ to M3^HI) may correspond to specific quantiles, thresholds, or model variants. The symmetry of the distribution suggests balanced evidence for and against toxicity, while the peak at 0.45 indicates a moderate probability of toxicity. The labels on the vertical lines could reflect different experimental conditions or model parameters influencing the toxicity probability.
---
**Note**: No non-English text is present. All labels and values are transcribed with approximate positioning based on the graph’s scale.
</details>
respectively. Mathematically, this means that
$$a ^ { * } = \left \{ \begin{array} { l l } { E , } & { i f a \in L I } \\ { S , } & { i f a = E I } \\ { D , } & { i f a \in H I . } \end{array} ( 5 )$$
The goal is to optimally select a , which leads to a ∗ .
Table 1: A loss function of dose finding decisions a and model parameter m d . Columns are the sample space of m d , i.e., the candidate models are the toxicity probability intervals and rows are the action values for a and a ∗ (5).
| Loss function ( a,m d ), for a to select a model ∈ { LI,EI,HI } and m d also takes an interval value ∈ { LI,EI,HI } . | Loss function ( a,m d ), for a to select a model ∈ { LI,EI,HI } and m d also takes an interval value ∈ { LI,EI,HI } . | Loss function ( a,m d ), for a to select a model ∈ { LI,EI,HI } and m d also takes an interval value ∈ { LI,EI,HI } . | Loss function ( a,m d ), for a to select a model ∈ { LI,EI,HI } and m d also takes an interval value ∈ { LI,EI,HI } . | Loss function ( a,m d ), for a to select a model ∈ { LI,EI,HI } and m d also takes an interval value ∈ { LI,EI,HI } . | Loss function ( a,m d ), for a to select a model ∈ { LI,EI,HI } and m d also takes an interval value ∈ { LI,EI,HI } . | Loss function ( a,m d ), for a to select a model ∈ { LI,EI,HI } and m d also takes an interval value ∈ { LI,EI,HI } . | Loss function ( a,m d ), for a to select a model ∈ { LI,EI,HI } and m d also takes an interval value ∈ { LI,EI,HI } . |
|----------------------------------------------------------------------------------------------------------------------------------------|----------------------------------------------------------------------------------------------------------------------------------------|----------------------------------------------------------------------------------------------------------------------------------------|----------------------------------------------------------------------------------------------------------------------------------------|----------------------------------------------------------------------------------------------------------------------------------------|----------------------------------------------------------------------------------------------------------------------------------------|----------------------------------------------------------------------------------------------------------------------------------------|----------------------------------------------------------------------------------------------------------------------------------------|
| | m d ∈ LI : Intervals below the Equiv. Interval | m d ∈ LI : Intervals below the Equiv. Interval | m d ∈ LI : Intervals below the Equiv. Interval | m d = EI : Equiv. Interval | m d ∈ HI : Intervals above Equiv. Interval | m d ∈ HI : Intervals above Equiv. Interval | m d ∈ HI : Intervals above Equiv. Interval |
| Actions a , a ∗ | M LI k 1 +1 = (0 , p T - 1 - k 1 δ ) | · · · | M LI 1 = ( p T - 1 - δ, p T - 1 ) | M EI = ( p T - 1 , p T + 2 ) | M HI 1 = ( p T + 2 , p T + 2 + δ | · · · | M HI k 2 +1 = ( p T + 2 + k 2 δ, 1) |
| a = M LI 1 ,a ∗ = E | 0 | 1 | 1 | 1 | 1 | 1 | 1 |
| · · · · · · | · · · · · · | · · · · · · | · · · · · · | · · · · · · | · · · · · · | · · · · · · | · · · · · · |
| a = M LI k 1 +1 ,a ∗ = E | 1 | 1 | 0 | 1 | 1 | 1 | 1 |
| a = M EI ,a ∗ = S | 1 | 1 | 1 | 0 | 1 | · · · | 1 |
| a = M HI 1 ,a ∗ = D | 1 | 1 | 1 | 1 | 0 | 1 | 1 |
| · · · · · · | · · · · · · | · · · · · · | · · · · · · | · · · · · · | · · · · · · | · · · · · · | · · · · · · |
| a = M HI k 2 +1 ,a ∗ = D | 1 | 1 | 1 | 1 | 1 | · · · | 0 |
Assume that given n d , x d follows a binomial distribution, i.e., f ( x d | n d , p d ) ∝ p x d d (1 -p d ) n d -x d . For p d , given interval (model) m d = M i , assume a prior
$$p _ { d } \, | \, m _ { d } = M _ { i } \sim B e t a ( 1 , 1 ) I ( p _ { d } \in M _ { i } ) .$$
Assume prior probability p ( m d = M i ) is the same for all the models (intervals), where M i ∈ ∪{ LI, EI, HI } . Theorem 2 below provides the optimal decision rule for mTPI-2.
Theorem 2. The new Bayes rule D mTPI-2 ≡ D a ∗ that takes action a ∗ ∈ { E,S,D } corresponds to the Bayes rule D a that takes actions a ∈ { LI, EI, HI } . Under ( a, m d ) in Table 1 and the hierarchical model { f ( x d | n d , p d ) , f ( p d | m d ) , p ( m d ) } above, D mTPI-2 is given by the following rule:
- If M max ≡ arg max i Pr ( m d = M i | { x d , n d } ) = EI , D mTPI-2 = S , to Stay.
- If M max ≡ arg max i Pr ( m d = M i | { x d , n d } ) ∈ LI , D mTPI-2 = E , to Escalate.
- If M max ≡ arg max i Pr ( m d = M i | { x d , n d } ) ∈ HI , D mTPI-2 = D , to De-escalate.
Proof is immediate given the fact that D a is the Bayes rule for the loss function in Table 1 and the definition in (5).
Theorem 2 states that the optimal rule is to first find the interval M max with the largest posterior probability. If M max is the EI , the equivalence interval, stay at the current dose and treat the next cohort of patients at that dose; if M max is one of the intervals in LI , escalate to and treat the next cohort of patients at the next higher dose; if M max is one of the intervals in HI , de-escalate to and treat the next cohort of patients at the next lower dose. This decision rule minimizes the Bayes risk, i.e., the posterior expected loss.
Corollary 1: The optimal decision D mTPI -2 is equivalent to the following procedure: Assume dose d is the current dose being used for treatment.
1. Compute UPM ( i, d ) in (3) for each interval M i ∈ ∪{ LI, EI, HI } . Let M max be the interval with the largest UPM .
2. If M max is the EI , in LI , or in HI , the optimal rule D mTPI -2 is to Stay, Escalate, or De-escalate, respectively.
Proof: It suffices to prove Pr ( m d = M i | { x d , n d } ) = UPM ( i, d ) , which is immediate.
## 3.3 Design Algorithm
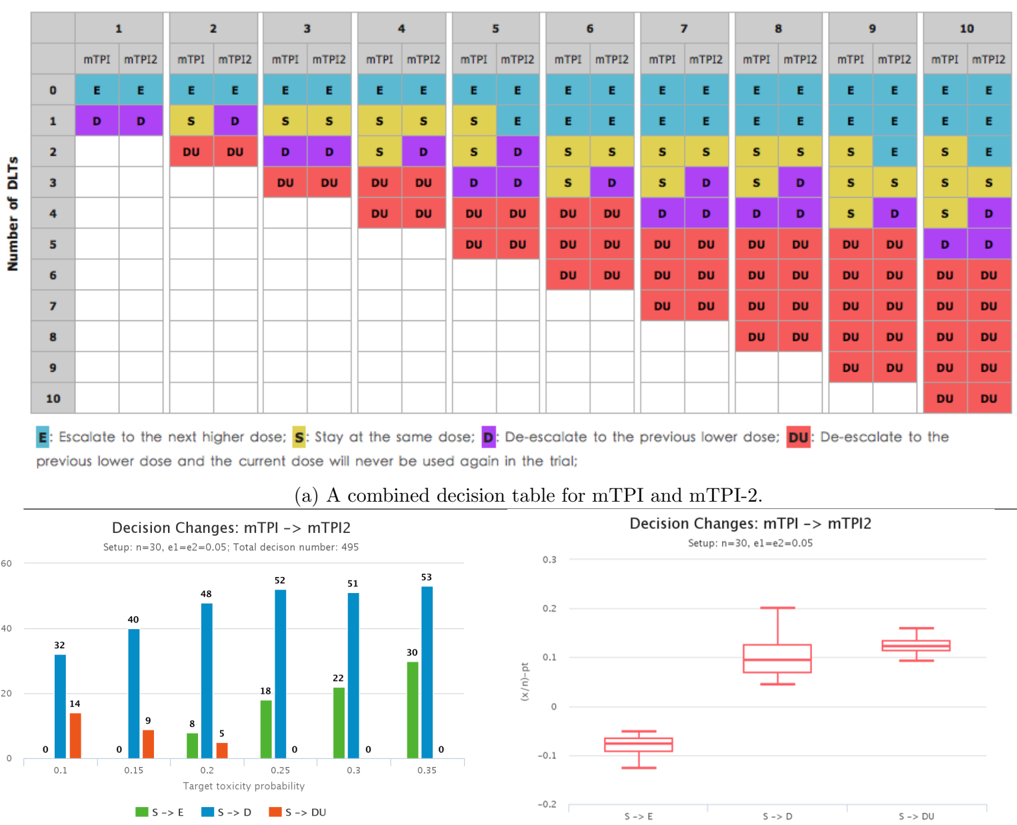
The implementation of the mTPI-2 design is as simple and transparent as mTPI. A decision table of all the optimal decisions in Corollary 1 can be precalculated. See Figure 3 as an example for a trial with p T = 0 . 3 and 1 = 2 = 0 . 05. The table in Figure 3(a) guides all the dose assignment decisions throughout the trial. For example, suppose a trial has five candidate doses, and dose 3 is being used to treat patients. Then the possible doses for treating future patients are doses 2, 3, and 4. Record n 3 and x 3 as the number of patients treated and number of patients experienced DLT at dose 3, then go to the table entry corresponds to row x 3 and column n 3 , and treat the next cohort of patients based on the decision in the table. For example, if x 3 = 3 and n 3 = 6, the decision is D in Figure 3(a), and the next patients will be treated at dose 2. Note that in contrast, Figure 3(a) would suggest S under mTPI, a now suboptimal decision under mTPI-2. More discussion about Figure 3 will follow next. The full algorithm of mTPI-2 is given below, assuming patients are enrolled in cohorts of size ≥ 1 .
- Optimal decision rule: Suppose that the current dose is d , d ∈ { 1 , · · · , D } candidate doses. After the toxicity outcomes of the most recent patient cohort are observed, denote ( x d , n d ) the current observed trial data. Select the dose for treating the next cohort among { ( d -1) , d, ( d + 1) } based on the optimal rule D mTPI -2 in Corollary 1. There are two exceptions: if d = 1, the next available doses are { d, ( d +1) } ; if d = D , the next available doses are { ( D -1) , D } .
- Trial stopping rule: Assume n 1 > 0. If Pr ( p 1 > p T | x d , n d ) > ξ, for a large probability ξ , say 0 . 95, terminate the trial due to excessive toxicity. Otherwise, terminate the trial when the maximum sample size is reached. In the special case of cohorts of size 1, do not apply the stopping rule Pr ( p 1 > p T | x d , n d ) > ξ, until three or more patients have been evaluated at a dose.
- MTD selection: At the end of the trial, select the dose as the estimated MTD with the smallest difference | ˆ p ∗ d -p T | among all the doses d for which n d > 0 and Pr ( p d > p T | x d , n d ) < ξ . Here ˆ p ∗ d is the isotonically transformed posterior mean of p d , the same as that in the mTPI design (Ji et al., 2010). If two or more doses tie for the smallest difference, perform the following rule. Let p ∗ denote the transformed posterior mean ˆ p ∗ d of the tied doses.
- If p ∗ < p T , choose the highest dose among the tied doses.
- If p ∗ > p T , choose the lowest dose among the tied doses.
## 4 Results
## 4.1 Decision Tables With Bayes Factors
As an interval design, both mTPI and mTPI-2 generate a set of decisions based on the input values p T , 1 , and 2 from physicians. They are summarized in a tabular format, e.g., those in Figure 3. Together, three values define the equivalence interval ( p T - 1 , p T + 2 ) where any dose with a toxicity probability falling into the interval can be considered as an MTD. Doses with toxicity probabilities outside the interval are considered either too low or too high. In a dose-finding trial aiming at identifying the MTD, the decision table can be precalculated for any values of p T ∈ (0 , 1) and 1 , 2 p T , and a sample size which determines column number of the table. Suppose a sample size maxN is decided for the trial. For each enumerated integer pairs, ( x, n ), 0 ≤ x ≤ n ≤ maxN , the decision D mTPI-2 ∈ { D,S,E } is precalculated.
Figures 3 (a) shows an example of the decision tables under both designs for p T = 0 . 3 and a sample size of 12. As can be seen, the main improvement of the mTPI-2 design over mTPI is the precise and 'faithful' decisions that reflect physicians input. For example, unlike mTPI where a decision S is given when x d = 3 toxicity events are observed out of n d = 6 patients, mTPI-2 recommends D , to de-escalate. Similarly, when x d = 2 and n d = 9, the decision becomes E for mTPI-2 instead of S for mTPI. In essence, mTPI-2 becomes a more 'nimble' design due to the effort in blunting the Ockham's razor. Specifically, mTPI favors the EI and the decision S , to stay, simply because the equivalence interval has the shortest length and is preferred in the Bayesian inference due to the Ockham's razor. In contrast, mTPI-2 avoids the Ockham's razor by having equal-lengthed intervals. Therefore, in Figures 3(a) the mTPI-2 design shows fewer S , more D 's and E 's.
Figure 3(b) shows the distribution of different decisions between mTPI-2 and mTPI for different p T values and a large sample size of 30. As can be seen, all the differences are related to changing the decision S in mTPI to not S ( D , E , or DU ) in mTPI-2. In general, many S decisions are changed to D or E , corresponding to the green and blue bars, respectively. Also, when p T < 0 . 2, there are no green bars (hence no change from S to E ), which seems to be sensible since escalation is less likely when p T < 0 . 2. In addition, when p T ≤ 0 . 2, some S decisions are changed to DU (red bars). That is, some 'stay' decisions in mTPI are changed to a composite decision in mTPI-2, which says that first, 'De-escalate' and second, the current dose is deemed too toxic and will be removed from the trial. This is a major modification on the dosing decision.
We look into why there is such a big change. For example, such a change occurs when p T = 0 . 1 and x d = 3 out of n d = 12 patients experience DLT. Under mTPI, the three intervals are (0 , 0 . 05), (0 . 05 , 0 . 15), and (0 . 15 , 1). Intuitively, the empirical toxicity rate equals x d /n d = 0 . 25, which is much higher than p T = 0 . 1. So D , de-escalate, should be preferred. However, based on mTPI the UPM for S is the largest. The main reason is that the posterior distribution of p d is Beta(4, 10) given data ( x d = 3 , n d = 12), which has a very light right tail and puts tiny probability mass when p d > 0 . 7. This allows Ockham's razor to sharply penalize the right interval (0 . 15 , 1), which is of length 0 . 85. In contrast, the EI (0 . 05 , 0 . 15) only has a length of 0 . 15. As a consequence, the UPM value for each of the three intervals, defined as the ratio of interval's posterior probability mass and interval length, favors the shorter interval (0 . 05 , 0 . 15) instead of (0 . 15 , 1), even though the posterior distribution puts most mass above 0.15. Therefore, mTPI gives an S for ( x d = 3 , n d = 12). However, the mTPI-2 design blunts the Ockham's razor and uses sub-intervals with equal length. Based on the new statistical framework under mTPI-2, the winning subinterval is (0 . 25 , 0 . 35) and the optimal decision
is D . In addition, under mTPI-2 the safety rule is invoked and therefore U is added. In the case of mTPI, since the decision is S , the safety rule is not even evaluated (mTPI does not evaluate the safety rule unless the decision is D ). For these reasons, when x d = 3 and n d = 12 at a given dose d , mTPI would stay ( S ) and mTPI would de-escalate and remove dose d from the trial (due to high toxicity). This example shows that mTPI-2 is a safer design than mTPI.
In Figure 3(c) we show that the changes from mTPI decisions to mTPI-2 decisions are all compatible with the empirical toxicity rate x d /n d . That is, mTPI-2 would only change S to E when the empirical rate is lower than p T , and S to D when the empirical rate is higher than p T .
Due to the principled decision-theoretic framework, mTPI-2 calculates the posterior probability Pr ( m d = M i | { x d , n d } ) for each of the intervals, M i ∈ { LI, EI, HI } . Naturally, the Bayes factor (BF) between any two intervals can be calculated as
$$B F _ { i j } = \frac { P r ( m _ { d } = M _ { i } | \{ x _ { d } , n _ { d } \} ) } { P r ( m _ { d } = M _ { j } | \{ x _ { d } , n _ { d } \} ) } ,$$
assuming equal prior probability for each model M i . A value close to 1 means there is only weak evidence supporting one model or the other. In mTPI-2, in addition to provide the winning decision in the table, we also display the BF of the winning decision versus the decision with the second largest posterior probability. Therefore, all those BF's are greater than 1 but a value close to 1, say < 1 . 05 indicates uncertainty in the decision. Due to small sample sizes for phase I trials, such weak decisions are not uncommon as can be seen in Table 2 below.
## 4.2 Simulation Studies
We conduct a comprehensive study that evaluates the performance of mTPI-2 and mTPI. Powered by crowd sourcing, we include a study based on 1,774 scenarios and 6,013,460 simulated trials, generated by 71 independent users of our existing tool, NGDF (Yang et al., 2015). NGDF is a web tool that allows users to design and simulate dose-finding trials based on various methods, including 3+3, CRM, and mTPI. We take the scenarios and simulation settings (including sample size and number of simulated trials per scenario) and simulate trials based on mTPI and mTPI-2. Therefore, the scenarios we use are from NGDF users, which constitute a crowd-sourcing exercise. Crowd sourcing typically allows objective and unbiased assessment of various methods, since the evaluators are a large number of different users, rather than the inventors themselves.
## NumberofPatients
(b) Changes between mTPI and mTPI-2 for various p T values.
<details>
<summary>Image 3 Details</summary>
### Visual Description
## Decision Table and Statistical Analysis for mTPI and mTPI-2
### Overview
The image contains a combined decision table for mTPI and mTPI-2, two bar charts, and a box plot. The decision table outlines dose escalation/de-escalation rules based on mTPI and mTPI2 values. The bar charts and box plot analyze decision changes under specific trial setups (n=30, e1=e2=0.05).
---
### Components/Axes
#### Decision Table
- **Structure**: 10x10 grid with rows (0–10) representing the number of DLTs and columns (1–10) representing trial stages.
- **Colors**:
- **E (Blue)**: Escalate to the next higher dose.
- **S (Yellow)**: Stay at the same dose.
- **D (Purple)**: De-escalate to the previous lower dose.
- **DU (Red)**: De-escalate to the previous lower dose, and the current dose will never be used again.
- **Legend**: Located at the bottom, with color-coded labels for E, S, D, DU.
- **Footnote**: Explains the meaning of each color in terms of dose adjustments.
#### Bar Charts
1. **First Bar Chart** ("Decision Changes: mTPI -> mTPI2"):
- **X-axis**: Target toxicity probability (0.1, 0.15, 0.2, 0.25, 0.3, 0.35).
- **Y-axis**: Number of decisions (0–60).
- **Bars**:
- **S->E (Green)**: Escalate to next dose.
- **S->D (Blue)**: De-escalate to previous dose.
- **S->DU (Orange)**: De-escalate and discontinue current dose.
- **Total Decisions**: 495.
2. **Second Bar Chart** ("Decision Changes: mTPI -> mTPI2"):
- **X-axis**: Same as above (target toxicity probability).
- **Y-axis**: (x/n)-pt (proportion of decisions, -0.2 to 0.2).
- **Bars**:
- **S->E (Red)**: Escalate to next dose.
- **S->D (Red)**: De-escalate to previous dose.
- **S->DU (Red)**: De-escalate and discontinue current dose.
- **Total Decisions**: 53.
#### Box Plot
- **X-axis**: Decision changes (S->E, S->D, S->DU).
- **Y-axis**: (x/n)-pt (proportion of decisions, -0.2 to 0.2).
- **Bars**: Red boxes represent median and quartiles for each decision change.
---
### Detailed Analysis
#### Decision Table
- **Key Observations**:
- **Escalation (E)**: Dominates early stages (columns 1–3) and lower DLT counts (rows 0–1).
- **De-escalation (D)**: Appears in mid-to-late stages (columns 4–10) and higher DLT counts (rows 2–10).
- **DU (Red)**: Concentrated in late stages (columns 7–10) and high DLT counts (rows 6–10).
- **S (Yellow)**: Appears sporadically, especially in mid-stages (columns 4–6) and mid-DLT counts (rows 3–5).
#### Bar Charts
1. **First Bar Chart**:
- **Trends**:
- **S->D (Blue)**: Highest frequency (53 at 0.35 toxicity probability).
- **S->E (Green)**: Increases from 0 (0.1) to 30 (0.35).
- **S->DU (Orange)**: Decreases from 14 (0.1) to 0 (0.35).
- **Notable**: S->D dominates, suggesting a trend toward de-escalation at higher toxicity probabilities.
2. **Second Bar Chart**:
- **Trends**:
- All bars are red, indicating normalized proportions.
- **S->D** has the highest median (box plot), followed by S->DU and S->E.
- **Notable**: Proportions are smaller than the first chart, suggesting a different scaling or subset of data.
#### Box Plot
- **Trends**:
- **S->D**: Highest median (~0.15) and widest interquartile range.
- **S->E**: Lowest median (~-0.05) and narrowest range.
- **S->DU**: Intermediate median (~0.05) and moderate spread.
- **Notable**: S->D shows the greatest variability in decision changes.
---
### Key Observations
1. **Decision Table**:
- Escalation (E) is most common in early stages and low DLT counts.
- De-escalation (D) and DU (red) become prevalent in later stages and higher DLT counts.
- DU (red) indicates irreversible discontinuation, concentrated in high-risk scenarios.
2. **Bar Charts**:
- **S->D** is the most frequent decision across toxicity probabilities.
- **S->E** increases with toxicity probability, while **S->DU** decreases.
- The second chart’s normalized values (proportions) align with the first chart’s trends but on a smaller scale.
3. **Box Plot**:
- **S->D** has the highest median and variability, indicating it is the most common and variable decision.
- **S->E** and **S->DU** show smaller medians and less variability.
---
### Interpretation
- **Decision Logic**: The table and charts suggest that as toxicity probability increases, the likelihood of de-escalating (D) or discontinuing (DU) rises, reflecting a safety-first approach in trial design.
- **Statistical Significance**: The box plot confirms that S->D decisions are statistically more variable and frequent, while S->E decisions are less common and more consistent.
- **Anomalies**: The absence of DU decisions in the second bar chart (0 at 0.3 and 0.35) may indicate a subset of data or a specific trial condition not reflected in the first chart.
- **Implications**: The data highlights the importance of balancing dose escalation with safety monitoring, as higher toxicity probabilities lead to more conservative decisions.
---
### Spatial Grounding
- **Decision Table**: Top section, grid layout with color-coded cells.
- **Bar Charts**: Bottom-left (first chart) and bottom-right (second chart), with legends and axis labels.
- **Box Plot**: Bottom-center, aligned with the bar charts for comparative analysis.
### Final Notes
The image provides a comprehensive view of decision-making dynamics in a clinical trial, emphasizing the interplay between toxicity probability, DLT counts, and dose adjustments. The statistical tools (bar charts, box plot) reinforce the trends observed in the decision table, offering actionable insights for trial optimization.
</details>
(c) A box-plot of x d /n d -p T values for the changes.
Figure 3: An example of the optimal decision tables for mTPI and mTPI-2. (a) presents decisions for both mTPI and mTPI2. For each 'Number of Patients' (column), there are two subcolumns listing the decisions of mTPI and mTPI2 side by side. Here, the target toxicity probability p T = 0 . 30 and 1 = 2 = 0 . 05 . (b) summarizes the differences in decisions between mTPI and mTPI2 with breakdowns of different p T values. For example, the blue bar denotes a change from decision S in mTPI to decision E in mTPI-2. (c) Boxplots of ( x d /n d -p T ) for the decisions that are changed in mTPI. The plots show that when x d /n d < p T , decisions S are changed to E ; when x d /n d > p T , decisions S are changed to D or DU .
Table 2: Decisions in mTPI-2 along with Bayes' factors. For any decision that is not 'U', a Bayes factor (BF) is provided comparing the winning decision and the second most likely decision. The BF value here is always greater than 1 since we calculated the BF of the winning decision versus the second best decision. A BF value closer to 1 indicates weaker evidence supporting the winning decision.
| | Number of Patients | Number of Patients | Number of Patients | Number of Patients | Number of Patients | Number of Patients | Number of Patients | Number of Patients |
|---------------------|----------------------|----------------------|----------------------|----------------------|----------------------|----------------------|----------------------|----------------------|
| | 3 | (BF) | 6 | (BF) | 9 | (BF) | 12 | (BF) |
| 0 1 2 3 4 5 6 7 8 9 | E S | (2.12) | E | (4.47) | E | (9.38) | E | (19.56) |
| | | (1.02) | E | (1.29) | E | (2.34) | E | (4.8) |
| | D | (2.32) | S | (1.04) | E | (1.12) | E | (1.64) |
| | U | | D | (1.68) | S | (1.06) | S | (1.03) |
| | | | U | | D | (1.45) | S | (1.08) |
| | | | U | | U | | D | (1.42) |
| | | | U | | U | | D | (2.73) |
| | | | | | U | | U | |
| | | | | | U | | U | |
| | | | | | U | | U | |
| 10 | | | | | | | U | |
| 11 | | | | | | | U | |
| 12 | | | | | | | U | |
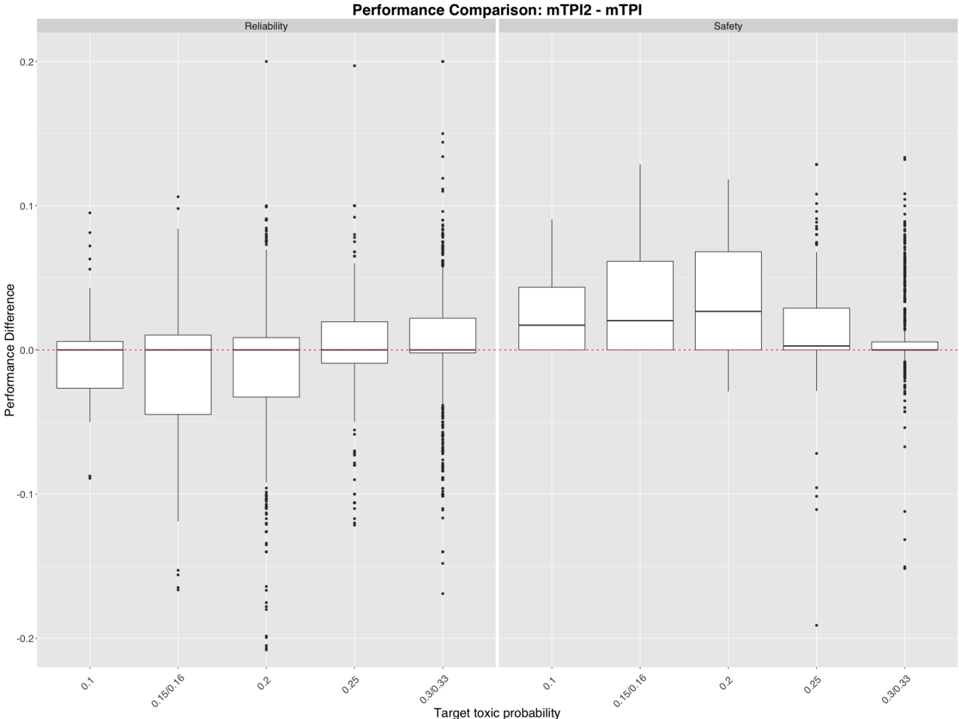
We compare both methods in terms of reliability and safety, as described in Ji and Wang (2013). In particular, reliability is the average percentage that the true MTD is selected at the end of the trial, for a given scenario and across all the simulated trials; and safety is the average percentage of patients treated at or below the true MTD, for a given scenario and across all the simulated trials. So for each method, we obtain 1,774 reliability values, one for each scenario. We then take pair-wise differences between any two methods in their reliability values for the same scenario, and plot the boxplots of the differences in the left half of Figure 4. Each boxplot corresponds to a unique p T value of the simulated trials. In the right half we show the boxplots for safety comparisons in the same manner.
Figure 4 shows that when p T ≤ 0 . 2, mTPI is slightly more reliable in identifying the true MTD than mTPI-2. However, when p T > 0 . 2, mTPI-2 is more reliable. What stands out is that mTPI-2 is always safer than mTPI regardless of the p T values, which means that mTPI-2 has less chance of assigning patients to overly toxic doses than mTPI. In practice, mTPI-2 and mTPI are both easy to implement, only requiring 1) generating dose-assignment decision tables (e.g., in Figure 3a) prior to trial initiation and 2) following the decisions in the table during the course of the trial.
Figure 4: Boxplots comparing the reliability and safety of mTPI and mTPI-2.
<details>
<summary>Image 4 Details</summary>
### Visual Description
## Box Plot: Performance Comparison: mTPI2 - mTPI
### Overview
The image presents a comparative box plot analysis of performance differences between two models (mTPI2 and mTPI) across varying target toxic probabilities. The data is split into two categories: **Reliability** (left) and **Safety** (right). Performance differences are measured on a scale from -0.2 to 0.2, with a red dashed line at 0.0 indicating no difference. The x-axis categorizes data by target toxic probability ranges (0.1, 0.15/0.16, 0.2, 0.25, 0.3/0.33).
---
### Components/Axes
- **X-Axis**: Target toxic probability (categorical bins: 0.1, 0.15/0.16, 0.2, 0.25, 0.3/0.33).
- **Y-Axis**: Performance Difference (continuous scale from -0.2 to 0.2).
- **Legend**:
- **Reliability**: Gray (left section).
- **Safety**: Black (right section).
- **Red Dashed Line**: Baseline at 0.0 performance difference.
---
### Detailed Analysis
#### Reliability (Left Section)
- **0.1**: Median ~-0.05, interquartile range (IQR) spans -0.05 to -0.01. Outliers at ~-0.15 and ~0.05.
- **0.15/0.16**: Median ~-0.03, IQR spans -0.08 to -0.01. Outliers at ~-0.18 and ~0.02.
- **0.2**: Median ~-0.02, IQR spans -0.06 to 0.01. Outliers at ~-0.12 and ~0.08.
- **0.25**: Median ~-0.01, IQR spans -0.04 to 0.02. Outliers at ~-0.15 and ~0.1.
- **0.3/0.33**: Median ~-0.01, IQR spans -0.03 to 0.01. Outliers at ~-0.18 and ~0.05.
#### Safety (Right Section)
- **0.1**: Median ~0.03, IQR spans 0.01 to 0.05. Outliers at ~-0.05 and ~0.12.
- **0.15/0.16**: Median ~0.05, IQR spans 0.03 to 0.08. Outliers at ~-0.02 and ~0.15.
- **0.2**: Median ~0.06, IQR spans 0.04 to 0.1. Outliers at ~-0.03 and ~0.18.
- **0.25**: Median ~0.04, IQR spans 0.02 to 0.07. Outliers at ~-0.05 and ~0.12.
- **0.3/0.33**: Median ~0.02, IQR spans 0.01 to 0.04. Outliers at ~-0.08 and ~0.15.
---
### Key Observations
1. **Reliability Trends**:
- Performance differences are predominantly negative (below 0.0) across all target toxic probabilities.
- Median values cluster near -0.01 to -0.05, with increasing variability (wider IQRs) at higher toxicity targets (e.g., 0.25 and 0.3/0.33).
- Outliers suggest occasional positive performance differences, but these are rare.
2. **Safety Trends**:
- Performance differences are predominantly positive (above 0.0) across all ranges.
- Median values increase slightly with higher toxicity targets (e.g., 0.2 has the highest median at ~0.06).
- Safety shows greater variability at higher toxicity targets (e.g., 0.25 and 0.3/0.33 have wider IQRs).
3. **Outliers**:
- Reliability outliers below -0.15 and above 0.05 are sparse but notable.
- Safety outliers below -0.05 and above 0.15 indicate rare deviations from the trend.
---
### Interpretation
- **Model Behavior**:
- mTPI2 underperforms mTPI in **Reliability** across most scenarios, with performance differences worsening as target toxic probability increases. This suggests mTPI2 may struggle with consistency in high-stakes or ambiguous contexts.
- In **Safety**, mTPI2 generally outperforms mTPI, with performance differences peaking at 0.2. However, the widening IQRs at higher toxicity targets imply increased unpredictability in extreme cases.
- **Design Implications**:
- The divergence in trends between Reliability and Safety highlights a trade-off: optimizing for safety may come at the cost of reliability, and vice versa.
- Outliers in both categories warrant investigation to determine if they represent edge cases or systemic issues in specific toxicity ranges.
- **Limitations**:
- The box plots do not specify the direction of performance differences (e.g., whether mTPI2 is faster, more accurate, or less resource-intensive than mTPI).
- The absence of statistical significance markers (e.g., p-values) makes it unclear whether differences are meaningful or due to random variation.
---
### Spatial Grounding
- **Legend**: Top-center, clearly labeling Reliability (gray) and Safety (black).
- **Red Dashed Line**: Horizontally centered at 0.0, dividing positive and negative performance differences.
- **Box Plots**: Aligned vertically under each x-axis category, with Reliability on the left and Safety on the right.
---
### Content Details
- **Reliability**:
- Median values: -0.05 (0.1), -0.03 (0.15/0.16), -0.02 (0.2), -0.01 (0.25), -0.01 (0.3/0.33).
- Outliers: -0.15, -0.18, -0.12, -0.15, -0.18 (negative); 0.05, 0.02, 0.08, 0.1, 0.05 (positive).
- **Safety**:
- Median values: 0.03 (0.1), 0.05 (0.15/0.16), 0.06 (0.2), 0.04 (0.25), 0.02 (0.3/0.33).
- Outliers: -0.05, -0.02, -0.03, -0.05, -0.08 (negative); 0.12, 0.15, 0.18, 0.12, 0.15 (positive).
---
### Final Notes
The data underscores a critical tension between Reliability and Safety in model performance. While mTPI2 shows promise in Safety, its Reliability lags behind mTPI, particularly in high-toxicity scenarios. Further analysis is needed to quantify the trade-offs and explore mitigation strategies.
</details>
## 5 Software
We have implemented mTPI-2 as an online tool at www.compgenome.org/NGDF . It only requires a web browser, such as Google Chrome, to access. The same website hosts mTPI, 3+3, and a version of CRM which allows head-to-head comparison between mTPI-2 and these designs. There is no need to download or maintain any software package, and the web tool can be accessed anywhere via internet. In our experience, the web tool runs successfully on a tablet such as iPad or a smart phone such as iphone. This capability allows investigators to use the design with great flexibility. A detailed user manual is provided on the website to assist new users.
## 6 Discussion
We present mTPI-2, an improved mTPI design, to reduce the effect from the Ockham's razor in the posterior inference. The mTPI-2 design is based on formal Bayesian decision theoretic framework, adjusting for Ockham's razor. It mitigates some suboptimal decisions in mTPI and provides theoretically optimal and intuitively sound decision rules. As a result, mTPI-2 makes more refined actions that allow more efficient exploration of different doses in the dose finding process.
The mTPI-2 design hinges on user-provided quantities, p T , 1 and 2 . It treats any dose with toxicity probability smaller than ( p T - 1 ) or larger than ( p T + 2 ) as being lower or higher than the MTD, respectively. Therefore, these two values are the key input of the design and must be elicited from physicians. For example, one can ask the physician what the highest toxicity rate is that would still warrant a dose escalation ( p T - 1 ) and the lowest rate ( p T + 2 ) that would warrant a dose de-escalation. In this paper, we consider 1 = 2 . Intuitively, when the two 's are not equal, the decisions can be altered in a nonsymmetric way such as allowing more escalation than de-escalation or the opposite. This is an ongoing research direction that we are currently pursuing.
We focus on the comparison between mTPI and mTPI-2 in this paper. For interested readers desired to compare mTPI-2 to the 3+3 design (Storer, 1989) or the continual reassessment method (CRM, O'Quigley et al. (1990)), we refer to Ji and Wang (2013) and Yang et al. (2015) who compared mTPI to 3+3 and CRM through extensive simulation studies, which serves as an indirect comparison to mTPI-2.
Innovatively, mTPI-2 is able to provide Bayes factors for each decision so that investigators can assess the uncertainty behind it. These Bayes factors may provide additional use for future work, such as allowing for randomization between two different decisions when the value of Bayes factor comparing the two decisions
is very close to 1.
The size of the equivalence interval serves as an 'effect size' for phase I dose-finding trials. This is an added benefit of interval-based designs, such as mTPI and mTPI-2. A narrower equivalence interval implies that the MTD must be identified with more precision, and therefore demands a larger sample size. Also the sample size will depend on the number of doses in the trial and the cohort size, see (Ji and Wang, 2013) for a discussion. We intend to address the sample size issue in a future work.
## References
Berger, J. (1988). 0.(1985), statistical decision theory and bayesian analysis.
- Cheung, Y. K. and Chappell, R. (2002). A simple technique to evaluate model sensitivity in the continual reassessment method. Biometrics 58, 671-674.
- Good, I. J. (1967). A bayesian significance test for multinomial distributions. Journal of the Royal Statistical Society. Series B (Methodological) pages 399-431.
- Ivanova, A., Flournoy, N., and Chung, Y. (2007). Cumulative cohort design for dose-finding. Journal of Statistical Planning and Inference 137, 2316-2327.
- Jefferys, W. H. (1990). Bayesian analysis of random event generator data. Journal of Scientific Exploration 4, 153-169.
- Jefferys, W. H. and Berger, J. O. (1992). Ockham's razor and bayesian analysis. American Scientist 80, 64-72.
- Ji, Y., Li, Y., and Bekele, B. N. (2007). Dose-finding in phase i clinical trials based on toxicity probability intervals. Clinical Trials 4, 235-244.
- Ji, Y., Liu, P., Li, Y., and Bekele, B. N. (2010). A modified toxicity probability interval method for dosefinding trials. Clinical Trials page 1740774510382799.
- Ji, Y. and Wang, S.-J. (2013). Modified toxicity probability interval design: a safer and more reliable method than the 3+ 3 design for practical phase i trials. Journal of Clinical Oncology 31, 1785-1791.
- Johnson, N. L., Kotz, S., and Balakrishnan, N. (2002). Continuous multivariate distributions, volume 2 (page 238) , volume 59. New York: John Wiley & Sons.
- Liu, S. and Yuan, Y. (2015). Bayesian optimal interval designs for phase i clinical trials. Journal of the Royal Statistical Society: Series C (Applied Statistics) 64, 507-523.
- MacKay, D. J. (1992). Bayesian methods for adaptive models . PhD thesis, California Institute of Technology.
- O'Quigley, J., Pepe, M., and Fisher, L. (1990). Continual reassessment method: a practical design for phase 1 clinical trials in cancer. Biometrics pages 33-48.
- Oron, A. P., Azriel, D., and Hoff, P. D. (2011). Dose-finding designs: the role of convergence properties. The international journal of biostatistics 7, 1-17.
- Storer, B. E. (1989). Design and analysis of phase i clinical trials. Biometrics pages 925-937.
- Swaminathan, A. (2007). Convexity of the incomplete beta functions. Integral Transforms and Special Functions 18, 521-528.
- Thorburn, W. M. (1918). The myth of occam's razor. Mind 27, 345-353.
- Yang, S., Wang, S.-J., and Ji, Y. (2015). An integrated dose-finding tool for phase i trials in oncology. Contemporary clinical trials 45, 426-434.
## Appendix
## A. Proof of Theorem 1
Recall that S ( M i ) is the size of interval length for model M i , i ∈ { E,S,D } . For example, for M E , S ( M E ) = p T - 1 .
It suffices to show that the decisions rule D mTPI maximizes E ((1 - ( i, M j )) | { x d , n d } ), the posterior expected utility, where utility is defined as one minus the 0-1 loss, i.e., (1 - ( i, M j )) . The posterior expected utility for action i ∈ { E,S,D } , at dose d is given by
$$\begin{array} { r l r } { L ( i , d ) } & { = } & { \sum _ { j \in \{ E , S , D \} } \ell ( i , M _ { j } ) p \left ( M _ { j } | \, ( x _ { d } , n _ { d } ) \right ) } \\ & { \quad \infty \sum _ { j \in \{ E , S , D \} } \ell ( i , M _ { j } ) \int p ( x _ { d } | \, n _ { d } , p _ { d } ) p ( p _ { d } | \, M _ { j } ) p ( M _ { j } ) d p _ { d } } \\ & { = } & { \int p ( x _ { d } | \, n _ { d } , p _ { d } ) p ( p _ { d } | \, M _ { i } ) p ( M _ { i } ) d p _ { d } } \\ & { \quad \infty \sum _ { l _ { i } } ^ { h _ { i } } \frac { 1 } { S ( M _ { i } ) } p _ { d } ^ { x _ { d } } ( 1 - p _ { d } ) ^ { n _ { d } - x _ { d } } d p _ { d } } \\ & { = } & { \frac { P r ( M _ { i } | \{ x _ { d } , n _ { d } \} ) } { S ( M _ { i } ) } } \end{array}$$
Therefore, the decision rule (2) given by
$$\mathcal { D } _ { m T P I } = \arg \max _ { i \in \{ E , S , D \} } U P M ( i , d ) & & ( 7 )$$
maximizes the posterior expected utility, which is equivalent to minimizing the posterior expected 0-1 loss.
## B. Rate of Incomplete Beta Function
We only need to consider the posterior probability of model M i in the calculation of UPM, i.e.,
$$P r ( M _ { i } \, | \, x _ { d } , n _ { d } ) \circ \frac { 1 } { S ( M _ { i } ) } \int _ { l _ { i } } ^ { h _ { i } } p _ { d } ^ { x _ { d } } ( 1 - p _ { d } ) ^ { n _ { d } - x _ { d } } & d p _ { d } \\ \quad \, \infty \frac { I _ { h _ { i } } ( x _ { d } + 1 , n _ { d } - x _ { d } + 1 ) - I _ { l _ { i } } ( x _ { d } + 1 , n _ { d } - x _ { d } + 1 ) } { h _ { i } - l _ { i } } \quad ( 8 )$$
where which equals
$$I _ { x } ( p , q ) = \frac { 1 } { B ( p , q ) } \int _ { 0 } ^ { x } t ^ { p - 1 } ( 1 - t ) ^ { q - 1 } d t$$
is the incomplete beta function, with
Based on Johnson et al. (2002), where
$$z \ = \ \frac { k } { | q - 0 . 5 - n ( 1 - x ) | } \left \{ \frac { 2 } { 1 + ( 6 n ) ^ { - 1 } } \left [ ( q - 0 . 5 ) \log \left \{ \frac { q - 0 . 5 } { n ( 1 - x ) } \right \} + ( p - 0 . 5 ) \log \left \{ \frac { p - 0 . 5 } { n x } \right \} \right ] \right \} ^ { 1 / 2 } ,$$
n = n d -1 and k = n d -x d -1 / 3 -( n d + 1 / 3)(1 -x ). When x d = 3 and n d = 6, the incomplete beta function can be shown to be approximated by
$$\Phi ( s g n ( x - 0 . 5 ) ) * \sqrt { - 7 \log ( x ( 1 - x ) ) } ) .$$
Based on Feller (1968), this can be approximated by
$$I ( x > 0 . 5 ) * \frac { 1 } { 2 } + s g n ( x - 0 . 5 ) * \frac { e ^ { - y ^ { 2 } / 2 } } { \sqrt { 2 \pi } y } , \quad y = \sqrt { - 7 \log ( x ( 1 - x ) ) } ,$$
$$I ( x > 0 . 5 ) * \frac { 1 } { 2 } + s g n ( x - 0 . 5 ) * \frac { \{ x ( 1 - x ) \} ^ { 1 / 1 4 } } { \sqrt { - 1 4 \pi \log ( x ( 1 - x ) ) } } .$$
A numerical evaluation reveals that when x takes values at 0.25, 0.35, and near 1, the expression of (8) favors
$$B ( p , q ) = \int _ { 0 } ^ { 1 } t ^ { p - 1 } ( 1 - t ) ^ { q - 1 } d t .$$
$$I _ { x } ( p , q ) \approx \Phi ( z )$$
model M D in which h i = 1 and l i = 0 . 35 over model M S in which h i = 0 . 35 and l i = 0 . 25. Unfortunately, there is no general conclusion on the value of (8) for any x d and n d values, which makes the theoretical derivation difficult. The above derivation pushes forward the theoretical development for the incomplete beta function in that it gives the ratio of ( x (1 -x )) 1 / 14 / √ -log ( x (1 -x )). However, the entire function if not monotone with a mode at 0.5, which makes it difficult to evaluate the magnitude of (8) as a difference of two incomplete beta functions. It is known that the analytic expression of incomplete beta function is still an open research question (Swaminathan, 2007). Therefore, we leave the further theoretical development to future work.