\n
## Diagram: Lambda Calculus Reduction Examples
### Overview
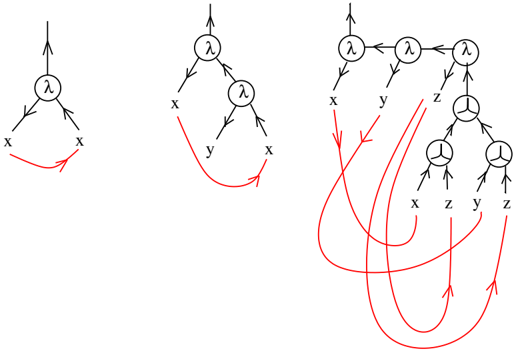
The image presents three diagrams illustrating lambda calculus reduction steps. Each diagram depicts a lambda expression and its reduction, represented as a tree-like structure with labeled nodes and arrows indicating the reduction process. The diagrams demonstrate how lambda expressions are simplified by applying beta reduction.
### Components/Axes
The diagrams consist of:
* **Nodes:** Represented by circles, labeled with either "λ" (lambda) or variables (x, y, z).
* **Arrows:** Red curved arrows indicate the reduction process, showing how a lambda abstraction is applied to an argument.
* **Input/Output:** Each diagram shows an initial lambda expression and its reduced form.
### Detailed Analysis or Content Details
**Diagram 1 (Leftmost):**
* The initial expression is a lambda abstraction with a single variable 'x' and a self-application.
* The lambda node (λ) has two outgoing edges, both labeled 'x', and these edges loop back to the lambda node itself.
* The reduction arrow starts from the bottom-left 'x' and curves upwards to the lambda node.
**Diagram 2 (Center):**
* The initial expression is a lambda abstraction with two variables 'x' and 'y'.
* The lambda node (λ) has two branches. The first branch leads to 'x', and the second branch splits into two further branches, labeled 'y' and 'x'.
* The reduction arrow starts from the bottom 'x' and curves upwards to the lambda node.
**Diagram 3 (Rightmost):**
* This diagram shows a more complex reduction.
* There are two lambda nodes (λ).
* The first lambda node has outgoing edges to 'x' and 'y'.
* The second lambda node has a more complex structure, branching to 'z', and then further branching to 'x', 'z', 'y', and 'z'.
* Multiple reduction arrows are present, indicating multiple reduction steps. The arrows originate from 'x', 'y', 'z', and the lower branches of the second lambda node, and curve upwards towards the lambda nodes.
### Key Observations
* The diagrams demonstrate the application of beta reduction, where a lambda abstraction is applied to an argument.
* The complexity of the diagrams increases from left to right, showing more intricate reduction steps.
* The use of red arrows consistently indicates the direction of reduction.
* The diagrams do not contain numerical data, but rather illustrate a conceptual process.
### Interpretation
The diagrams visually represent the process of lambda calculus reduction. They demonstrate how complex lambda expressions can be simplified by repeatedly applying beta reduction. The increasing complexity of the diagrams suggests that the reduction process can become more involved as the initial expression becomes more intricate. The diagrams are a pedagogical tool for understanding the core concepts of lambda calculus, a foundational model of computation. The diagrams show how a function (represented by the lambda abstraction) is applied to an argument (represented by the variables x, y, and z), resulting in a simplified expression. The arrows indicate the substitution process, where the argument replaces the formal parameter in the function body. The diagrams are not providing specific data, but rather illustrating a process. They are a visual representation of a formal system.