## Chart: Test Error vs. Alpha for ReLU and ELU Activation Functions
### Overview
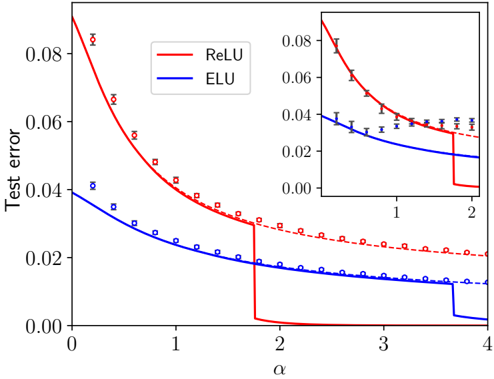
The image is a line chart comparing the test error of ReLU and ELU activation functions as a function of a parameter alpha (α). The chart shows two lines, one red (ReLU) and one blue (ELU), representing the test error for each activation function. The x-axis represents the value of alpha, ranging from 0 to 4. The y-axis represents the test error, ranging from 0 to 0.08. An inset plot provides a zoomed-in view of the region where alpha ranges from 0 to 2. Data points are marked on the lines, with error bars visible in the inset.
### Components/Axes
* **X-axis:** α (alpha), ranging from 0 to 4. Axis markers are present at 0, 1, 2, 3, and 4.
* **Y-axis:** Test error, ranging from 0.00 to 0.08. Axis markers are present at 0.00, 0.02, 0.04, 0.06, and 0.08.
* **Legend:** Located in the top-center of the chart.
* Red line: ReLU
* Blue line: ELU
* **Inset Plot:** Located in the top-right corner, showing a zoomed-in view of the data for α ranging from approximately 0 to 2.
### Detailed Analysis
* **ReLU (Red Line):**
* Trend: The test error decreases rapidly as alpha increases from 0 to approximately 2. At alpha = 2, the test error drops sharply to near zero. The dashed red line represents the data points.
* Data Points:
* α = 0: Test error ≈ 0.085
* α = 1: Test error ≈ 0.05
* α = 2: Test error ≈ 0.03
* α > 2: Test error ≈ 0.00
* **ELU (Blue Line):**
* Trend: The test error decreases as alpha increases from 0 to approximately 4. At alpha = 2, the test error drops sharply, but not to zero. The dashed blue line represents the data points.
* Data Points:
* α = 0: Test error ≈ 0.04
* α = 1: Test error ≈ 0.03
* α = 2: Test error ≈ 0.02
* α > 2: Test error ≈ 0.01
### Key Observations
* Both ReLU and ELU activation functions exhibit decreasing test error as alpha increases.
* ReLU shows a more significant drop in test error at α = 2, reaching near zero.
* ELU's test error decreases more gradually and does not reach zero within the plotted range.
* The inset plot provides a clearer view of the data points and error bars, especially for smaller values of alpha.
### Interpretation
The chart suggests that both ReLU and ELU activation functions benefit from increasing the parameter alpha, as indicated by the decreasing test error. The sharp drop in test error for ReLU at α = 2 indicates a potential threshold or critical value for this parameter. The ELU activation function, while also benefiting from increasing alpha, does not exhibit as dramatic a drop in test error as ReLU. This could indicate that ELU is more stable or less sensitive to the value of alpha within the plotted range. The error bars on the data points in the inset plot provide an indication of the uncertainty in the test error measurements. The dashed lines represent the data points.