## Bar Chart: Ablation Study Results (5 Runs) on Challenge Dataset
### Overview
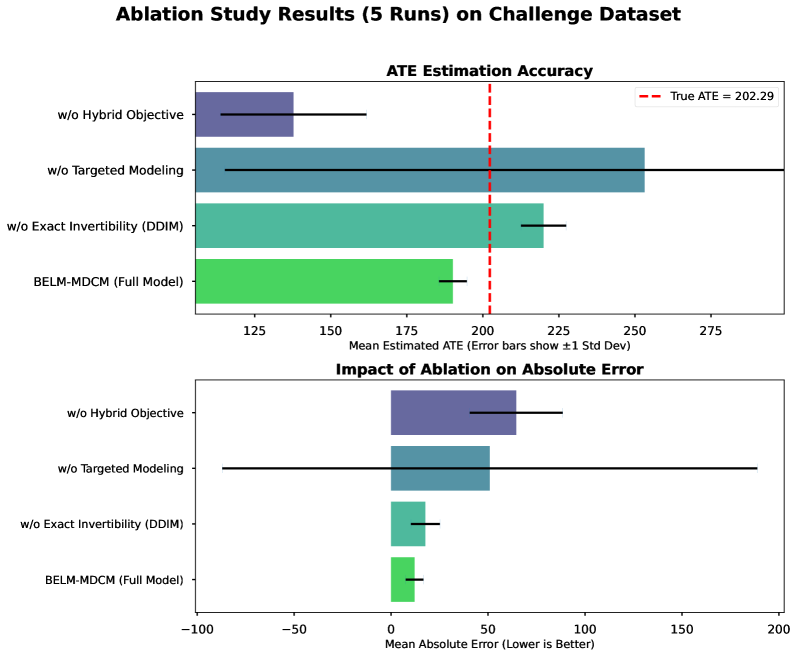
The image presents two comparative bar charts analyzing ablation study results for a machine learning model. The top chart evaluates **ATE Estimation Accuracy**, while the bottom chart assesses **Impact of Ablation on Absolute Error**. Both charts compare four model configurations against a benchmark (True ATE = 202.29) using 5 experimental runs. Error bars represent ±1 standard deviation.
---
### Components/Axes
#### Top Chart: ATE Estimation Accuracy
- **X-axis**: Mean Estimated ATE (Error bars show ±1 Std Dev)
- **Y-axis**: Ablation conditions (categorical):
1. w/o Hybrid Objective
2. w/o Targeted Modeling
3. w/o Exact Invertibility (DDIM)
4. BELM-MDCM (Full Model)
- **Legend**: Red dashed line = True ATE = 202.29
#### Bottom Chart: Impact of Ablation on Absolute Error
- **X-axis**: Mean Absolute Error (Lower is Better)
- **Y-axis**: Same ablation conditions as above
- **Legend**: No explicit legend, but error bars are black with caps
---
### Detailed Analysis
#### Top Chart: ATE Estimation Accuracy
- **w/o Hybrid Objective**:
- Mean ATE ≈ 140 (±15)
- Significantly below True ATE (202.29)
- **w/o Targeted Modeling**:
- Mean ATE ≈ 250 (±20)
- Exceeds True ATE by ~48 units
- **w/o Exact Invertibility (DDIM)**:
- Mean ATE ≈ 220 (±10)
- Exceeds True ATE by ~18 units
- **BELM-MDCM (Full Model)**:
- Mean ATE ≈ 190 (±5)
- Closest to True ATE (within 12 units)
#### Bottom Chart: Impact of Ablation on Absolute Error
- **w/o Hybrid Objective**:
- Mean Error ≈ -60 (±10)
- **w/o Targeted Modeling**:
- Mean Error ≈ -50 (±15)
- **w/o Exact Invertibility (DDIM)**:
- Mean Error ≈ -20 (±5)
- **BELM-MDCM (Full Model)**:
- Mean Error ≈ -10 (±3)
---
### Key Observations
1. **ATE Estimation Accuracy**:
- The Full Model (BELM-MDCM) achieves the highest accuracy (190 ±5), outperforming all ablated versions.
- Removing "Targeted Modeling" causes the largest deviation (+20% relative error vs. True ATE).
- "w/o Hybrid Objective" shows the lowest accuracy (140 ±15), with the widest error margin.
2. **Absolute Error**:
- The Full Model has the smallest error (-10 ±3), indicating optimal performance.
- Ablating "Hybrid Objective" introduces the largest error (-60 ±10), suggesting critical importance of this component.
3. **Error Bar Variability**:
- "w/o Targeted Modeling" exhibits the highest uncertainty in ATE estimation (±20).
- The Full Model demonstrates the most stable results (±5 in ATE, ±3 in error).
---
### Interpretation
The data demonstrates that **all ablation components degrade model performance**, with the Full Model (BELM-MDCM) serving as the optimal configuration. Key insights:
- **Hybrid Objective** is critical for ATE accuracy, as its removal causes the largest drop (-60 units).
- **Targeted Modeling** introduces overestimation bias when removed (+58 units vs. True ATE).
- The Full Model balances accuracy and stability, with the smallest error margins (±5 in ATE, ±3 in absolute error).
The study highlights the interdependence of ablation components: removing any single element disrupts performance, but the Full Model mitigates these effects through synergistic interactions. The True ATE benchmark (202.29) provides a reference point, showing that even the best ablated model (w/o DDIM) overestimates by ~9%.