## Bar Chart: Robustness to Many-to-One SCM: BELM vs. DDIM
### Overview
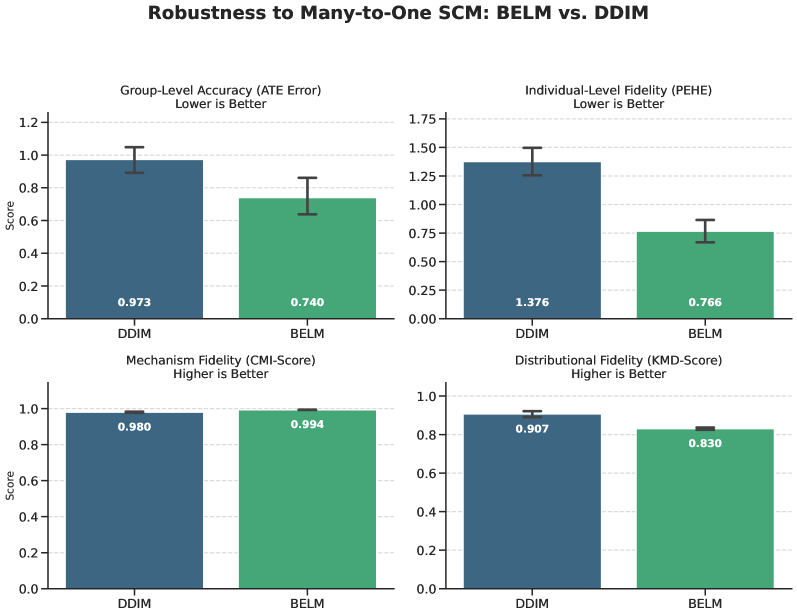
The image compares two methods, **DDIM** and **BELM**, across four metrics related to robustness in many-to-one structural causal models (SCMs). Each metric is visualized as a bar chart with error bars, and the results are split into two categories: "lower is better" (Group-Level Accuracy, Individual-Level Fidelity) and "higher is better" (Mechanism Fidelity, Distributional Fidelity).
### Components/Axes
- **X-axis**: Methods compared (**DDIM** in blue, **BELM** in green).
- **Y-axis**: Scores for each metric (ranging from 0.0 to 1.75).
- **Legend**: Located in the top-right corner, with **DDIM** (blue) and **BELM** (green) explicitly labeled.
- **Subplot Titles**:
1. **Group-Level Accuracy (ATE Error)**: Lower is better.
2. **Individual-Level Fidelity (PEHE)**: Lower is better.
3. **Mechanism Fidelity (CMI-Score)**: Higher is better.
4. **Distributional Fidelity (KMD-Score)**: Higher is better.
### Detailed Analysis
#### Group-Level Accuracy (ATE Error)
- **DDIM**: Score = 0.973 (blue bar).
- **BELM**: Score = 0.740 (green bar).
- **Error Bars**: Approximate ranges: DDIM (±0.05), BELM (±0.07).
#### Individual-Level Fidelity (PEHE)
- **DDIM**: Score = 1.376 (blue bar).
- **BELM**: Score = 0.766 (green bar).
- **Error Bars**: Approximate ranges: DDIM (±0.08), BELM (±0.05).
#### Mechanism Fidelity (CMI-Score)
- **DDIM**: Score = 0.980 (blue bar).
- **BELM**: Score = 0.994 (green bar).
- **Error Bars**: Approximate ranges: DDIM (±0.01), BELM (±0.005).
#### Distributional Fidelity (KMD-Score)
- **DDIM**: Score = 0.907 (blue bar).
- **BELM**: Score = 0.830 (green bar).
- **Error Bars**: Approximate ranges: DDIM (±0.01), BELM (±0.005).
### Key Observations
1. **BELM outperforms DDIM** in **Group-Level Accuracy** (0.740 vs. 0.973) and **Individual-Level Fidelity** (0.766 vs. 1.376), where lower scores are better.
2. **DDIM outperforms BELM** in **Mechanism Fidelity** (0.980 vs. 0.994) and **Distributional Fidelity** (0.907 vs. 0.830), where higher scores are better.
3. **Error bars** suggest variability in results, with BELM showing slightly larger uncertainty in Group-Level Accuracy and DDIM in Individual-Level Fidelity.
### Interpretation
- **BELM’s strength** in group-level metrics (ATE Error, PEHE) implies it may better handle robustness in scenarios where collective accuracy or individual fidelity is prioritized.
- **DDIM’s advantage** in mechanism and distributional fidelity suggests it excels in capturing finer-grained causal relationships or distributional properties.
- The trade-off between the two methods highlights a potential design choice: BELM for group-level robustness, DDIM for individual-level or mechanistic precision.
- **Notable anomaly**: BELM’s lower PEHE score (0.766) is significantly better than DDIM’s (1.376), indicating a stark difference in individual-level performance.
### Spatial Grounding
- **Legend**: Top-right corner, clearly associating colors with methods.
- **Subplot Layout**: 2x2 grid, with each metric’s title positioned above its respective chart.
- **Bar Colors**: Blue (DDIM) and green (BELM) consistently match the legend.
### Content Details
- All numerical values are explicitly labeled on the bars.
- Error bars are visually distinct but lack exact numerical ranges in the image.
- No additional text or annotations beyond the provided labels.
### Final Notes
The chart provides a clear comparative analysis of BELM and DDIM across four robustness metrics. The results suggest context-dependent performance, with no single method dominating all categories. Further investigation into error bar ranges and statistical significance would strengthen conclusions.