## Chart: Training Time vs. Various Metrics
### Overview
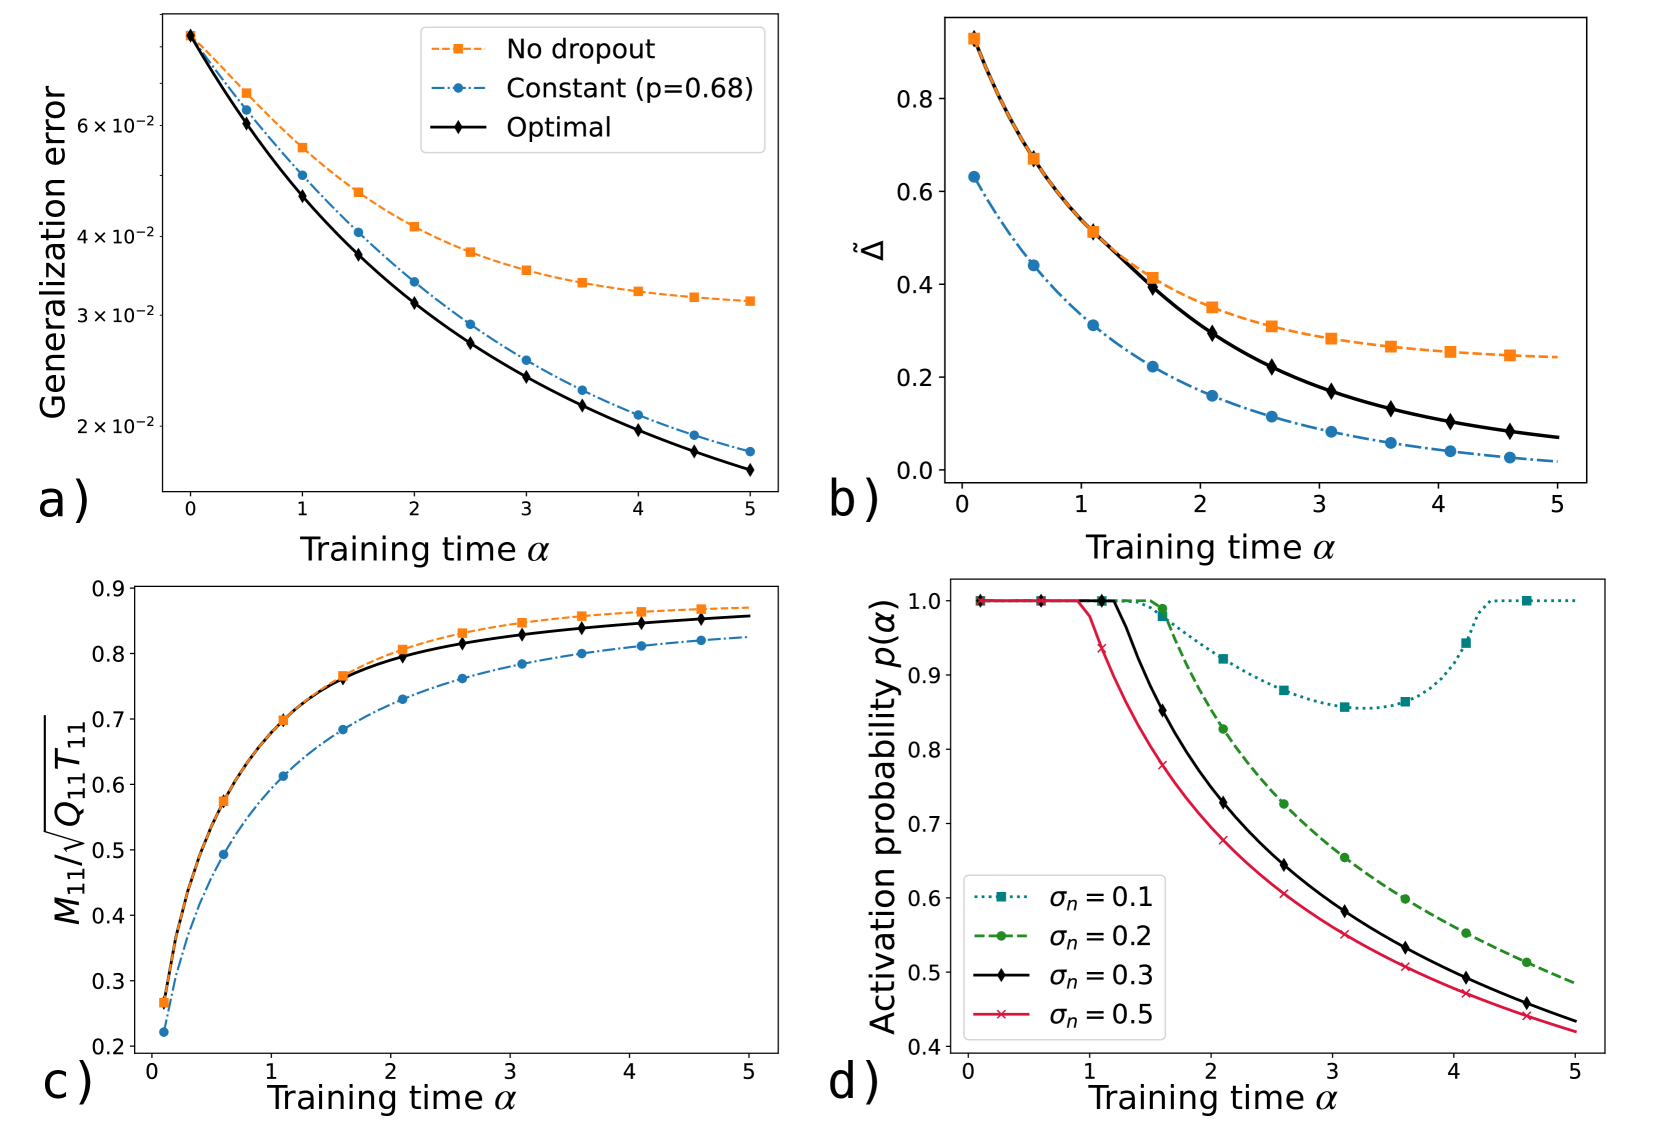
The image presents four line charts (a, b, c, d) that depict the relationship between training time (alpha) and different performance metrics or probabilities in a machine learning context. The charts explore the impact of dropout regularization and noise levels on generalization error, a measure of model performance (Delta), a ratio involving matrix elements (M11/sqrt(Q11*T11)), and activation probability.
### Components/Axes
**Chart a)**
* **Title:** Generalization error vs. Training time
* **X-axis:** Training time α (values: 0 to 5, incrementing by 1)
* **Y-axis:** Generalization error (values: 2 x 10^-2 to 6 x 10^-2, incrementing by 1 x 10^-2)
* **Legend:**
* Orange dashed line with square markers: No dropout
* Blue dashed-dotted line with circle markers: Constant (p=0.68)
* Black solid line with diamond markers: Optimal
**Chart b)**
* **Title:** Delta vs. Training time
* **X-axis:** Training time α (values: 0 to 5, incrementing by 1)
* **Y-axis:** Δ̃ (values: 0.0 to 0.8, incrementing by 0.2)
* **Legend:** (Same as Chart a)
* Orange dashed line with square markers: No dropout
* Blue dashed-dotted line with circle markers: Constant (p=0.68)
* Black solid line with diamond markers: Optimal
**Chart c)**
* **Title:** M11/sqrt(Q11\*T11) vs. Training time
* **X-axis:** Training time α (values: 0 to 5, incrementing by 1)
* **Y-axis:** M11/√(Q11\*T11) (values: 0.2 to 0.9, incrementing by 0.1)
* **Legend:** (Same as Chart a)
* Orange dashed line with square markers: No dropout
* Blue dashed-dotted line with circle markers: Constant (p=0.68)
* Black solid line with diamond markers: Optimal
**Chart d)**
* **Title:** Activation probability p(α) vs. Training time
* **X-axis:** Training time α (values: 0 to 5, incrementing by 1)
* **Y-axis:** Activation probability p(α) (values: 0.4 to 1.0, incrementing by 0.1)
* **Legend:**
* Teal dotted line with square markers: σn = 0.1
* Green dashed line with circle markers: σn = 0.2
* Black solid line with diamond markers: σn = 0.3
* Red line with x markers: σn = 0.5
### Detailed Analysis
**Chart a) Generalization Error**
* **No dropout (orange):** The generalization error decreases rapidly from approximately 6.8e-2 at α=0 to approximately 3.2e-2 at α=5.
* **Constant (p=0.68) (blue):** The generalization error decreases from approximately 6.3e-2 at α=0 to approximately 1.6e-2 at α=5.
* **Optimal (black):** The generalization error decreases from approximately 6.8e-2 at α=0 to approximately 1.4e-2 at α=5.
**Chart b) Delta**
* **No dropout (orange):** Delta decreases from approximately 0.88 at α=0 to approximately 0.25 at α=5.
* **Constant (p=0.68) (blue):** Delta decreases from approximately 0.63 at α=0 to approximately 0.08 at α=5.
* **Optimal (black):** Delta decreases from approximately 0.88 at α=0 to approximately 0.07 at α=5.
**Chart c) M11/sqrt(Q11\*T11)**
* **No dropout (orange):** The ratio increases from approximately 0.27 at α=0 to approximately 0.87 at α=5.
* **Constant (p=0.68) (blue):** The ratio increases from approximately 0.27 at α=0 to approximately 0.83 at α=5.
* **Optimal (black):** The ratio increases from approximately 0.27 at α=0 to approximately 0.86 at α=5.
**Chart d) Activation Probability**
* **σn = 0.1 (teal):** The activation probability remains at 1.0 until α=2, then decreases to approximately 0.86 at α=3.5, then increases back to 1.0 at α=5.
* **σn = 0.2 (green):** The activation probability remains at 1.0 until α=1, then decreases to approximately 0.58 at α=5.
* **σn = 0.3 (black):** The activation probability remains at 1.0 until α=1, then decreases to approximately 0.43 at α=5.
* **σn = 0.5 (red):** The activation probability remains at 1.0 until α=0.5, then decreases to approximately 0.43 at α=5.
### Key Observations
* In charts a, b, and c, the "Optimal" configuration generally performs best or is very close to the best, followed by "No dropout," and then "Constant (p=0.68)."
* In chart d, higher noise levels (σn) lead to a more rapid decrease in activation probability as training time increases.
### Interpretation
The charts suggest that the "Optimal" configuration, likely referring to an optimized dropout strategy, consistently achieves the lowest generalization error and delta, while maximizing the ratio M11/sqrt(Q11\*T11). This indicates that a well-tuned dropout strategy can significantly improve model performance. The activation probability plots show how different noise levels affect the activation of neurons during training. Higher noise levels cause neurons to deactivate more quickly, potentially influencing the model's learning dynamics and generalization ability. The data suggests that finding the right balance of dropout and noise is crucial for optimizing model performance.