## Grid Diagram: Numbered Cell Pathway with Directional Arrows
### Overview
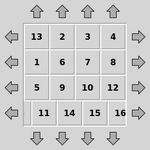
The image depicts a 4x4 grid of numbered cells (1–16) surrounded by directional arrows. The grid is arranged in a non-sequential numerical order, with arrows on the perimeter indicating movement directions (up, down, left, right). The numbers are distributed unevenly across the grid, suggesting a specific traversal pattern or puzzle logic.
### Components/Axes
- **Grid Structure**:
- 4 rows and 4 columns of cells.
- Numbers 1–16 are placed in a non-linear sequence:
- Row 1: 13, 2, 3, 4
- Row 2: 1, 6, 7, 8
- Row 3: 5, 9, 10, 12
- Row 4: 11, 14, 15, 16
- **Directional Arrows**:
- **Top Row**: Arrows point **upward** (above each cell).
- **Left Column**: Arrows point **leftward** (to the left of each cell).
- **Right Column**: Arrows point **rightward** (to the right of each cell).
- **Bottom Row**: Arrows point **downward** (below each cell).
### Detailed Analysis
- **Number Placement**:
- The numbers 1–16 are distributed in a way that does not follow a simple row-wise or column-wise order. For example:
- The top-left cell contains **13**, while the bottom-right cell contains **16**.
- The number **1** is located in the second row, first column.
- The sequence appears to form a spiral-like pattern starting from the top-left (13) and moving inward, but with irregularities (e.g., 1 is placed below 13).
- **Arrow Directions**:
- Arrows on the grid’s perimeter suggest movement constraints. For example:
- Cells on the top row (13, 2, 3, 4) have upward arrows, implying movement toward the grid’s interior.
- Cells on the bottom row (11, 14, 15, 16) have downward arrows, suggesting movement toward the grid’s center.
- The left and right columns have arrows pointing outward, potentially indicating boundaries or exits.
### Key Observations
1. **Non-Sequential Numbering**: The numbers 1–16 are not arranged in a standard grid order (e.g., 1–4 in the first row, 5–8 in the second). This suggests a custom traversal logic.
2. **Arrow Consistency**: All perimeter arrows point outward, creating a closed loop around the grid. This may imply that movement is restricted to the grid’s interior.
3. **Potential Path**: A possible path could start at **13** (top-left), move right to **2**, **3**, **4**, then down to **8**, **12**, **16**, left to **15**, **14**, **11**, up to **5**, **9**, and finally to **1**. However, this path does not strictly follow the arrows, as some movements (e.g., from 4 to 8) require diagonal steps, which are not indicated by the arrows.
### Interpretation
This diagram likely represents a **pathfinding puzzle** or **movement constraint system**. The arrows on the perimeter define allowed directions for traversal, while the numbers may represent steps or positions in a sequence. The non-sequential numbering could indicate a challenge where the solver must navigate the grid using the arrows to reach a target (e.g., 16) or complete a circuit.
- **Notable Anomalies**:
- The number **1** is placed in the second row, first column, which breaks the expected spiral pattern.
- The number **12** in the third row, fourth column is adjacent to **10** and **8**, but its position does not align with a clear directional flow.
- **Underlying Logic**:
The arrows suggest that movement is constrained to the grid’s edges, requiring the solver to "hug" the perimeter. The numbers may represent a hidden sequence or a checksum for validation. For example, the sum of numbers in each row or column could follow a pattern, but this is not immediately evident.
This diagram could be used in contexts such as algorithm design (e.g., maze-solving), puzzle games, or instructional materials for spatial reasoning. The lack of explicit labels or legends leaves the exact purpose open to interpretation, but the directional arrows and numbered cells strongly imply a focus on movement and sequencing.