\n
## Logic Puzzle Grid: Number Placement Puzzle
### Overview
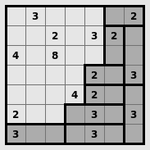
The image displays a 9x9 grid-based logic puzzle, similar in structure to a Sudoku or Kakuro puzzle. The grid contains a mix of numbered cells and shaded (gray) cells. The numbers appear to be clues or given values placed in specific cells, while the shaded cells likely represent barriers or separators that define regions or blocks within the puzzle. There are no explicit axis labels, titles, or legends; the puzzle's rules are implied by its structure.
### Components/Axes
* **Grid Structure:** A 9x9 square grid, divided into 81 individual cells.
* **Cell Content:** Cells contain either a single digit (2, 3, 4, or 8) or are shaded gray. Some cells are empty (white with no number).
* **Spatial Layout:** The grid is presented without any external labels, titles, or a legend. The shading pattern is the primary visual element defining the puzzle's internal structure.
### Detailed Analysis
The grid is analyzed row by row, from top to bottom. The position is described using (Row, Column) coordinates, where Row 1 is the top row and Column 1 is the leftmost column.
**Row 1:** (1,1): Empty | (1,2): **3** | (1,3): Empty | (1,4): Empty | (1,5): Empty | (1,6): Empty | (1,7): **Shaded** | (1,8): Empty | (1,9): **2**
**Row 2:** (2,1): Empty | (2,2): Empty | (2,3): Empty | (2,4): **2** | (2,5): Empty | (2,6): **3** | (2,7): **2** | (2,8): **Shaded** | (2,9): Empty
**Row 3:** (3,1): **4** | (3,2): Empty | (3,3): **8** | (3,4): Empty | (3,5): Empty | (3,6): Empty | (3,7): **Shaded** | (3,8): **Shaded** | (3,9): **Shaded**
**Row 4:** (4,1): Empty | (4,2): Empty | (4,3): Empty | (4,4): Empty | (4,5): Empty | (4,6): Empty | (4,7): **Shaded** | (4,8): **2** | (4,9): **3**
**Row 5:** (5,1): Empty | (5,2): Empty | (5,3): Empty | (5,4): Empty | (5,5): Empty | (5,6): **2** | (5,7): **Shaded** | (5,8): **Shaded** | (5,9): **Shaded**
**Row 6:** (6,1): Empty | (6,2): Empty | (6,3): Empty | (6,4): Empty | (6,5): **4** | (6,6): **2** | (6,7): **Shaded** | (6,8): **Shaded** | (6,9): **3**
**Row 7:** (7,1): **2** | (7,2): Empty | (7,3): Empty | (7,4): Empty | (7,5): **Shaded** | (7,6): **Shaded** | (7,7): **Shaded** | (7,8): **Shaded** | (7,9): **3**
**Row 8:** (8,1): **3** | (8,2): **Shaded** | (8,3): **Shaded** | (8,4): **Shaded** | (8,5): **Shaded** | (8,6): **3** | (8,7): **Shaded** | (8,8): **Shaded** | (8,9): **Shaded**
**Row 9:** (9,1): **Shaded** | (9,2): **Shaded** | (9,3): **Shaded** | (9,4): **Shaded** | (9,5): **Shaded** | (9,6): **3** | (9,7): **Shaded** | (9,8): **Shaded** | (9,9): **Shaded**
**Summary of Given Numbers:**
* **2:** Found at (1,9), (2,4), (2,7), (4,8), (5,6), (6,6), (7,1).
* **3:** Found at (1,2), (2,6), (4,9), (6,9), (7,9), (8,6), (9,6).
* **4:** Found at (3,1), (6,5).
* **8:** Found at (3,3).
**Shading Pattern:** The shaded cells form a continuous, connected region primarily in the bottom-right quadrant of the grid, extending upwards along the rightmost column and leftwards along the bottom rows. This creates a large, irregular "L" or staircase-shaped block. The top-left 6x6 area of the grid is mostly unshaded, containing all the given numbers.
### Key Observations
1. **Clustering of Numbers:** All given numbers are located within the unshaded (white) region of the grid, specifically in the top-left 6x6 area. No numbers appear in the shaded region.
2. **Shading as a Barrier:** The shaded cells appear to act as a single, contiguous barrier or wall, separating the grid into at least two distinct zones: the active puzzle area (top-left) and the inactive/shaded area (bottom-right).
3. **Number Distribution:** The numbers 2 and 3 are the most common clues. The numbers 4 and 8 appear only once each. The highest number, 8, is placed in a central position within the active area (Row 3, Column 3).
4. **Potential Puzzle Type:** The structure strongly suggests a "Fillomino" or "Nurikabe" style puzzle. In such puzzles, the goal is often to fill the unshaded cells with numbers such that connected groups of cells containing the same number form regions (polyominoes) of a size equal to that number. The shaded cells typically represent the "sea" or non-numbered area.
### Interpretation
This image presents the **initial state or clue set** for a logic puzzle. The data (the placed numbers and the shading pattern) defines the puzzle's constraints.
* **What it demonstrates:** The puzzle provides a starting configuration. The solver must use the given numbers and the shading pattern to deduce the correct number for every unshaded cell, following specific rules (not provided in the image but implied by the genre).
* **Relationship between elements:** The numbers are the primary clues. The shading defines the boundaries of the playable area and likely dictates that numbers cannot be placed there. The spatial relationship between numbers (e.g., the 8 at (3,3) is surrounded by empty cells) is critical for logical deduction.
* **Notable patterns/anomalies:** The most significant pattern is the strict separation of clues and shading. There are no numbers in the shaded zone, and the shading forms one unbroken mass. This is a common and intentional design in such puzzles to create a solvable logical path. The placement of the single '8' is a key anchor point, as it will require a large connected region of eight cells, heavily influencing the solution in the top-left quadrant.
**In essence, the image does not show a chart of data trends but rather a logical problem statement. The "information" is the set of constraints (clues and barriers) from which a unique solution must be derived.**