\n
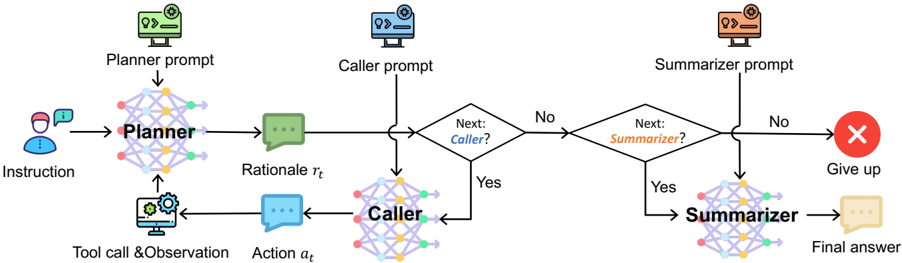
## Diagram: ReAct Agent Workflow
### Overview
The image depicts a diagram illustrating the workflow of a ReAct (Reason + Act) agent, a type of AI agent that iteratively reasons and acts to solve a task. The diagram shows a sequence of components – Planner, Caller, and Summarizer – connected by arrows indicating the flow of information and control. Decision points are represented by diamond shapes.
### Components/Axes
The diagram consists of the following components:
* **Instruction:** Input to the system, represented by a person icon with a speech bubble.
* **Planner:** A component represented by a head icon with a network of nodes, receiving the instruction and generating a rationale (r<sub>t</sub>).
* **Rationale (r<sub>t</sub>):** Output from the Planner, represented by a speech bubble.
* **Caller:** A component represented by a phone icon with a network of nodes, receiving the rationale and generating an action (a<sub>t</sub>).
* **Action (a<sub>t</sub>):** Output from the Caller, represented by a speech bubble.
* **Tool call & Observation:** Feedback loop from the environment, represented by a computer icon with gears.
* **Summarizer:** A component represented by a person icon with a document, receiving information and generating a final answer.
* **Final answer:** Output from the Summarizer, represented by a speech bubble.
* **Decision Points:** Diamond shapes labeled "Next: Caller?" and "Next: Summarizer?".
* **Termination:** A red "X" symbol indicating the agent gives up.
* **Prompts:** Labels above the components indicating the type of prompt used: "Planner prompt", "Caller prompt", "Summarizer prompt".
### Detailed Analysis / Content Details
The diagram illustrates a cyclical process.
1. The process begins with an **Instruction** being fed into the **Planner**.
2. The **Planner** generates a **Rationale (r<sub>t</sub>)**.
3. The **Rationale** is passed to the **Caller**.
4. The **Caller** generates an **Action (a<sub>t</sub>)**.
5. The **Action** interacts with the environment via **Tool call & Observation**, providing feedback to the **Planner**.
6. A decision point asks: "Next: Caller?".
* If "Yes", the process loops back to the **Caller**.
* If "No", the process moves to the next decision point.
7. The next decision point asks: "Next: Summarizer?".
* If "Yes", the process moves to the **Summarizer**.
* If "No", the process terminates with a "Give up" signal.
8. The **Summarizer** generates a **Final answer**.
### Key Observations
The diagram highlights the iterative nature of the ReAct agent. The agent continuously plans, acts, observes, and refines its actions based on the feedback received from the environment. The decision points allow the agent to determine whether to continue calling tools or to summarize the results and provide a final answer. The "Give up" signal indicates a mechanism for handling situations where the agent cannot find a solution.
### Interpretation
This diagram demonstrates a control flow for an AI agent designed to solve complex tasks through iterative reasoning and action. The ReAct framework allows the agent to dynamically adapt its strategy based on the results of its actions. The loop between the Caller and Planner, driven by Tool call & Observation, is crucial for exploration and learning. The decision points represent the agent's ability to assess its progress and determine the next best course of action. The inclusion of a "Give up" mechanism suggests a practical consideration for handling unsolvable or intractable problems. The diagram effectively visualizes the interplay between reasoning, acting, and observing, which are the core principles of the ReAct approach. The prompts above each component indicate the type of input each module receives, suggesting a modular design.