\n
## Diagram: 10x10 Number Grid Puzzle (Likely Kakuro or Similar)
### Overview
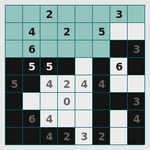
The image displays a 10x10 grid-based number puzzle, resembling a Kakuro or cross-sum puzzle. The grid contains a mix of empty white cells, light blue shaded cells, and black shaded cells. Numerical digits are placed within some of the white cells. There are no explicit axis labels, titles, or legends, as this is a puzzle grid rather than a data chart.
### Components/Axes
* **Grid Structure:** A 10-row by 10-column grid.
* **Cell Types:**
* **White Cells:** Contain numbers or are empty. These are the primary input cells.
* **Light Blue Shaded Cells:** Form a contiguous block in the top-left quadrant (Rows 1-4, Columns 1-6, with some interruptions). These typically act as separators or non-playable areas in such puzzles.
* **Black Shaded Cells:** Scattered throughout the grid, often forming barriers or defining the boundaries of number runs. Notable clusters are in the bottom-left (Rows 6-10, Columns 1-2) and right side (Rows 3-10, Columns 9-10).
* **Numerical Data:** Digits (0-9) are present in specific white cells. Their positions are detailed below.
### Detailed Analysis
**Spatial Layout of Numbers:**
The numbers are distributed across the grid. The following table lists each visible number by its approximate row and column position (Row 1 is the top row, Column 1 is the leftmost column).
| Row | Column | Number |
| :-- | :----- | :----- |
| 1 | 3 | 2 |
| 1 | 8 | 3 |
| 2 | 2 | 4 |
| 2 | 4 | 2 |
| 2 | 7 | 5 |
| 3 | 2 | 6 |
| 3 | 6 | 5 |
| 3 | 10 | 3 |
| 4 | 2 | 5 |
| 4 | 3 | 5 |
| 4 | 8 | 6 |
| 5 | 1 | 5 |
| 5 | 4 | 2 |
| 5 | 5 | 4 |
| 5 | 6 | 4 |
| 6 | 1 | 2 |
| 6 | 4 | 0 |
| 6 | 9 | 3 |
| 7 | 2 | 6 |
| 7 | 10 | 4 |
| 8 | 3 | 4 |
| 9 | 4 | 2 |
| 9 | 6 | 3 |
| 9 | 8 | 2 |
| 10 | 3 | 4 |
| 10 | 5 | 2 |
| 10 | 7 | 3 |
| 10 | 9 | 4 |
**Shaded Region Analysis:**
* **Light Blue Block:** Occupies a large area from (Row 1, Col 1) to (Row 4, Col 6), but is not a perfect rectangle. It is interrupted by white cells containing numbers at (1,3), (2,2), (2,4), (3,2), (4,2), and (4,3).
* **Black Cells:** Create distinct corridors and islands. For example, a vertical black bar runs down Column 10 from Row 3 to Row 10. Another cluster blocks the bottom-left corner.
### Key Observations
1. **Number Distribution:** Numbers are not randomly placed. They appear to be clustered in the central and right portions of the grid, avoiding the dense light blue block in the top-left.
2. **Digit Range:** The visible digits range from 0 to 6, with 2, 3, 4, 5, and 6 being most common. The single '0' at (6,4) is notable.
3. **Puzzle State:** The grid appears to be a puzzle in progress or a puzzle setup. Many white cells are empty, suggesting they are meant to be filled by the solver based on puzzle rules (e.g., sums for Kakuro).
4. **Structural Patterns:** The black and light blue cells create a complex network of isolated and connected white cell runs, which is characteristic of puzzles where numbers must sum to clues placed in the shaded cells.
### Interpretation
This image is a **technical diagram of a logic puzzle grid**, not a data chart. Therefore, it does not present empirical data or trends to interpret. Instead, its "information" is its structural configuration.
* **Purpose:** The grid defines the playing field for a number-placement puzzle. The shaded cells (light blue and black) are immutable barriers that define the "words" (runs of white cells) for which sums or other relationships must be satisfied.
* **Relationships:** The numbers currently placed in white cells are likely either given clues or partial solutions entered by a user. Their positions relative to the shaded barriers determine which puzzle rules apply to them (e.g., a number in a horizontal run must contribute to the sum for that run's clue).
* **Notable Anomaly:** The presence of a '0' at (Row 6, Column 4) is unusual for many number-sum puzzles, as they typically use positive integers. This could indicate a specific variant of the puzzle or an error in the puzzle's state.
* **Missing Information:** The critical "clue" numbers that would typically be printed inside the shaded cells (light blue or black) to indicate the target sums for adjacent runs are **not visible** in this image. Without these clues, the puzzle is unsolvable, and the placed numbers lack context. The image shows the grid's skeleton and some filled cells, but not the complete rule set required to solve it.
**Conclusion:** The image provides a complete spatial map of a 10x10 puzzle grid's layout, including all barrier positions and currently entered digits. However, it lacks the essential clue data that would allow one to deduce the puzzle's rules or verify the correctness of the placed numbers. It is a snapshot of a puzzle's structure, not a self-contained dataset.