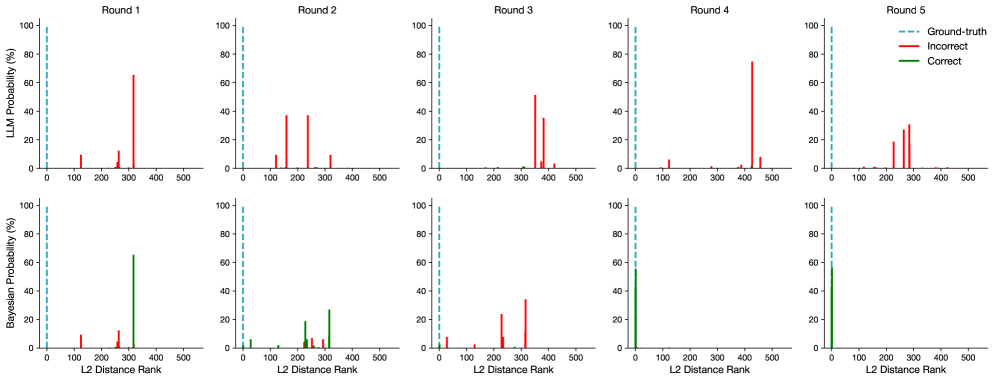
## Bar Chart Grid: LLM vs. Bayesian Probability by Round
### Overview
The image displays a 2x5 grid of bar charts comparing the performance of two models—LLM (top row) and Bayesian (bottom row)—across five sequential rounds (Round 1 to Round 5). Each chart plots probability percentages against the "L2 Distance Rank" of predictions. A legend identifies three data series: a dashed blue line for "Ground-truth," red bars for "Incorrect" predictions, and green bars for "Correct" predictions. The overall visualization appears to track how each model's prediction accuracy and confidence (as probability) evolve relative to the ground truth rank over multiple rounds.
### Components/Axes
* **Layout:** Two rows, five columns. Each column represents a round (1-5).
* **Y-Axis (Top Row):** Labeled "LLM Probability (%)". Scale ranges from 0 to 100 in increments of 20.
* **Y-Axis (Bottom Row):** Labeled "Bayesian Probability (%)". Scale ranges from 0 to 100 in increments of 20.
* **X-Axis (All Charts):** Labeled "L2 Distance Rank". Scale ranges from 0 to 500 in increments of 100.
* **Legend:** Positioned in the top-right corner of the entire figure.
* `--- Ground-truth` (Dashed blue vertical line)
* `— Incorrect` (Solid red bar)
* `— Correct` (Solid green bar)
* **Titles:** Each column is titled "Round 1", "Round 2", "Round 3", "Round 4", "Round 5" at the top of the respective column.
### Detailed Analysis
**Top Row (LLM Probability):**
* **Round 1:** One prominent red bar at approximately L2 Rank 300 with a height of ~65%. A smaller red bar is near rank 100 (~10%). No green bars are visible.
* **Round 2:** Two prominent red bars: one near rank 150 (~38%) and another near rank 200 (~38%). Smaller red bars appear near ranks 100 and 300. No green bars.
* **Round 3:** Two prominent red bars: one near rank 350 (~52%) and another near rank 380 (~35%). Smaller red bars near ranks 300 and 400. No green bars.
* **Round 4:** One very tall red bar near rank 420 (~75%). A smaller red bar near rank 100 (~8%). No green bars.
* **Round 5:** Two prominent red bars: one near rank 250 (~20%) and another near rank 280 (~30%). Smaller red bars near ranks 200 and 300. No green bars.
**Bottom Row (Bayesian Probability):**
* **Round 1:** One prominent green bar at approximately L2 Rank 300 with a height of ~65%. A smaller red bar is near rank 100 (~10%).
* **Round 2:** Multiple green bars: a cluster between ranks 200-300, with the tallest near rank 250 (~20%) and another near rank 300 (~28%). Several small red bars are also present in the same rank range.
* **Round 3:** Two prominent red bars: one near rank 250 (~22%) and another near rank 300 (~35%). Smaller red bars near ranks 0 and 100. No green bars.
* **Round 4:** One prominent green bar at rank 0 (the ground-truth line) with a height of ~55%. No red bars are visible.
* **Round 5:** One prominent green bar at rank 0 with a height of ~58%. No red bars are visible.
**Ground-Truth Line:** In all ten charts, a dashed blue vertical line is consistently positioned at L2 Distance Rank = 0.
### Key Observations
1. **Model Performance Divergence:** The LLM model (top row) shows exclusively incorrect predictions (red bars) across all five rounds. The Bayesian model (bottom row) shows a mix of incorrect and correct predictions in early rounds (1-3) but transitions to exclusively correct predictions (green bars) at the ground-truth rank (0) in Rounds 4 and 5.
2. **Trend in Bayesian Model:** The Bayesian model demonstrates a clear trend of improvement. Its correct predictions shift from being at a high L2 rank (~300 in Round 1) to being perfectly aligned with the ground truth (rank 0) by Round 4, maintaining this in Round 5.
3. **Trend in LLM Model:** The LLM model shows no correct predictions. The rank and probability of its incorrect predictions fluctuate across rounds without a clear improving trend.
4. **Probability Magnitude:** The highest probability assigned by the LLM to an incorrect prediction is ~75% (Round 4). The highest probability assigned by the Bayesian model to a correct prediction is ~65% (Round 1), later settling at ~55-58% for perfect-rank predictions.
### Interpretation
This visualization likely compares the calibration and accuracy of a Large Language Model (LLM) and a Bayesian model on a task where the correct answer corresponds to a low "L2 Distance Rank" (ideally 0). The data suggests a significant difference in learning or adaptation between the two models over sequential rounds.
* **The Bayesian model appears to learn effectively.** Its progression from high-rank correct predictions to perfect-rank correct predictions indicates it is successfully refining its internal parameters or beliefs to align with the ground truth. The presence of both red and green bars in early rounds suggests initial uncertainty that resolves over time.
* **The LLM model shows no evidence of learning this specific metric.** Its consistent assignment of high probability to incorrect, high-rank answers implies a fundamental misalignment between its output distribution and the ground truth for this task. It may be confidently wrong, a known issue with some LLMs.
* **The "L2 Distance Rank" is a critical metric.** It quantifies how far a model's top prediction is from the correct answer in some embedding space. A rank of 0 means the model's top choice is the ground truth. The Bayesian model achieves this; the LLM does not.
* **The charts demonstrate model calibration vs. accuracy.** The LLM assigns high probability (confidence) to wrong answers, indicating poor calibration for this task. The Bayesian model's confidence (probability) for its correct answers is moderate (~55-65%), which may reflect appropriate uncertainty.
In summary, the image provides strong visual evidence that for the evaluated task and metric, the Bayesian model adapts and becomes accurate over time, while the LLM remains persistently and confidently incorrect. This could inform model selection for sequential decision-making or ranking tasks where ground truth alignment is crucial.