TECHNICAL ASSET FINGERPRINT
97278de7088919ff1a9a8559
Click to view fullscreen
Press ESC or click to close
FOUND IN PAPERS
EXPERT: healer-alpha-free VERSION 1
RUNTIME: free/openrouter/healer-alpha
INTEL_VERIFIED
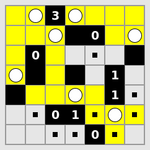
## Logic Puzzle Grid: 10x10 Nonogram or Similar Grid Puzzle
### Overview
The image displays a 10x10 grid-based logic puzzle, likely a nonogram (also known as picross, griddlers, or picture logic puzzles). The grid contains cells filled with three distinct colors: black, white, and yellow. Some white cells contain numbers or symbols. The puzzle appears to be in a partially solved or instructional state, with yellow highlighting indicating a specific focus or selection.
### Components/Axes
* **Grid Structure:** A 10x10 square grid. Rows are numbered implicitly from top to bottom (1-10), and columns from left to right (1-10).
* **Clue Numbers:** Numerical clues are present along the top and left edges of the grid, which are standard for nonograms.
* **Top Edge (Column Clues):** Above column 3, the number `3` is visible. Above column 6, the number `0` is visible. Other column clues are not fully visible or are obscured.
* **Left Edge (Row Clues):** To the left of row 3, the number `0` is visible. To the left of row 5, the number `1` is visible. To the left of row 7, the number `0` is visible. To the left of row 9, the number `0` is visible. Other row clues are not fully visible.
* **Cell States:**
* **Black Cells:** Represent filled or "on" cells in the puzzle solution.
* **White Cells:** Represent empty or "off" cells. Some contain embedded symbols.
* **Yellow Cells:** Highlight a specific region or pattern within the grid. This is likely an annotation or a step in the solving process, not part of the final puzzle state.
* **Embedded Symbols (within white cells):**
* **Numbers:** The digit `1` appears in multiple cells.
* **Circles:** Both filled (●) and outlined (○) circles appear.
* **Small Squares:** Filled black squares (■) appear in several cells.
### Detailed Analysis
**Spatial Grounding & Component Isolation:**
The grid is processed as a whole. The yellow highlighting forms a connected, snake-like path.
**Row-by-Row Content (from top to bottom):**
* **Row 1:** Cells (1,2)=Yellow, (1,3)=White with `3` and ○, (1,4)=Yellow, (1,5)=White with ○, (1,6)=Yellow, (1,7)=Black, (1,8)=White with `0`, (1,9)=Yellow, (1,10)=White with ○.
* **Row 2:** Cells (2,1)=Yellow, (2,2)=White with `0`, (2,3)=Black, (2,4)=Black, (2,5)=Yellow, (2,6)=Black, (2,7)=Yellow, (2,8)=Black, (2,9)=White, (2,10)=Yellow.
* **Row 3:** (Left clue: `0`) Cells (3,1)=White with ○, (3,2)=Yellow, (3,3)=White, (3,4)=Yellow, (3,5)=Black, (3,6)=Yellow, (3,7)=White with `1`, (3,8)=Yellow, (3,9)=Black, (3,10)=White.
* **Row 4:** Cells (4,1)=Black, (4,2)=Black, (4,3)=Yellow, (4,4)=White, (4,5)=Yellow, (4,6)=White with ■, (4,7)=Yellow, (4,8)=White with `1`, (4,9)=Yellow, (4,10)=Black.
* **Row 5:** (Left clue: `1`) Cells (5,1)=Yellow, (5,2)=White, (5,3)=Black, (5,4)=Yellow, (5,5)=White with ○, (5,6)=Yellow, (5,7)=White, (5,8)=Yellow, (5,9)=White with ■, (5,10)=Yellow.
* **Row 6:** Cells (6,1)=White, (6,2)=Yellow, (6,3)=Yellow, (6,4)=Black, (6,5)=Yellow, (6,6)=Black, (6,7)=Yellow, (6,8)=White with `1`, (6,9)=Yellow, (6,10)=White with ■.
* **Row 7:** (Left clue: `0`) Cells (7,1)=Yellow, (7,2)=White with ■, (7,3)=White, (7,4)=Yellow, (7,5)=Black, (7,6)=Yellow, (7,7)=White with ○, (7,8)=Yellow, (7,9)=White with ■, (7,10)=Yellow.
* **Row 8:** Cells (8,1)=White, (8,2)=Black, (8,3)=Yellow, (8,4)=White with ■, (8,5)=Yellow, (8,6)=White with ■, (8,7)=Yellow, (8,8)=Black, (8,9)=White, (8,10)=Black.
* **Row 9:** (Left clue: `0`) Cells (9,1)=Black, (9,2)=Yellow, (9,3)=White with ■, (9,4)=Yellow, (9,5)=White with ■, (9,6)=Yellow, (9,7)=Black, (9,8)=Yellow, (9,9)=Black, (9,10)=White.
* **Row 10:** Cells (10,1)=White, (10,2)=White, (10,3)=Yellow, (10,4)=White with ■, (10,5)=Yellow, (10,6)=White with ■, (10,7)=Yellow, (10,8)=White with ■, (10,9)=Yellow, (10,10)=White.
**Trend Verification (Yellow Path):** The yellow cells form a continuous, winding path that starts near the top-left, moves right, snakes down through the center, and ends near the bottom-right. It does not follow a simple linear trend but connects specific cells.
### Key Observations
1. **Symbol Distribution:** The number `1` appears exclusively in white cells within the yellow path (rows 3, 4, 6). The number `0` appears in white cells both inside and outside the path.
2. **Circle Placement:** Outlined circles (○) are found in white cells at positions (1,3), (1,5), (1,10), (3,1), (5,5), and (7,7). All are within the yellow-highlighted region.
3. **Square Placement:** Small black squares (■) are found in white cells at (4,6), (5,9), (6,10), (7,2), (7,9), (8,4), (8,6), (9,3), (9,5), (10,4), (10,6), (10,8). Most are within or adjacent to the yellow path.
4. **Puzzle State:** The presence of both clue numbers and solution elements (black cells) suggests this is a puzzle in progress. The yellow highlighting is likely an annotation showing a logical deduction, a "chain" of cells, or a region being analyzed.
### Interpretation
This image represents a snapshot of a logical deduction process within a grid-based puzzle. The yellow highlighting is the most significant analytical element. It likely traces a **"chain" or "inference path"**—a common advanced technique in puzzles like nonograms or Sudoku.
* **What the Data Suggests:** The solver has identified a sequence of cells (the yellow path) where the state of one cell (e.g., being filled/black) logically forces the state of the next cell in the chain. The embedded numbers (`0`, `1`) and symbols (○, ■) within the path are probably **annotations or markers** used by the solver to track this logic. For example, a `1` might mark a cell confirmed to be the first in a block, a `0` might mark a confirmed empty cell, and circles/squares could represent different types of constraints or conclusions.
* **Relationships:** The chain connects clues from different rows and columns. The path's winding nature shows how a deduction in one area of the grid propagates constraints to distant areas. The fact that the chain includes cells with different embedded symbols suggests it integrates multiple pieces of evidence.
* **Anomalies/Notable Points:** The chain is complex and non-linear, indicating a sophisticated level of puzzle-solving. The absence of numbers in some highlighted cells implies those cells' states are inferred purely from positional logic relative to other cells in the chain. This image is less about the final solution and more about **visualizing the meta-logic** used to arrive at it. It serves as a technical diagram of a reasoning process.
DECODING INTELLIGENCE...