## Matrix: Response Decision Framework
### Overview
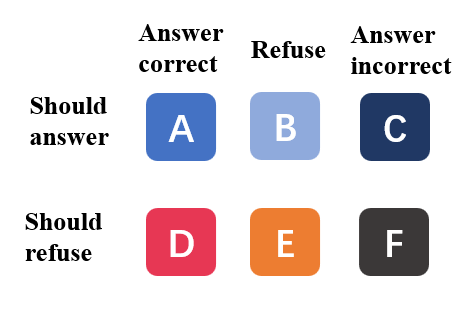
The image depicts a 2x3 categorical matrix organizing response strategies based on two dimensions:
1. **Vertical Axis**: "Should answer" (top row) vs "Should refuse" (bottom row)
2. **Horizontal Axis**: "Answer correct" (left column) vs "Refuse" (middle column) vs "Answer incorrect" (right column)
Each cell contains a letter (A-F) and a distinct color, representing specific decision outcomes.
### Components/Axes
- **Rows**:
- Top: "Should answer"
- Bottom: "Should refuse"
- **Columns**:
- Left: "Answer correct"
- Middle: "Refuse"
- Right: "Answer incorrect"
- **Cells**:
- **A**: Blue square with "A" (top-left)
- **B**: Light blue square with "B" (top-middle)
- **C**: Dark blue square with "C" (top-right)
- **D**: Red square with "D" (bottom-left)
- **E**: Orange square with "E" (bottom-middle)
- **F**: Black square with "F" (bottom-right)
### Detailed Analysis
- **Top Row ("Should answer")**:
- **A**: Correct answers trigger a response (blue).
- **B**: Refuse scenarios under "Should answer" (light blue).
- **C**: Incorrect answers under "Should answer" (dark blue).
- **Bottom Row ("Should refuse")**:
- **D**: Correct answers under "Should refuse" (red).
- **E**: Refuse scenarios under "Should refuse" (orange).
- **F**: Incorrect answers under "Should refuse" (black).
### Key Observations
1. **Color Coding**:
- Blue shades (A-C) dominate the "Should answer" row, suggesting prioritization of responsiveness.
- Warmer colors (D-F) in the "Should refuse" row may indicate higher stakes or error states.
2. **Diagonal Pattern**:
- Correct answers ("A") and refusals ("E") align with their respective rows, while mismatches (B, C, D, F) highlight decision conflicts.
3. **Ambiguity in Middle Column**:
- The "Refuse" column spans both rows, creating potential overlap in decision logic.
### Interpretation
This matrix appears to model a **decision-making system** for handling responses, likely in an AI or automated workflow context. Key insights:
- **Optimal Decisions**:
- Correct answers (A) and appropriate refusals (E) are clearly defined.
- **Error States**:
- **B** and **C** (top row) represent failures to refuse when incorrect answers should be withheld.
- **D** and **F** (bottom row) suggest incorrect refusals or responses to correct answers.
- **Design Implications**:
- The system may require refinement to reduce mismatches (e.g., improving accuracy to minimize **C** and **F**).
- The "Refuse" column’s dual presence in both rows indicates a need for clearer criteria to distinguish when refusal is appropriate.
This framework highlights trade-offs between responsiveness and caution, with color and position serving as visual cues for decision quality.