## Diagram: Comparison of Reasoning Approaches
### Overview
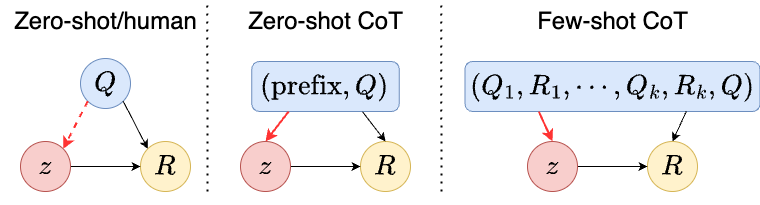
The image presents a comparative diagram illustrating three different approaches to reasoning: Zero-shot/human, Zero-shot Chain-of-Thought (CoT), and Few-shot CoT. Each approach is represented as a directed graph, showing the flow of information between different components.
### Components/Axes
* **Titles:**
* Left: "Zero-shot/human"
* Center: "Zero-shot CoT"
* Right: "Few-shot CoT"
* **Nodes:**
* Q: Represented as a blue circle, likely representing the initial question or input.
* z: Represented as a red circle, likely representing intermediate reasoning steps or latent variables.
* R: Represented as a yellow circle, likely representing the final answer or result.
* **Edges:**
* Solid black arrows: Represent direct dependencies or flow of information.
* Dashed red arrows: Represent a different type of dependency or flow, possibly indicating a less direct or more complex relationship.
* **Boxes:**
* Blue rounded boxes: Represent input prompts or context provided to the model.
* "(prefix, Q)" in the Zero-shot CoT diagram.
* "(Q1, R1, ..., Qk, Rk, Q)" in the Few-shot CoT diagram.
### Detailed Analysis
**1. Zero-shot/human:**
* A blue circle labeled "Q" is at the top.
* A red dashed arrow points from "Q" to a red circle labeled "z".
* A black arrow points from "Q" to a yellow circle labeled "R".
* A black arrow points from "z" to "R".
* Trend: The question "Q" directly influences both the intermediate reasoning "z" and the final answer "R". The intermediate reasoning "z" also influences the final answer "R".
**2. Zero-shot CoT:**
* A blue rounded box labeled "(prefix, Q)" is at the top.
* A red arrow points from "(prefix, Q)" to a red circle labeled "z".
* A black arrow points from "(prefix, Q)" to a yellow circle labeled "R".
* A black arrow points from "z" to "R".
* Trend: The prompt "(prefix, Q)" influences both the intermediate reasoning "z" and the final answer "R". The intermediate reasoning "z" also influences the final answer "R".
**3. Few-shot CoT:**
* A blue rounded box labeled "(Q1, R1, ..., Qk, Rk, Q)" is at the top.
* A red arrow points from "(Q1, R1, ..., Qk, Rk, Q)" to a red circle labeled "z".
* A black arrow points from "z" to a yellow circle labeled "R".
* Trend: The prompt "(Q1, R1, ..., Qk, Rk, Q)" influences the intermediate reasoning "z", which in turn influences the final answer "R".
### Key Observations
* The "Zero-shot/human" approach shows a direct influence of the question "Q" on both the intermediate reasoning "z" and the final answer "R".
* The "Zero-shot CoT" approach introduces a prefix to the question, influencing both the intermediate reasoning and the final answer.
* The "Few-shot CoT" approach uses a more complex prompt with multiple question-answer pairs to influence the intermediate reasoning, which then leads to the final answer.
* The intermediate reasoning step "z" always influences the final answer "R" in all three approaches.
### Interpretation
The diagram illustrates how different reasoning approaches leverage intermediate reasoning steps to arrive at a final answer. The "Zero-shot/human" approach represents a more direct reasoning process, while the "Zero-shot CoT" and "Few-shot CoT" approaches introduce prompts to guide the reasoning process. The "Few-shot CoT" approach, in particular, uses examples to improve the reasoning process. The diagram highlights the importance of intermediate reasoning steps in achieving accurate and reliable results. The red arrows indicate the initial influence of the prompt on the reasoning process, while the black arrows indicate the subsequent flow of information. The absence of a direct link from the prompt to the final answer in the "Few-shot CoT" approach suggests that the model relies more heavily on the intermediate reasoning steps to arrive at the final answer.