## Diagram: 4x4 Number Grid with Path
### Overview
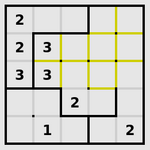
The image displays a 4x4 grid diagram, likely representing a logic puzzle or a pathfinding problem. The grid is subdivided into four 2x2 quadrants by thicker black lines. Some cells contain single-digit numbers (1, 2, or 3), while others are empty. A continuous yellow line traces a specific path through the grid, connecting certain cells.
### Components/Axes
* **Grid Structure:** A 4x4 square grid. The grid is further divided into four equal 2x2 subgrids (quadrants) by thicker black lines forming a cross in the center.
* **Cell Content:** Numbers are placed in specific cells. The numbers present are: 1, 2, and 3.
* **Path Element:** A solid yellow line of uniform thickness. It does not follow the grid lines but cuts through the centers of cells, forming a connected path.
### Detailed Analysis
**1. Grid Cell Content (by row, from top-left):**
* **Row 1:** Cell (1,1): `2` | Cell (1,2): Empty | Cell (1,3): Empty | Cell (1,4): Empty
* **Row 2:** Cell (2,1): `2` | Cell (2,2): `3` | Cell (2,3): Empty | Cell (2,4): Empty
* **Row 3:** Cell (3,1): `3` | Cell (3,2): `3` | Cell (3,3): `2` | Cell (3,4): Empty
* **Row 4:** Cell (4,1): Empty | Cell (4,2): `1` | Cell (4,3): Empty | Cell (4,4): `2`
**2. Yellow Path Description:**
The path is a single, continuous, non-branching line. Its trajectory is as follows:
* **Start:** The path begins in the top-right quadrant, specifically in the cell at Row 1, Column 3 (which is empty of a number).
* **Segment 1:** It travels vertically downward through the center of cell (1,3) into cell (2,3).
* **Segment 2:** It turns 90 degrees left (west) and travels horizontally through the center of cell (2,3) into cell (2,2), which contains the number `3`.
* **Segment 3:** It turns 90 degrees down (south) and travels vertically through the center of cell (2,2) into cell (3,2), which contains the number `3`.
* **Segment 4:** It turns 90 degrees right (east) and travels horizontally through the center of cell (3,2) into cell (3,3), which contains the number `2`.
* **Segment 5:** It turns 90 degrees up (north) and travels vertically through the center of cell (3,3) back into cell (2,3).
* **Segment 6:** It turns 90 degrees right (east) and travels horizontally through the center of cell (2,3) into cell (2,4).
* **End:** The path terminates in cell (2,4), which is empty.
**Path Summary:** The yellow line forms a closed loop or circuit that visits the sequence of cells: (1,3) -> (2,3) -> (2,2)[`3`] -> (3,2)[`3`] -> (3,3)[`2`] -> (2,3) -> (2,4). It notably passes through three numbered cells.
### Key Observations
1. **Number Distribution:** Numbers are only present in 7 of the 16 cells. The top-left 2x2 quadrant is the most densely populated (all four cells have numbers). The bottom-right quadrant has only one number.
2. **Number Values:** All numbers are low integers (1, 2, 3). The number `3` appears most frequently (three times), followed by `2` (three times), and `1` (once).
3. **Path and Numbers:** The yellow path deliberately intersects three numbered cells: two `3`s and one `2`. It does not touch the `1` or the other `2`s.
4. **Spatial Layout:** The path is confined to the top-right and center of the grid, avoiding the entire leftmost column and the bottom row except for the central cell (3,2).
### Interpretation
This diagram is characteristic of a **"Number Link" or "Flow Free" style logic puzzle**. The objective in such puzzles is typically to connect all pairs of matching numbers with a continuous, non-overlapping path that fills the entire grid or connects specific points.
* **What the Data Suggests:** The yellow line is likely the **solution path** for connecting the two `3`s and the `2` in the center. The path starts and ends in empty cells, which is unusual for standard Number Link (where paths start/end on numbers). This could indicate:
* A variant where the path must form a specific shape or loop.
* That the path shown is only a *segment* of a larger solution.
* That the empty start/end cells have an implied value or rule not visible in the static image.
* **Anomalies:** The presence of the isolated `1` in cell (4,2) and the `2` in cell (4,4) is notable. They are not connected by the yellow path. In a complete puzzle, they would likely need to be connected to their matching numbers (another `1` and `2`, respectively) by separate paths, but those matching numbers or paths are not shown. This implies the image captures an **intermediate state or a partial solution**.
* **Underlying Logic:** The puzzle's rules are not fully stated, but the visual evidence points to a constraint-based game where numbers act as terminals for paths, and the grid's subdivision into quadrants may impose additional rules (e.g., paths cannot cross quadrant borders, or must visit each quadrant). The yellow path's specific route suggests it is navigating around or through the numbered cells as required by the puzzle's logic.