TECHNICAL ASSET FINGERPRINT
ab52471f7908e69edeed554c
Click to view fullscreen
Press ESC or click to close
FOUND IN PAPERS
EXPERT: healer-alpha-free VERSION 1
RUNTIME: free/openrouter/healer-alpha
INTEL_VERIFIED
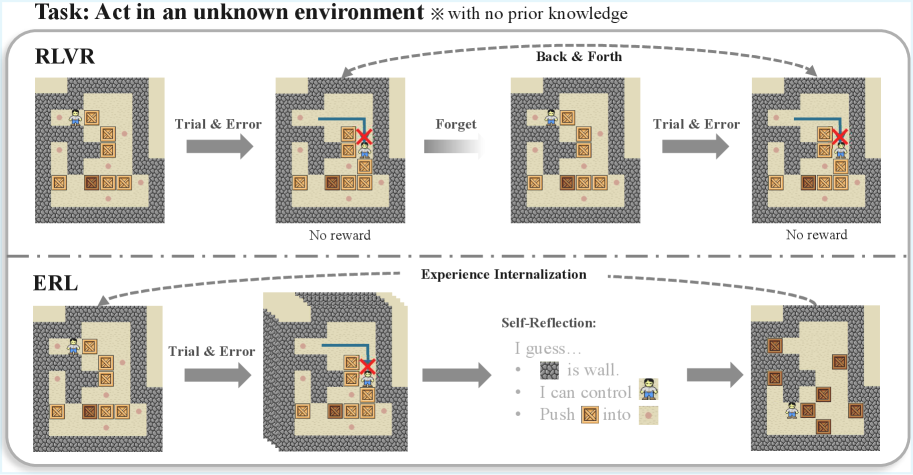
## Diagram: Comparison of RLVR and ERL Learning Paradigms in an Unknown Environment
### Overview
The image is a technical diagram comparing two learning paradigms—**RLVR** (Reinforcement Learning with Visual Representations, inferred) and **ERL** (Evolutionary Reinforcement Learning or a similar reflective variant, inferred)—applied to an agent acting in an unknown, grid-based environment. The diagram illustrates the process and outcome of each approach through sequential visual scenes and annotations. The overall task is defined at the top.
### Components/Axes
* **Header/Task Definition:** Text at the top reads: "Task: Act in an unknown environment ※ with no prior knowledge".
* **Main Sections:** The diagram is split horizontally by a dashed line into two primary sections:
* **Top Section:** Labeled **RLVR**.
* **Bottom Section:** Labeled **ERL**.
* **Visual Elements:** Each section contains a sequence of four grid-world screenshots. The environment consists of:
* **Walls:** Dark grey, textured blocks forming maze boundaries.
* **Floor:** Light beige tiles.
* **Agent:** A small human-like icon (blue shirt, brown hair).
* **Boxes:** Brown, square objects with a lighter square pattern on top.
* **Targets:** Small, pinkish-red dots on the floor.
* **Annotations & Flow:**
* **Arrows:** Grey arrows indicate the sequence of steps or flow of the process.
* **Text Labels:** Describe actions or states between scenes (e.g., "Trial & Error", "Forget", "Back & Forth", "Experience Internalization").
* **Outcome Labels:** Below the second and fourth scenes in the RLVR sequence, the text "No reward" appears.
* **Self-Reflection Box:** In the ERL sequence, between the third and fourth scenes, there is a text block titled "Self-Reflection:" containing three bullet points.
* **Legend/Key:** Implicitly defined by the consistent visual elements across all scenes (agent, boxes, walls, targets).
### Detailed Analysis
**RLVR Sequence (Top Section):**
1. **Scene 1 (Left):** Initial state. Agent is in the top-left area. Several boxes and targets are scattered.
2. **Transition 1:** Arrow labeled "Trial & Error" points to Scene 2.
3. **Scene 2:** Agent has moved. A blue line traces a path from the agent's previous position to its current one, ending at a red "X" over a box. This indicates a failed attempt to push the box onto a target. Text below: "No reward".
4. **Transition 2:** Arrow labeled "Forget" points to Scene 3.
5. **Scene 3:** The environment appears reset or unchanged from Scene 1. The agent is back near its starting position. An overarching dashed arrow labeled "Back & Forth" connects Scene 1 and Scene 3, indicating a cycle.
6. **Transition 3:** Arrow labeled "Trial & Error" points to Scene 4.
7. **Scene 4:** Visually identical to Scene 2, showing the same failed attempt. Text below: "No reward". The process is cyclical and unproductive.
**ERL Sequence (Bottom Section):**
1. **Scene 1 (Left):** Identical initial state to RLVR's Scene 1.
2. **Transition 1:** Arrow labeled "Trial & Error" points to Scene 2.
3. **Scene 2:** Identical to RLVR's Scene 2, showing the same failed attempt (agent path, red "X" on box).
4. **Transition 2:** Arrow points to a "Self-Reflection" text block.
5. **Self-Reflection Content:**
* "I guess..."
* "• [Wall Icon] is wall."
* "• I can control [Agent Icon]"
* "• Push [Box Icon] into [Target Icon]"
6. **Transition 3:** Arrow labeled "Experience Internalization" (above the dashed line) points from the Self-Reflection block to Scene 4. A dashed arrow also loops from Scene 4 back to Scene 1, suggesting a learned policy is applied from the start.
7. **Scene 4 (Right):** A new, successful state. The agent is in the bottom-right. Two boxes have been successfully pushed onto two target dots (the dots are now covered by the boxes). The layout of other boxes remains.
### Key Observations
1. **Identical Starting Conditions:** Both RLVR and ERL begin with the exact same environment configuration.
2. **Identical Initial Failure:** Both paradigms experience the same initial "Trial & Error" failure, depicted by the same scene with the red "X".
3. **Divergent Processes:** The critical difference occurs after the first failure.
* **RLVR** enters a "Forget" and "Back & Forth" loop, repeatedly attempting and failing the same action, leading to no reward.
* **ERL** engages in "Self-Reflection," deriving explicit rules about the environment's mechanics (walls, controllability, objective).
4. **Divergent Outcomes:** The reflection enables "Experience Internalization," leading to a successful outcome in the final ERL scene where boxes are on targets. RLVR shows no progress.
5. **Spatial Layout:** The legend (agent, box, target icons) is integrated directly into the "Self-Reflection" text, grounding the abstract rules in the visual symbols used in the diagrams.
### Interpretation
This diagram argues for the superiority of a reflective, model-based learning approach (ERL) over a purely trial-and-error, possibly memory-less approach (RLVR) in novel environments.
* **What the Data Suggests:** The data (visual outcomes) demonstrates that simply repeating failed actions (RLVR) is futile. In contrast, pausing to abstract rules from experience (ERL) allows the agent to build an internal model of the world ("wall," "control," "push into"). This model enables planning and successful task completion.
* **How Elements Relate:** The "Self-Reflection" block is the pivotal component. It transforms raw sensory experience (the failed trial) into declarative knowledge. The "Experience Internalization" arrow signifies the application of this knowledge to modify the agent's policy, leading to a different and successful outcome. The dashed loop in ERL suggests this learned policy can be applied from the outset of similar future tasks.
* **Notable Anomalies/Patterns:** The most striking pattern is the direct visual contrast between the cyclical, static failure of RLVR and the linear, progressive success of ERL. The identical starting points and initial failures make the comparison controlled and highlight the reflection phase as the sole differentiating variable responsible for the success. The diagram is a clear visual metaphor for the adage "learn from your mistakes" applied to artificial intelligence.
DECODING INTELLIGENCE...