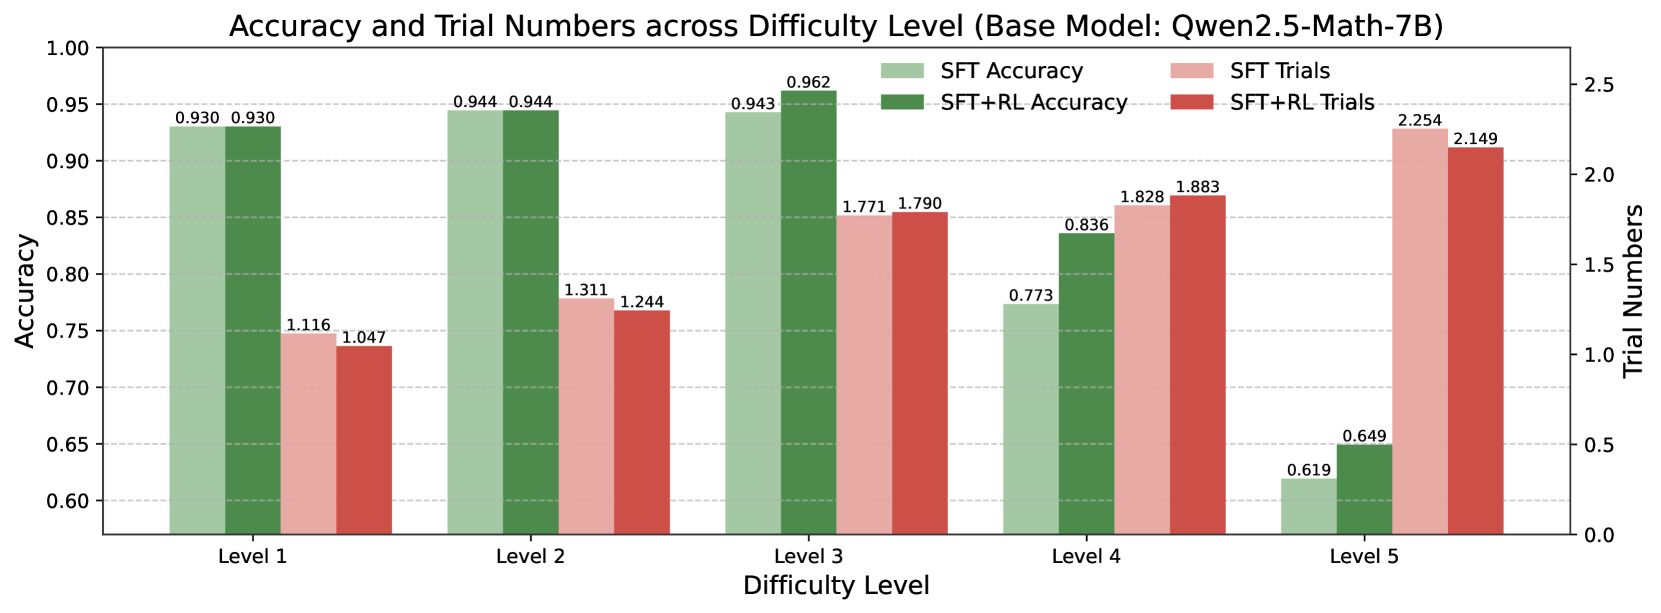
## Bar Chart: Accuracy and Trial Numbers across Difficulty Level
### Overview
This bar chart displays the accuracy and trial numbers for two different training methodologies, "SFT" and "SFT+RL", across five distinct difficulty levels. The chart uses a dual y-axis system: the left y-axis represents "Accuracy" (ranging from 0.60 to 1.00), and the right y-axis represents "Trial Numbers" (ranging from 0.0 to 2.5). The x-axis denotes the "Difficulty Level", with categories from Level 1 to Level 5.
### Components/Axes
* **Title:** "Accuracy and Trial Numbers across Difficulty Level (Base Model: Qwen2.5-Math-7B)"
* **X-axis Label:** "Difficulty Level"
* **Categories:** Level 1, Level 2, Level 3, Level 4, Level 5
* **Left Y-axis Label:** "Accuracy"
* **Scale:** 0.60, 0.65, 0.70, 0.75, 0.80, 0.85, 0.90, 0.95, 1.00
* **Right Y-axis Label:** "Trial Numbers"
* **Scale:** 0.0, 0.5, 1.0, 1.5, 2.0, 2.5
* **Legend:** Located in the top-center of the chart.
* **SFT Accuracy:** Light green bars.
* **SFT+RL Accuracy:** Dark green bars.
* **SFT Trials:** Light red bars.
* **SFT+RL Trials:** Dark red bars.
### Detailed Analysis
The chart presents grouped bars for each difficulty level, with two bars representing accuracy and two bars representing trial numbers.
**Level 1:**
* **SFT Accuracy:** 0.930 (light green bar, left y-axis)
* **SFT+RL Accuracy:** 0.930 (dark green bar, left y-axis)
* **SFT Trials:** 1.116 (light red bar, right y-axis)
* **SFT+RL Trials:** 1.047 (dark red bar, right y-axis)
**Level 2:**
* **SFT Accuracy:** 0.944 (light green bar, left y-axis)
* **SFT+RL Accuracy:** 0.944 (dark green bar, left y-axis)
* **SFT Trials:** 1.311 (light red bar, right y-axis)
* **SFT+RL Trials:** 1.244 (dark red bar, right y-axis)
**Level 3:**
* **SFT Accuracy:** 0.943 (light green bar, left y-axis)
* **SFT+RL Accuracy:** 0.962 (dark green bar, left y-axis)
* **SFT Trials:** 1.771 (light red bar, right y-axis)
* **SFT+RL Trials:** 1.790 (dark red bar, right y-axis)
**Level 4:**
* **SFT Accuracy:** 0.773 (light green bar, left y-axis)
* **SFT+RL Accuracy:** 0.836 (dark green bar, left y-axis)
* **SFT Trials:** 1.828 (light red bar, right y-axis)
* **SFT+RL Trials:** 1.883 (dark red bar, right y-axis)
**Level 5:**
* **SFT Accuracy:** 0.619 (light green bar, left y-axis)
* **SFT+RL Accuracy:** 0.649 (dark green bar, left y-axis)
* **SFT Trials:** 2.254 (light red bar, right y-axis)
* **SFT+RL Trials:** 2.149 (dark red bar, right y-axis)
### Key Observations
* **Accuracy Trend:** Accuracy for both SFT and SFT+RL generally decreases as the difficulty level increases, with a notable drop observed from Level 3 to Level 4, and further decline to Level 5.
* **SFT+RL vs. SFT Accuracy:** In Level 1 and Level 2, SFT and SFT+RL accuracies are identical (0.930 and 0.944 respectively). From Level 3 onwards, SFT+RL consistently shows slightly higher accuracy than SFT. The largest gap is at Level 5 (0.649 vs 0.619).
* **Trial Numbers Trend:** Trial numbers for both SFT and SFT+RL generally increase with increasing difficulty level, peaking at Level 5.
* **SFT+RL vs. SFT Trials:** SFT+RL trials are consistently lower than SFT trials for Level 1, Level 2, and Level 5. However, at Level 3 and Level 4, SFT+RL trials are slightly higher than SFT trials.
* **Correlation between Accuracy and Trials:** There appears to be an inverse relationship between accuracy and trial numbers. As difficulty increases, accuracy tends to decrease, while trial numbers tend to increase.
### Interpretation
This chart demonstrates the performance of a base model (Qwen2.5-Math-7B) under different training conditions (SFT vs. SFT+RL) across varying difficulty levels.
The data suggests that for lower difficulty levels (1 and 2), the SFT and SFT+RL training methods yield identical accuracy, and SFT+RL requires slightly fewer trials. As the difficulty increases (Level 3 onwards), the SFT+RL method begins to outperform SFT in terms of accuracy, albeit with a slight increase in trial numbers at Level 3 and 4, and a decrease at Level 5 compared to SFT. The significant drop in accuracy from Level 3 to Level 5 for both methods, coupled with the rise in trial numbers, indicates that the model struggles with higher difficulty problems, requiring more computational effort to achieve lower performance. The SFT+RL method appears to be more robust at higher difficulties, maintaining better accuracy despite the increased challenge. The exact reason for the identical accuracy at Levels 1 and 2, and the fluctuating trial number comparison between SFT and SFT+RL at higher levels, warrants further investigation into the specific training dynamics.